School of Innovation, Design and Engineering
IKEA of Sweden AB
Optimisation of the Ektorp sofa frame
through the use of Finite element analysis
Master thesis work
30 credits, D-level
Author: Anders Rundgren and Fredrik Wörmke
Title: Optimisation of the Ektorp sofa frame through the use of Finite element
analysis Report code:
Department: Mälardalen University, School of Innovation, Design and Engineering
Publication type: Student thesis
Level: Independent thesis Advanced level, 20 credits / 30 HE credits
Project initiator: IKEA of Sweden AB
Tutors: Antonio Sellari, IKEA of Sweden AB and
Bengt Gustafsson, Mälardalen University
Examiner: Rolf Lövgren, Mälardalen University
Year of issue: 2011
Language: English
Number of pages: 137
Key words: Finite element analysis, Product development, FEA, FEM, Design,
Abstract
The interest in using finite element analysis (FEA) as a product development tool is present within IKEA of Sweden (IoS). To gain additional support from within IoS a project was issued to identify the merits and demerits of FEA. This was done by applying FEA to optimise an existing product, namely the Ektorp sofa frame. Three important questions are addressed in this report:
How can the finite element method efficiently and reliably be applied to improve an existing product?
What types of improvements can be anticipated from using the finite element method and how can these be achieved?
What products are suitable to be developed with the use of FEA?
As the sofa frame mainly consists of wood a literature study is conducted to answer several questions regarding the use of wood in conjunction with FEA. Real life tests are performed to verify acquired material data.
The original design is analysed with FEA to act as reference for newer concepts and also to identify areas of improvement. Additional design tools are also applied to complement the FEA.
Concepts are generated to improve a number of factors such as weight, number of components and cost. These concepts are analysed with FEA to be compared to the original design and incrementally changed until meeting set requirements.
A final concept where the cost, weight and number of components are reduced is thoroughly described and presented as a CAD model. The final result is the Ektorp sofa frame with its weight reduced by 10.9%, number of components reduced by 18.2% and material cost reduced by 13.4% The conclusion from this process is that FEA can efficiently and reliably be applied to improve an existing product. This, however, requires thorough knowledge in FEA. Strength, weight and cost are the most obvious factors that can benefit from the use of FEA while almost all design changes can benefit indirectly as well. Almost any product can benefit from the use of FEA; however, several factors decide the efficiency and reliability of these analyses, such as analysis experience and product complexity.
Abstrakt
Det finns ett intresse för att använda finita element analyser (FEA) som ett produktutvecklingsverktyg på IKEA of Sweden (IoS). För att få ett ökat stöd inom IoS skapades ett projekt där för och nackdelarna med FEA kan identifieras. Detta projekt baserades på att optimera en existerande produkt, nämligen Ektorp soffans ram. Tre viktiga frågor behandlas i och med detta projekt:
Hur kan finita element metoden appliceras på ett effektivt och tillförlitligt sätt för att optimera en existerande produkt?
Vilka typer av förbättringar kan man förvänta sig genom att använda finita element metoden och hur uppnås dessa?
Vilka produkter lämpar sig att utvecklas med hjälp av FEA?
Eftersom soffans ram till större delen består av trä inleds en litteraturstudie för att besvara frågor som berör användandet av trä i samband med FEA. Verkliga tester utförs för att verifiera insamlade
materialdata.
Originalkonstruktionen analyseras med FEA för att skapa en referens till kommande koncept och även för att identifiera möjliga förbättringsområden. Flera designverktyg används för att komplettera FEA. Koncept genereras för att förbättra en rad faktorer såsom vikten, antalet komponenter och kostnaden. Dessa koncept analyseras med FEA och jämförs mot originalkonstruktionen för att förbättras
inkrementellt tills det att fastställda krav uppfylls.
Ett slutgiltigt koncept där kostnad, vikt och antalet komponenter är minskat beskrivs i detalj och presenteras som en CAD modell. Det slutgiltiga resultatet är Ektorp-soffans ram där vikten är reducerad med 10,9%, antalet komponenter reducerade med 18,2% och materialkostnaderna reducerade med 13,4%.
Slutsatsen från projektet är att FEA kan appliceras på ett effektivt och tillförlitligt sätt för att förbättra en existerande produkt. Detta kräver dock omfattande kunskap inom FEA. Hållfasthet, vikt och kostnad är de mest uppenbara parametrar som kan tjäna på användandet av FEA medan nästan alla konstruktionsändringar kan dra nytta av FEA indirekt. Nästan alla produkter kan dra nytta av FEA, det finns dock en rad faktorer som avgör hur pass effektiva och tillförlitliga analyserna blir. Exempel på dessa är användarerfarenhet och produktkomplexitet.
Nyckelord: Finit element analys, Produktutveckling, FEA, FEM, Konstruktion, Optimering, Ram, Soffa, IKEA, Trä, SolidWorks Simulation, CAD
Acknowledgements
We want to send a warm thank you to our tutor at IKEA of Sweden Antonio Sellari for his commitment to this project and his supportive attitude. We also want to thank him for his consistently rapid
responses to our thoughts and questions.
Special thanks go to our tutor Bengt Gustafsson at Mälardalen University for his dedication and
determination to help us solve problems arising throughout the project. We also want to thank him for his always constructive feedback and criticism.
We also want to send a thank you to all the teachers at Mälardalen University that have taught and inspired us throughout our education.
We are deeply grateful for all the support from classmates, friends and family during the entire project.
Finally we want to thank IKEA AB for their positive attitude and the way they made us feel welcome during the entire course of the project.
Dictionary
Assembly Built from several parts or sub-assemblies.
Brace An internal support in the backrest.
Comfort The padding surrounding the sofa frame.
Convergence When the change in a parameter becomes sufficiently small between
increments.
Cover The textile covering the comfort of the sofa.
Degree of freedom The possible combinations of translation and rotation for an object.
Design study tool A tool for automating the process of tweaking a design to fit a set criterion.
Factor of safety A term describing the relation between stress and yield strength.
Fillet A feature in SolidWorks that adds a radius to a corner.
Fixture A feature in SolidWorks restricting the movement of a selection.
Ideation The process of creating and forming ideas.
Iso clipping A feature in SolidWorks that allows the user to isolate certain intervals on a
study result plot.
Member A part of a structural design.
Mesh The result from dividing a model into smaller fragments used for calculation.
No penetration A contact set in SolidWorks that allows separate deformation but no
penetration between the surfaces.
Part A single 3D object in SolidWorks.
Plot The results of a study made in SolidWorks with colours illustrating a set interval.
Product range All of the products developed at IKEA of Sweden.
Prototype A physical representation of a function in a design.
Split line A feature in SolidWorks used to divide a surface.
Sub-assembly Built from several parts.
Web The section of a model contributing with the most stiffness.
Abbreviations
CAD Computer aided design
DFA Design for assembly
DFA2 Design for assembly 2, a different method
FEA Finite element analysis
FEM Finite element method
FMEA Failure modes and effects analysis
FoS Factor of safety
HB Hardboard
Table of contents
1 INTRODUCTION ...1
2 AIM OF PROJECT ...1
3 PROJECT DIRECTIVES ...1
4 PROBLEM STATEMENT ...2
5 PROJECT DELIVERIES AND LIMITATIONS ...2
5.1 GATE 1 – 2010-10-07 ...2 5.2 GATE 2 – 2010-10-28 ...2 5.3 GATE 3 – 2010-11-22 ...2 5.4 GATE 4 – 2011-01-28 ...3 5.5 PRESENTATION ...3 5.6 REPORT ...3 5.7 LIMITATIONS...3
6 THEORETICAL BACKGROUND & SOLUTIONS METHODS ...4
6.1 PLANNING...4
6.2 REAL LIFE TESTING ...5
6.3 THE FINITE ELEMENT METHOD, FEM ...5
6.4 WOOD ...6
6.4.1 The problem of optimising wood ... 6
6.4.2 The effect of knots and other imperfections ... 7
6.4.3 Moisture and its effect on the strength of wood ... 8
6.5 FUNCTION ANALYSIS ...9
6.6 FINITE ELEMENT ANALYSIS IN SOLIDWORKS ...9
6.6.1 Isotropic and orthotropic material properties ... 11
6.6.2 Linear and nonlinear materials... 11
6.6.3 Static linear and nonlinear analysis ... 12
6.6.4 Simulating different methods of bonding... 13
6.6.5 Meaningful stress analysis and failure criterion ... 15
6.6.6 Finding reliable material data ... 16
6.6.7 Optimising simulation ... 16
6.7 BRAINSTORMING ... 18
6.8 FMEA ... 19
6.8.1 When and why to use FMEA? ... 19
6.8.2 Types of FMEA ... 20
6.8.3 The general process of conducting an FMEA ... 20
6.9 PUGH MATRIX ... 21
6.10 DESIGN FOR MANUFACTURING AND ASSEMBLY, DFMA ... 22
6.10.1 DFA – Design for Assembly ... 23
7 APPLIED SOLUTION PROCEDURES ... 24
7.1 PLANNING – STAGE 1 ... 24
7.1.1 Gate 1 ... 25
7.1.2 Problems and solutions ... 25
7.2 LITERATURE STUDY – STAGE 2 ... 25
7.2.1 Matchup-tests ... 26
7.2.2 Summary of questions ... 29
7.2.3 Identify FMEA- and DFA tools ... 32
7.2.4 Gate 2 ... 32
7.3 ANALYSIS OF THE EXISTING FRAME – STAGE 3... 33
7.3.1 Simplifications ... 34
7.3.2 Bonding and Material properties... 36
7.3.3 Meshing ... 37
7.3.4 Studies ... 39
7.3.5 Function analysis ... 44
7.3.6 Design for assembly ... 45
7.3.7 Failure mode and effects analysis ... 45
7.3.8 Gate 3 ... 45
7.3.9 Problems and solutions ... 46
7.4 OPTIMISATION – STAGE 4 ... 46
7.4.1 Generate concepts ... 46
7.4.2 Screening and combining ... 48
7.4.3 Development of concepts ... 49
7.4.4 Second evaluation ... 50
7.4.5 Combining, analysing and improving concepts with FEA ... 51
7.4.6 Final evaluation ... 54
7.4.7 Gate 4 ... 54
7.4.8 Problems and solutions ... 54
7.5 PRESENTATION ... 54 8 RESULTS ... 55 8.1 ARMREST ... 55 8.2 BACKREST ... 57 8.3 BOTTOM FRAME ... 58 8.4 ENTIRE FRAME ... 60 9 ANALYSIS ... 62
9.1 HOW CAN THE FINITE ELEMENT METHOD EFFICIENTLY AND RELIABLY BE APPLIED TO IMPROVE AN EXISTING PRODUCT? ... 62
9.1.1 FEA efficiency ... 62
9.1.2 FEA Reliability... 63
9.2 WHAT TYPES OF IMPROVEMENTS CAN BE ANTICIPATED FROM USING THE FINITE ELEMENT METHOD AND HOW CAN THESE BE ACHIEVED? ... 63
9.3 WHAT PRODUCTS ARE SUITABLE TO BE DEVELOPED WITH THE USE OF FEA? ... 64
9.3.1 Restrictive dimensions ... 64 9.3.2 Material properties... 64 9.3.3 Assembly size ... 65 9.3.4 Product usage ... 65 9.3.5 Simulation compatibility ... 65 9.4 PRODUCT REQUIREMENTS ... 66 10 CONCLUSIONS ... 69 11 RECOMMENDATIONS ... 70
11.1 MATERIAL DATA ACQUISITION ... 70
11.2 FEA PROCESS PLAN ... 70
Table of Appendices
APPENDIX 1 - SPECIFICATION OF REQUIREMENTS ... 74
APPENDIX 2 - DFA2 EVALUATION POINTS ... 75
APPENDIX 3 - GANTT CHART, TIME PLAN ... 84
APPENDIX 4 - TEST LAB RESULTS ... 85
APPENDIX 5 - IKEA TESTS ... 89
APPENDIX 6 - REASONING BEHIND FORCES USED IN THE ANALYSES ... 94
APPENDIX 7 - CONVERGENCE DATA ... 96
APPENDIX 8 - FUNCTION ANALYSES ... 97
APPENDIX 9 - FMEA ... 99
APPENDIX 10 - EARLY SKETCHES ... 100
APPENDIX 11 - DFA RESULTS ... 105
APPENDIX 12 - CONCEPT COMPARISON ... 108
Table of figures
Figure 1 - Principal sketch of a Gantt chart. ... 4
Figure 2 - Bend test of a beam in a computer environment. ... 5
Figure 3 - Bend test of a beam in a test lab. ... 5
Figure 4 - Normal distribution of strength in laminated wood and regular wood ... 7
Figure 5 - The behavior of stresses in relation to the neutral axis. ... 7
Figure 6 - The relation between environmental humidity and moisture content of wood. ... 8
Figure 7 - A function analysis of a screwdriver ... 9
Figure 8 - The process of making a finite element analysis in SolidWorks. ... 9
Figure 9 - Directions in wood as an orthotropic material. ... 11
Figure 10 - Load-displacement curve for spruce. ... 12
Figure 11 - Load-displacement curve for steel. ... 12
Figure 12 - Load-displacement curve for a polymer. ... 12
Figure 13 - Behaviour of a nail and the surrounding wood ... 14
Figure 14 - An attempt of simulating the complex behaviour of nails when subject to shear. ... 14
Figure 15 - The behaviour of a glued particleboard butt joint. ... 14
Figure 16 - Illustration on how directional stresses affect isotropic materials. ... 15
Figure 17 - Illustration on how directional stresses affect orthotropic materials. ... 15
Figure 18 - Comparison between two parts with the same max stress but different displacements. .... 16
Figure 19 - Illustration of the convergence with different degrees of freedom ... 17
Figure 20 - Illustration showing the behaviour of stress in sharp corners versus rounded corners. ... 17
Figure 21 - The principle of a Pugh matrix. ... 22
Figure 22 - The process for the project. ... 24
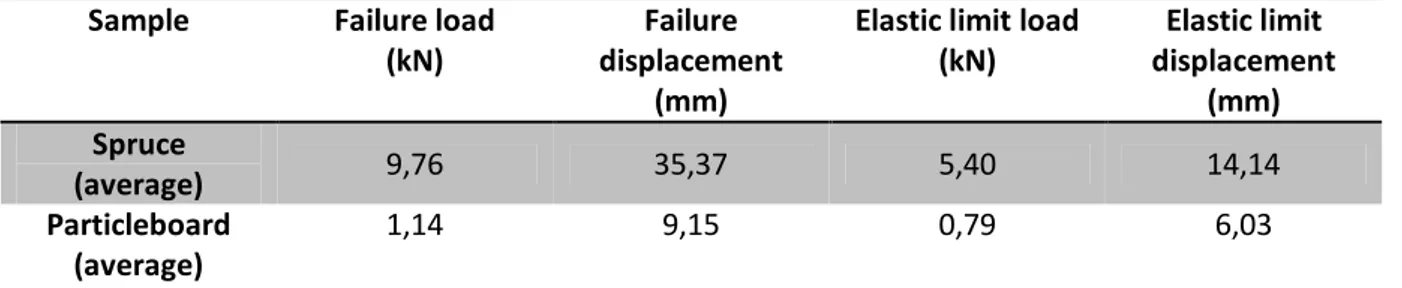
Figure 23 - Bend test of a spruce member. ... 27
Figure 24 - Average results from the bend tests. ... 27
Figure 25 - Bend test of spruce in SolidWorks simulation, result shown with a displacement plot. ... 28
Figure 26 - Bend test of particleboard in SolidWorks, result shown with a displacement plot. ... 28
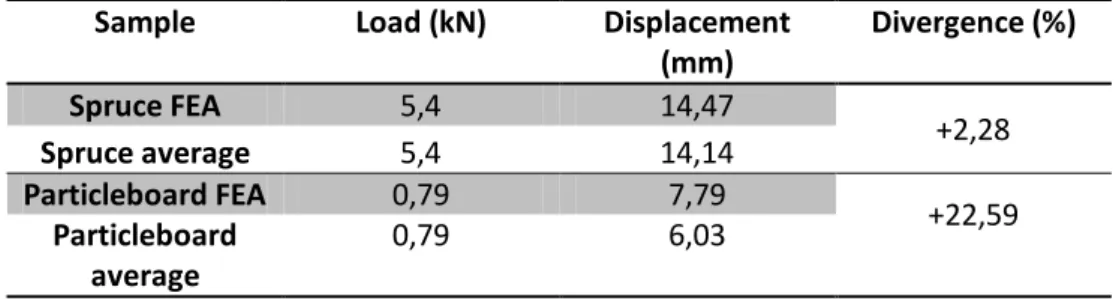
Figure 27 - Results of the virtual tests. ... 28
Figure 28 - Comparison of test results. ... 29
Figure 29 - Selection of IKEA tests together with updated loads. ... 33
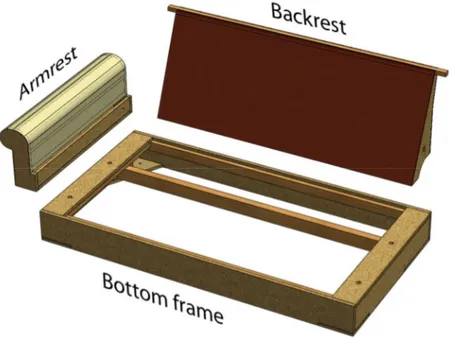
Figure 30 - Exploded view of Ektorp sofa frame. ... 34
Figure 31 - The relation between a distributed load and point load. ... 35
Figure 32 - Illustration of excluded cardboard and plastic ear. ... 35
Figure 33 - Simplification of a hinge. ... 35
Figure 34 - Simplification of a steel bracket. ... 36
Figure 35 - Simplification of a fastener. ... 36
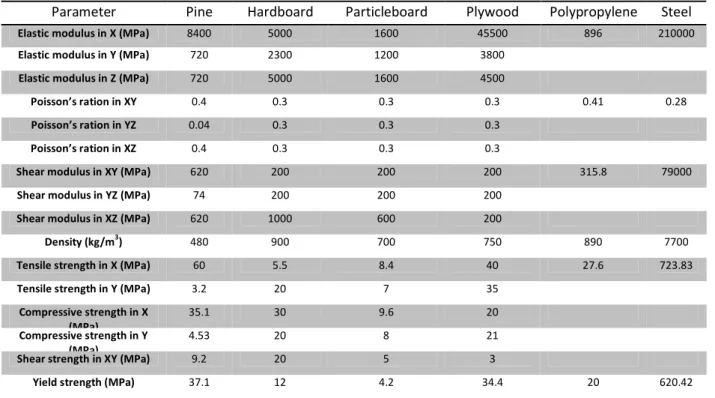
Figure 36 - Material data for materials used in the analysis. ... 37
Figure 44 - FEA test frame frontal... 41
Figure 45 - Highlighting areas below factor of safety 3 in colour, frame frontal. ... 42
Figure 46 - Force distribution of the FEA test frame and backrest. ... 42
Figure 47 - Highlighting areas below factor of safety 2.5 in colour, frame and backrest. ... 43
Figure 48 - Illustrating the direction of the force used in the FEA test backrest vertical. ... 43
Figure 49 - Showing areas below factor of safety 2.5 in colour. ... 44
Figure 50 - DFA2 score original design. ... 45
Figure 51 - Sketches on armrest specific concepts. ... 47
Figure 52 - Notes on a sketch of the backrest ... 47
Figure 53 - Example of an idea regarding the bottom frame. ... 48
Figure 54 - Ideas turned in to a concept, armrest. ... 48
Figure 55 - Overview DFA score... 49
Figure 56 - Comparison between existing armrest design and a concept.. ... 50
Figure 57 - Example of a problem detected when translated into a 3D model. ... 51
Figure 58 - The four main concepts derived from the combination process. ... 52
Figure 59 - Comparison of corresponding analyses. ... 53
Figure 60 - Example of improvement through the use of FEA. ... 53
Figure 61 - Visual comparison between original and concept armrest. ... 55
Figure 62 - Profile of original armrest. ... 55
Figure 63 - Profile of final armrest concept... 55
Figure 64 - Plastic support for final armrest concept. ... 56
Figure 65 - Armrest data comparison.. ... 56
Figure 66 - Visual comparison between original and concept backrest. ... 57
Figure 67 - Removed material, original backrest to final concept. ... 57
Figure 68 - Comparison backrest braces, original to final concept. ... 57
Figure 69 - Backrest data comparison... 58
Figure 70 - Visual comparison between original and concept bottom frame. ... 58
Figure 71 - Detail image bottom frame, original to bottom frame. ... 59
Figure 72 - Profile of bottom frame, original to final concept... 59
Figure 73 - Bottom frame data comparison. ... 60
Figure 74 - Visual comparison between original and concept frame. ... 60
Figure 75 - Final concept. ... 61
Figure 76 - Data comparison for the entire sofa frame. ... 61
Figure 77 - Reductions made by optimisation. ... 61
Figure 78 - Final concept, armrest horizontal analysis. ... 67
Figure 79 - Final concept, armrest vertical analysis. ... 67
Figure 80 - Final concept, frame frontal analysis. ... 67
Figure 81 - Final concept, frame and backrest analysis. ... 67
1 Introduction
Incremental improvements to lower costs are always important in product development. Even the smallest of changes can have a huge impact when something is produced in great volumes. Ektorp is the bestseller among sofas at IKEA and could benefit greatly from improvements. The interest in reducing the manufacturing cost has previously, among other things, involved studies about automation. The conclusion was that a more thorough redesign of the sofa will be required to cut costs in addition to production improvements alone.
Part of the redesign project is narrowed down to improving the frame itself while comfort and textile also have to be studied in separate projects. While redesigning the frame it will be important to work towards higher sustainability and improve several aspects of the design: reduced amount of
components, use less material, use fewer types of materials, design for faster assembly and manufacturability.
Previous designs have first been built to be tested in a lab environment later. To cut cost, a more scientific approach is desired where the designs will be built in a virtual environment, tested and validated through finite element analysis.
The topic of this project is about the general process of improving a design through the use of finite element analysis and other design tools. In addition to this general process a number of possibilities and problems that finite element analysis poses with will be discussed. The mentioned process will be applied as a practical study by improving the IKEA Ektorp sofa frame.
The project is issued by IKEA of Sweden which is the branch of IKEA AB that manages the IKEA product range. IKEA of Sweden is the centre of product development at IKEA AB.
2 Aim of project
The aim of this project is to understand and analyse an existing IKEA product and optimise the design in a virtual environment. The finite element method is to be used as the foundation in the process of analysing and optimising the product. Other tools, as for example DFA, will be used as a complement. Establishing a well-functioning process for the use of the finite element method as a product
development tool is also an important part of this project.
3 Project directives
The project will be executed at Mälardalen University in Eskilstuna. Gate presentations and meetings of interest will be taking place at IKEA of Sweden, Älmhult, hereafter called IoS.
The sofa frame can be altered to the extent that the present look of the sofa, complete with comfort and cover, is completely maintained. This means that the present comfort and cover should fit the new concept frame without modifications.
4 Problem statement
Using computer aided analysis can cut costs and shorten time to market. It can also reduce the need for prototypes and speed up the time between approving different incremental changes. To
implement such a tool into an established product development process requires support from many actors. As a first step prior to this project a separate thesis study made by Christensson (2010) about the benefits of using the finite element method have been made to create interest. As a natural follow-up a presentation of a concept made from utilizing this method is now to be made to gain additional support from within the company. The requirements for this concept and the project in general are available in Appendix 1. In addition to a concept, questions regarding the process of using the finite element method will be answered in such a manner that the merits and demerits will be clear. This report will explicitly answer the following questions by conducting a practical study:
How can the finite element method efficiently and reliably be applied to improve an existing product?
What type of improvements can be anticipated from using the finite element method and how can these be achieved?
What products are suitable to be developed with the use of FEA?
5 Project deliveries and limitations
The project is divided into five stages with complementary gates which all have certain deliveries tied to them. Below is a listing of the gates and what is expected to be achieved at the time of the gate.
5.1 Gate 1 – 2010-10-07
At gate 1 the planning of the project is in focus. The project planning consists of a project brief, a preliminary time schedule in form of a Gantt chart and a list together with a short introduction to what literature will be used during the project. These documents will be shared with IoS and the tutor at Mälardalen University for approval.
5.2 Gate 2 – 2010-10-28
Gate 2 focuses on the results of the literature study. The study will answer a series of questions regarding how the work with FEA and project related materials will function. These questions will be formulated during stage 2 and revised during the course of the study. The answers will be reviewed at gate 2 by IoS and the tutor at Mälardalen University for approval.
5.3 Gate 3 – 2010-11-22
In this gate several types of tests and analyses will be presented. These are listed below: Finite element analysis
Material testing DFA/DFM
The focus of this stage will be on the FEA. The results from the FEA will be complemented with other tests and analyses.
A presentation of a list with possible areas of improvements derived from the analyses above will be given at IoS.
5.4 Gate 4 – 2011-01-28
This is the final gate before the actual presentation. The preliminary result of the optimisation will be presented to IoS for approval.
5.5 Presentation
Two presentations will be held, one at Mälardalen University and one at IoS. The presentation at Mälardalen University will be held at 2011-04-01.The presentation at IoS will be held at the end of April 2011.
5.6 Report
A detailed report will be provided at the end of the project which will present the process of the thesis work from start to finish. The final results will be presented in the report in form of a new frame concept. The concept will be thoroughly described with explanatory images and texts. In addition to the concept all questions from the problem statement will be answered explicitly.
5.7 Limitations
Actual physical tests are limited to testing simple members to verify the theoretical models used in FEA. No physical tests will be performed on the actual sofa frame.
The final design will be presented in its digital form. Prototypes will only be produced in the case of excess time.
The project will concern the actual frame of the sofa, whereas other functions like comfort and cover will be if at all, developed by IoS at a later stage.
The project stretches over a time period of 20 weeks and counts for 30 ECTS.
No technical drawings of the concepts will be produced unless specifically requested by IoS. In case of a request the drawings will be prepared after the course of the project.
All finite element analyses will be performed in SolidWorks Simulation hereafter referred to as SolidWorks.
For the Finite element analyses all contacting wood surfaces in the individual sub-assemblies:
armrests, backrest and bottom frame are to be considered glued. Also the wood materials used in the analyses is to be considered “perfect”, that is, no effect of knots and other imperfections are regarded
6 Theoretical background & solutions methods
This chapter is about the theoretical frame used throughout the project. Different tools and solutions methods are discussed and explained.
6.1 Planning
To be successful in a project, good planning is a requirement. The hardest part of a time plan lies in the time estimates. This is because every project is different and calls for different measures. It can also be hard to find a tool that illustrates the process and gives the desired feedback. One well-recognized tool that is often used in product development projects is called a Gantt chart. A Gantt chart can have many different appearances, but generally shows the same thing. Ulrich and Eppinger (2008, pp. 337-338) describes the principle of a simple version of the tool. Below this section a principal sketch over a more elaborate Gantt chart is shown, see Figure 1. This version is used in the thesis project.
The Gantt chart is divided into two parts; one part handling the rough time estimates for each activity and the other part handles resource distribution. The activities are written in the left column of the first part and a timeline is laid out at the top row. The time estimated for each activity is illustrated with marked fields. The outcome is filled in for every activity to be able to see how well the time plan is held and to get experience for future projects.
In the second part of the chart the available resources are filled in together with the outcome of those resources. Experience is a key ingredient to be successful in the task of planning a project. A positive thing about the Gantt chart is the possibility to easily mark certain checkpoints and set up goals for them to keep the project in motion forward.
Activities Date 1 Date 2 Date3 Date 4
Activity 1 Activity 2 Activity 3 P Q Checkpoint Planned P Outcome Q
Resources Date 1 Date 2 Date3 Date 4 Sum man hours
Person 1 4 4 8 3 4 7 Person 2 4 8 4 16 3 8 6 17 Person 3 8 8 6 6
Accumulated Sum (h), plan 8 16 24 32
Accumulated sum(h), Outcome 6 14 24 30
6.2 Real life testing
When working in a virtual environment, linking the results to reality is good in many ways. The perception of dimensions and size can easily be distorted when looking at a virtual object a long time. This can lead to faulty engineering when perceiving object as with “false” dimensions.
Real life testing can also be useful when confirming results received in a virtual environment with the actual real life results. Confirming computer results with real life data is often essential for credibility. A good approach to prove a principle is to perform small scale tests that are easily translated into physical tests. The figures below show an example of how a small scale test could look like. Figure 2 shows the results from the FEA performed in a virtual environment and Figure 3 shows the real life test performed in a test lab.
Figure 2 - Bend test of a beam in a computer environment. Figure 3 - Bend test of a beam in a test lab.
6.3 The Finite element method, FEM
The Swedish national Encyclopaedia makes this statement about FEM:
“FEM, Computer based general method for approximating numerical solutions of complex differential and integral equations, above all in the fields of technology and natural science. The method was introduced in the 1950s for solving strength related issues within the flight industry. It is built on among others the fragmenting of the area of calculation into defined subareas, Finite elements“ When evaluating stress data based on the Finite element method this project will refer to the analysis as FEA, finite element analysis.
A product development project can have many different goals. The categories listed below are a few examples of objectives common in PD projects.
Reduce weight Ease the manufacturing
Minimize material costs Speed up the assembly
Minimize the number of different materials Ease the disassembling Minimize the number of components Improve packaging
When a product development process is focused around reducing the weight of a product FEA can assist with optimising measurements with regards to strength and weight. This can be controlled to suit certain factors of safety or stress requirements. This is easiest done on part level but the effects of the assembly must be considered to make a decision about possible material reduction. The
optimisation can also be done in the assembly directly but a complete analysis of the design has to be made alongside an optimisation analysis of each component.
In the same way as when focusing on reducing weight FEA can help when trying to cut material costs. Using the design study tool to optimise in SolidWorks, material amounts and measurements can be changed and optimised with regard to volume and strength.
SolidWorks allows the user to easily change material of a part and re-analyse with the new material applied. This means that the number of material can quickly be altered and the strength of the assembly tested and redesigned if necessary.
This project is as earlier stated focused around the use of FEA as a product development tool. With regard to this, no deeper explanation of the theory behind FEA will be given. During the project FEA will be used in the form of a strength analysis tool in SolidWorks.
6.4 Wood
The properties of wood as a design material is an important area to cover in this report. This section discusses the problems and possibilities with the use of wood in general and in conjunction with FEA.
6.4.1 The problem of optimising wood
Wood is very complex and poses numerous problems such as:
Cracking Incoherent Unreliable
Shape restrictive Affected by environment
Despite this, wood is still widely used as a construction material all over the world. Frameworks for working with wood such as Eurocode 5 exist but takes a clear aim towards the construction business. This business has a greater need for quality control than the furniture business due to product lifetime and consequences of failure.
While aiming to reduce the cost by reducing the amount of material used in a design, dimensions are adapted until the safety factor approaches the one specified in the design criterion. In the construction business safety factors are added due to load duration and environmental conditions. On top of that these values compensate imperfections such as knots, cracks or moisture. A piece of furniture using these standards will become oversized and counteract the effort of trying to optimise in the first place.
According to Svenskt Limträ (2007) using laminated wood gives more reliable and higher strength as it reduces the effects of
imperfections of regular wood such as knots and cracks. The normal distribution of strength in laminated wood compared to regular wood can be seen in Figure 4. An improved quality control on the material will lead to that it is possible to work on a more predictable material and do more reliable analyses. This, however, results in increased costs and may defeat the initial ambitions of cutting costs by optimisation.
Figure 4 - Normal distribution of strength in laminated wood and regular wood (source: Svenskt Limträ, 2007).
6.4.2 The effect of knots and other imperfections
When a branch starts to grow out of a trunk of a tree, the grains have to bend around the branch and resulting in a knot. Knots affect the strength of the wood in several ways. First it reduces the relevant section area due to the change in grain direction. This depends on the diameter of the knot. Also when the grains change direction when bending around the knot it leads to localized slope of grain. This affects the strength properties a great deal when the slope of grain is high. The higher the slope of grain the more it affects the strength (Forest Products Management Development Institute, 1998). Wood is strongest in the longitudinal direction, meaning the direction of the grains. Having a member with grains parallel to the length of the member contributes to high strength. The more the grains around knots deviate from this direction the more rapidly the strength drops. Also, if the knot is situated on the edge of the member it affects the strength properties in a negative way much more than if the knot is situated in the middle. This is because, in a scenario of bending, the stress increases with the distance from the neutral axis of the member which can be seen in Figure 5.
Figure 5 - The behavior of stresses in relation to the neutral axis.
Another imperfection that affects the properties of the wood is splits. Splits are deep cracks that (Strength) (Amount)
Laminated
When analysing wooden structures the above mentioned imperfections could greatly alter the properties of the member analysed. Wood being an organic material causes deviations in its material properties. This is something to take into account when performing analyses on wood. Analysing a member with imperfections may require using conservative values estimated from a material database.
6.4.3 Moisture and its effect on the strength of wood
The conclusions in this section is based on Winandy’s texts on Wood Properties (1994, p. 554, 560). Water exists naturally in wood as it is a living material. The water can take two shapes in wood. Either it is stored freely in cavities or bound in the cells. The first type to dry off is the water freely available in cavities and when this type is completely absent the fibres are saturated, meaning 21-28% moisture content. From this point the wood will improve its mechanical properties down to 10-15% moisture content. This means that 10-15% of the dry weight of wood is water.
The moisture content in wood varies with the surrounding environment and these changes are often limited to short term fluctuations. When subject to these fluctuations only the surface of the wood is affected and does not greatly affect the strength of the wood. Over time wood strives toward equilibrium with the
environmental humidity according to Figure 6. Material data for wood is generally available in a set interval of moisture content, namely 10-12%. If a product is to be used in much different environmental humidity this needs to be considered by using conservative material values.
Figure 6 - The relation between environmental humidity and moisture content of wood (Source: TräGuiden, 2006).
6.5 Function analysis
Function analysis is a way of describing the function of a product without involving specific solutions. According to Österlin (2003, p. 36), involving solutions limits the creativity. A function analysis is based on a main function built from many sub functions. If a sub function is removed the main function cease. Functions that are desirable but not essential to the existence of the main function may be added as support functions. If a specific parameter is very important to the function, a limit can be added to specify the analysis further. Figure 7 illustrates a function analysis of a screwdriver.
Figure 7 - A function analysis of a screwdriver (source: Österlin, 2003).
The function analysis tool can be used to enforce the specification of requirements. It can also help to achieve the main function in a much more elegant way than first thought of by avoiding an over-complicated solution.
6.6 Finite element analysis in SolidWorks
Making finite element analyses in SolidWorks is assigned to a special built-in module in the program called Simulation. Below in Figure 8 a process chart is shown explaining the process of using FEA in SolidWorks.
Choose
study Apply Apply Apply
Apply
The first step to be made is to choose what type of analysis to use. There are several different analyses to choose from to suit the needs of the user. Some of the most commonly used study types include static linear analysis, nonlinear analysis and fatigue analysis. The following steps up to running the analysis can be made in any order but a natural and easy way is to do them according to the order given in the program. When the study type is chosen it is time to apply the appropriate material to the part or parts being analysed. The materials in SolidWorks can be defined as linear or nonlinear and isotropic or orthotropic depending on the prerequisites of the actual material properties.
The next natural step is to apply appropriate connections which simulate links between the different parts in the assembly. For example a glued connection can in some occasions be simulated as a bonded connection which means that the different parts are joined together without any chance of moving separately.
To perform an analysis the CAD model must have at least one fixed point; this is made by applying a fixture. There are a number of fixtures simulating situations such as a part standing on a floor or a part attached with a hinge. The use of fixtures is a way of simulating the interaction between parts without having to create an actual mesh, which increase the simulation time.
For the analysis to produce a result some kind of external load must be added. The external load can among others include external influences like pressure, forces or torque.
Finally, before proceeding to actually running the analysis the model must be meshed. Meshing is the procedure of dividing the model into small fragments used for calculations. A finer mesh gives, up to a certain point, more accurate calculations but takes exponentially longer time to complete.
After meshing the only thing left to do is to verify that everything is set as planned and then run the analysis. This verification is important when, in many cases, the analyses takes long time to complete. After the analysis is finished, a result plot has to be defined for the user to be able to draw any
conclusions about the analysis. There are a number of different result plots to choose from in order to show the information needed. One plot available is for example the factor of safety plot which
compares different failure criterions to the calculated stresses. It then gives a visual feedback by use of different colours for different factors of safety.
6.6.1 Isotropic and orthotropic material properties
A material with isotropic properties behaves identical in all directions. This means that it has the same Young’s modulus, yield strength, shear strength and tensile strength in all its directions. Steel is for example an isotropic material. A uniform piece of steel will behave equally in any direction regardless of the direction of the stress.
Orthotropic properties are the opposite of isotropic. A material with orthotropic properties behaves different in different directions. An orthotropic material can also possess different tensile and compressive properties even along the same axis. A typical orthotropic material is wood, where the grain affects how the material behaves. Wood has much better tensile and compression properties parallel to the grains than radially or tangentially to them. See Figure 9 for an explanation of the directions in wood as an orthotropic material. Wood also has stronger tensile than compression properties parallel to the grains.
Figure 9 - Directions in wood as an orthotropic material.
This means that if an orthotropic material is used for simulations it is required to define the directions of the material in order to get proper results. According to Winandy (1994, p. 7) the difference between tangential and radial directions in wood are relatively small compared to their relation with the longitudinal direction. Due to this, engineers in general do not need to consider the radial and tangential differences, only differentiate between fibre direction and perpendicular to fibre direction.
6.6.2 Linear and nonlinear materials
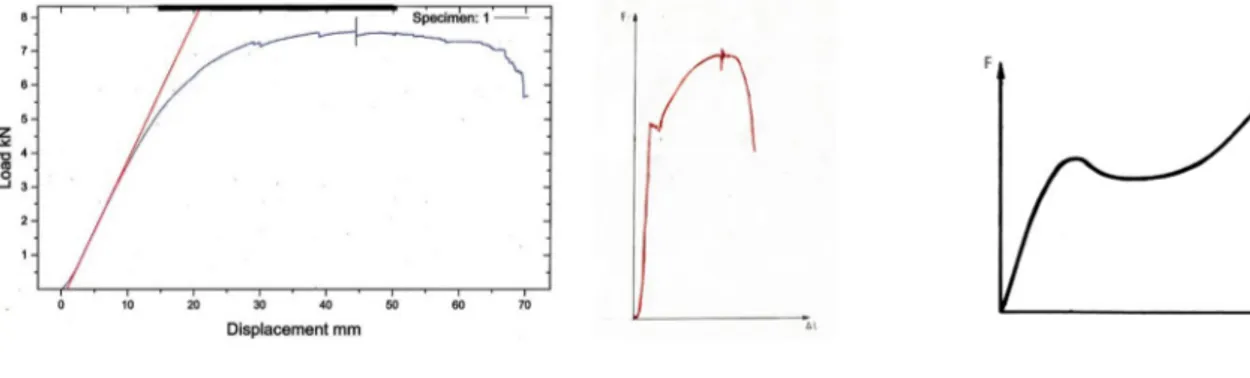
Linearity and nonlinearity in materials refers to the relation between load and displacement. Linear material properties are commonly used to simplify the behaviour of materials within a meaningful range of loads, such as up to the yield strength when doing steel designs. By exceeding the yield strength of steel, a nonlinear behaviour starts to occur. Even though steel in total behaves nonlinear a linear model will suffice. This is because it is mostly desirable to design below the yield strength, since plasticity will take place if exceeding it. There are, however, plenty of materials that behave nonlinear right from the start, even below the yield limit. The relation between load and displacement for wood has shown to behave almost linear. This behaviour changes as wood eventually handles the load increasingly worse while some plastics handle the load increasingly better in the same scenario up to complete failure.
Below three curves can be seen that illustrate the linear and nonlinear behaviour. Figure 10 displays a test made on a Spruce beam where the blue line represents the actual result and the red is a linear approximation that is considered valid up to a set load. Figure 11 illustrates the behaviour of steel and Figure 12 illustrates the behaviour of a typical polymer.
Figure 10 – Load-displacement curve for spruce. Figure 11 - Load-displacement
curve for steel.
Figure 12 - Load-displacement curve for a polymer.
It takes more effort to setup a nonlinear material in SolidWorks, so for the sake of efficiency in a product development process, it is preferable to use a linear setup if possible. This is of course valid only if the linear estimation is good enough to produce a reliable result. A nonlinear material setup in SolidWorks also requires the analysis model to be set to a nonlinear type, which generally is more time-consuming in its calculations.
Where the linear material types only present two optional models, linear elastic isotropic and linear elastic orthotropic, the nonlinear material presents more options.
Elasticity model Plasticity model Hyperelasticity model
Viscoelasticity model Creep model
Nitinol Material model
SolidWorks also limits the user to only isotropic material properties when using a nonlinear material model. This can cause a problem if an orthotropic material model is needed for a reliable result while a nonlinear analysis is needed due to large displacement.
6.6.3 Static linear and nonlinear analysis
This section discusses the difference between static linear and static nonlinear analyses and when to apply which. The facts are derived from the white paper produced by SolidWorks discussing the understanding of nonlinear analyses (SolidWorks, 2008).
First of all a definition of the difference between the two types of analyses is needed. A static linear analysis means that the stiffness of a design does not change during the analysis. The design retains the stiffness it possessed prior to the analysis throughout the entire analysis. This kind of analysis is used when the deformations of the design is so small that the shape and/or material properties does not change significantly during the deformation process.
In cases where large deformations are going to occur, a nonlinear analysis is needed. This kind of analysis takes stiffness changes into account during the deformation process and changes stiffness values incrementally throughout the analysis. If the yield strength of a material is exceeded its properties change as well as the stiffness. This also requires a nonlinear analysis. The shape of the analysed part can also contribute to the need for nonlinear analysis.
The material model used can in certain cases decide which of the analysis methods to use. A nonlinear material model demands a nonlinear analysis. This is because a nonlinear material behaves different throughout the entire analysis and requires incremental calculations to give acceptable results. Because of the incremental behaviour of nonlinear analyses, this kind of analyses are more demanding and takes much longer time to calculate. This is sometimes necessary to obtain accurate results, but if it can be avoided time can be saved.
Posing the following questions will help determine which analysis model to use.
Will the design deform so much that a nonlinear analysis is needed?
A rule of thumb according to SolidWorks (2010) is that if the deformation is larger than 1/20 of the part’s largest dimension a nonlinear analysis is needed.
Will the design be subject to such loads that the materials in question exceed the yield
strength?
If the stress analysis results in stresses exceeding yield strength it is necessary to use a nonlinear analysis for reliable results.
Do any of the parts in the assembly have a shape that requires a nonlinear analysis?
Certain parts change their stiffness when deformed just slightly. A membrane is an example of this. A flat membrane is less stiff than a slightly concave/convex one.
Do any of the materials in the assembly behave nonlinear below the relevant stress level?
If this is the case the material model forces the use of a nonlinear analysis. Some materials behave linear up to a certain point and nonlinear after that point. This scenario requires knowledge of when this happens and what the relevant stress level for the analysis is.
6.6.4 Simulating different methods of bonding
While SolidWorks does not directly offer any solutions to simulate bonding such as glue and nails, SolidWorks supports screws. There are, however, ways to mimic the missing types of bonding but require extensive knowledge and time to setup. Berggren (2005, pp. 82-91) points out methods of simulating glue and nails.
6.6.4.1 Nails
When using nails there is a risk of initiating cracks. The risk increases with larger nails. There are also problems with simulating the shear effect of the nails as a load is applied which can be seen in Figure 13. SolidWorks do not have an accurate way of doing this without too large deviations. There are many reports that discuss this matter, one being Berggren (2005) with the conclusion that the number of unknown parameters in the
interaction between wood and nail makes simulating this scenario very difficult. An attempt seen in Figure 14 by Berggren (2005, p.85) was made by simulating a
substitute layer that mimics the full effect of the nail and wood all together. He also concluded that the tools did not handle nails good at all, which has to be taken into consideration when using FEA. In addition to Berggren’s conclusions, the method is not useful if the aim is to drive design changes in conjunction with the analysis, as this method would be destructive to dimensions. This means the CAD model would contain additional geometry and alter existing members making the CAD data not suitable for production.
Figure 13 - Behaviour of a nail and the surrounding wood (Source: Berggren, 2005).
Figure 14 - An attempt of simulating the complex behaviour of nails when subject to shear (Source: Berggren, 2005).
6.6.4.2 Glue
When simulating glue as a method of bonding wood components together these can be regarded as if they were merged with each other. This is because glue in most cases creates a stronger bond than the actual strength of the wood itself (Berggren 2005, p. 54). The behaviour of a glued particleboard butt joint can be seen in Figure 15.
Figure 15 - The behaviour of a glued particleboard butt joint.
6.6.4.3 Screws
Screws have native support to be simulated in SolidWorks, but will in reality behave much like nails if subject to shear. It is not the fastener itself that pose the problem. The complex scenario of deforming wood together with a screw still remains. The support for screws is in the form of a connector which itself is not deformable and will cause problems unless a model of an actual screw with threads is created for accurate analysis. This is not an option as it would require dense meshing and vastly increase simulation times considering the capacity of computers today.
6.6.5 Meaningful stress analysis and failure criterion
When analysing a product several failure criterions can be studied. These differ between isotropic and orthotropic materials. The most common criterion is von Mises, which means that the resultant stress will be studied and compared to the yield limit. For an isotropic material this is excellent as it can handle a set stress in any given direction.
Figure 16 illustrates two scenarios where two sets of stresses are found in an isotropic material. The yield limit is represented by the black border. The resultant will always end up within the yield limit no matter what direction the effective components have.
For an orthotropic material the yield criterion looks a bit different. A stress in a set direction answers to the yield limit in the same direction only. If the same stress later takes on another direction, it has to answer to a completely different yield limit. This is illustrated in Figure 17. In the second part of Figure 17 it is clear how changing the stress directions can result in exceeding the yield limit although the size of the resultant remains the same.
Figure 16 - Illustration on how directional stresses affect isotropic materials. Perimeter representing the yield limits.
Figure 17 - Illustration on how directional stresses affect orthotropic materials. Perimeter representing the yield limits.
The yield limits can be different in X, Y, Z and in addition to that, they can also differ in tensile and compressive directions. This means a total of six different yield limits have to be studied as opposed to one in the isotropic scenario.
Using von Mises and comparing it to the lowest yield limit of all directions in an orthotropic scenario will send out warnings about exceeding the yield limit much earlier than in reality. But on the other hand it will result in much fewer analyses to study. Von Mises can be used as an initial analysis on an orthotropic material to quickly identify points of interest, which later has to be studied in detail in every principal direction. This is particularly true if the orthotropic materials do not differ much in its different directions. Particleboard is an example of this where the yield limits in the different
directions can be 4 MPa and 5 MPa. An excess of warnings will be shown in the opposite scenario if, for example, pine is used, which can have yield limits of 2 MPa and 40 MPa respectively.
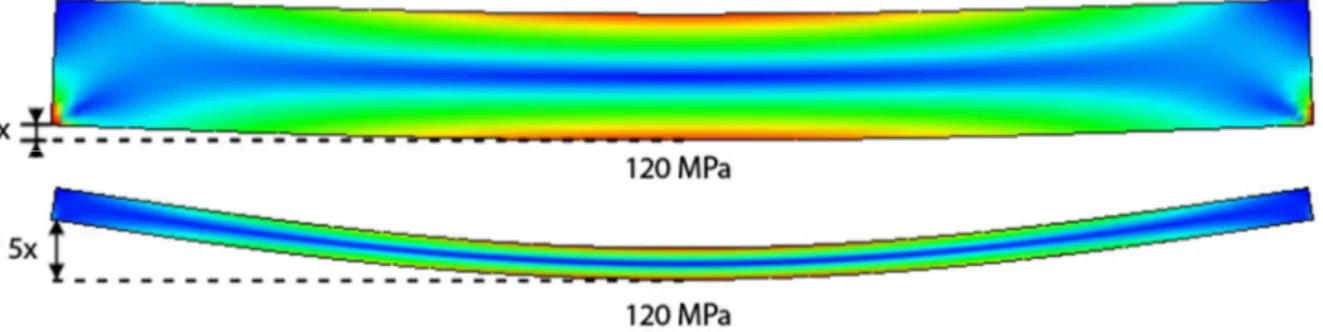
The deciding factor for a design is not always a factor of safety with regards to the yield strength of a material. It can also be desirable to have a maximum allowed displacement. Displacement is the
Figure 18 shows that even though both parts of same thickness but with different heights are subject to the same maximum stress they differ a lot in displacement denoted x.
Figure 18 - Comparison between two parts with the same max stress but different displacements.
6.6.6 Finding reliable material data
Most of the commonly used material databases like Eurocode and Boverket are tailored for the construction business. The characteristic values stated in these databases are given to a point where a high factor of safety is guaranteed because of the safety requirements given by the construction business. These values are defined as the 5th-percentile values obtained from the results of tests made at 20°C and 65% relative humidity (Porteous & Kermani, 2007, p. 14). This causes problems if the goal of an FE-analysis is to do detailed optimisations to the dimensions of a design. The chance of working with a piece of wood with much higher strength than specified in material databases is great. If a more accurate value can be used, it is possible to optimise closer to the actual yield limit.
If the existing material databases is unsatisfactory there is always the option of performing tests to get proper data. This demands for much time spent on performing the tests and calculating the
properties. Because each piece of wood is different from another these tests only decides the properties of the piece tested, not for the entire type of wood. Even though this is the case, tests like these can give a good mean value for the properties of the wood used.
SolidWorks default material database does not contain any orthotropic data for wood. Instead it is possible to define custom orthotropic materials.
For efficient use of FEA in a product development process it is recommended that a custom material database is established, where the material data has been verified to match the quality of the wood from the supplier.
6.6.7 Optimising simulation
If the aim of using FEA is to optimise the product development process, it has to be as time effective as possible. In order to achieve this there are several possible actions to be taken. One factor that
controls the amount of time spent calculating is the density of the mesh used. In general a finer mesh generates a more accurate result. This is because FEA predicts the behaviour of the model by
combining information from every element of the model. The finer the mesh, the longer it takes to calculate which means that if the number of mesh elements used is low the time spent calculating will also be low. If the mesh is too coarse inaccurate results will be produced. There is always a trade-off between time and accuracy. The conclusions in this section were derived from SolidWorks Online Help (2010).
6.6.7.1 Meshing
It is always a good practise to start with a coarse mesh to get an approximation of the result and make changes to the model based on those results. Then use a finer mesh to deliver more accurate results that can be used to fine tune the dimensions. With every refinement there will be a change in stress. It is only when this change is sufficiently small that the results can be accepted as final (Kurowski, 2010). Figure 19 shows an illustration of how the convergence can differ with increasing degrees of freedom.
Figure 19 - Illustration of the convergence with different degrees of freedom. (Source: Eckersley, 2009)
Sharp corners are prone to cause problems when attempting to find convergence in an analysis. Using a small radius just like in real life, where nothing is theoretically sharp, will provide a more reliable result. An illustration of the behaviour can be seen in Figure 20. The top part of the illustration shows a sharp corner and the lower part a round corner. Where the sharp corner is present stresses will increase infinitely whereas the stresses in the round corner will eventually converge with higher degrees of freedom. Sh ar p c o rn e r rn e r
Using a draft quality on the mesh means that the mesh elements have 3 nodes, the appearance of a triangle. This setting is great for making rough estimations and/or when little bending occurs and not as good for shapes such as curved surfaces. This option minimizes the time used for calculation but as said before, it is not suitable in all situations. The opposite setting is high quality and has 6 nodes per element. This means that the triangle have each side divided once. This makes for a more accurate result and it is the option that is recommended in most cases. Having a model with curved geometry demands this type of setting.
If interested in a certain point in the design where a concentrations of stress is expected the mesh may need to be very fine to see exactly how the model behaves around that point. Just making the mesh finer throughout the entire model will make the analysis very time consuming. In these scenarios the feature mesh control is very useful. This feature applies a denser mesh where specified.
6.6.7.2 Simplifications
In some cases it is possible to make a 2D-simplification. This means that the analysis is performed in a two dimensional plane. This saves a great amount of time, but the method has its limitations. For example it is not possible to use pin or bolt connections or certain types of fixtures. There are more limitations to this method that needs to be revised before implementation.
If the model is symmetrical the program can use symmetry to calculate one part of the model and mirror the results and interpolate the transition. Using this symmetry function can save time, especially if the model is big and complex or have a very fine mesh.
If parts of the model are in the shape of a sheet or something that is thin and has a large area, like a sheet of metal, the program’s ability to treat the part as a surface with a thickness is applicable. When doing this, the program only calculates the movement and stress on the surface of the model. This approach gives a reliable result if only interested in the surface stresses of a part. This method can save time due to its way of calculating only a thin slice of the model.
When working with a design based on beams SolidWorks has a special way of analysing. This is a simplified way with certain restrictions. The beam cannot for example be twisted along its length, have a variable cross section or have an irregularity along the length of the beam. But if the scenario
permits using this method, it can save time due to its fast way of calculation.
6.7 Brainstorming
A commonly used tool for generating ideas is brainstorming. Brainstorming is often performed in groups during a limited amount of time, this to push the participants to come up with as many ideas as possible. Often the time frame is around 5-10 minutes (Olander & Morrisey, 2003, p. 18). The group is given a scenario to brainstorm around by the facilitator, who is the leader of the brainstorming session. The scenario could be focused on any subject as long as the session has a clear aim. In a brainstorming session quantity is more important than quality. The amount of ideas is important to be able to increase the chance of combining the sometimes crazy ideas into more meaningful ideas at a later stage.
The session starts on the initiative of the facilitator and every participant is allowed to share his ideas as soon as the ideas pop up, no reaching of hands or waiting for the turn. The facilitator writes down all the ideas generated by the group. It is important that the participants and the facilitator are not critical to any ideas. The method is based on the principle that no ideas are bad ideas. It is also of essence that the ideas are displayed in a manner that all the participants can see all the ideas during the session. This helps the creation of new ideas by combining already stated ones.
It is the facilitator’s responsibility to keep the brainstorming going even when the ideas stop coming. It is important to keep going until the time is up because this is often when the best ideas are born (Olander & Morrisey, 2003, p. 18). This rather free way of generating ideas is built on the participants following the rules. By doing so the chance of finding creative solutions increases.
There are lots of different ways to alter this tool to be creative. One popular way is to use
brainstorming to generate ideas on a subject the participant is not used to. Reversing a statement to set a subject is a way to achieve this. Instead of generate ideas to the subject:
“How can we attract more customers?” This statement can be reversed to:
“How can we not attract more customers?”
By using this technique it is possible to break free from the accustomed models in the brain and be more creative (Johansson 2005, pp. 57-72). When having a lot of these “opposite ideas” it is time to translate these ideas to something useful. One idea produced could be “Do not show the opening hours”. Translating this idea into something useful could result in the shop focusing more on informing the customers about its opening hours.
6.8 FMEA
FMEA is an engineering tool used to locate possible and known failure modes and errors on a product/process or a bigger system. This tool is used in companies all over the world from small business to big enterprises. The possible gains from using a FMEA are clear and easy to understand and will be explained further down this section. A good FMEA is to locate the problem as well as the causes and effects of the problem. The FMEA should also result in possible solutions. The strength of this tool is its way of ranking the failure modes by giving each problem/error a RPN (Risk priority number) that indicates the most concerning issues.
6.8.1 When and why to use FMEA?
The need to minimize failure is of essence when wanting to save time, money and/or keep a good reputation. This is where the FMEA comes in handy. A FMEA can be used whenever a company is in a developing stage in their organization or product range. It also applies to all new concepts. The FMEA is an extensive tool that at first glance can be a bit intimidating due to its complex appearance. It can
6.8.2 Types of FMEA
According to Stamatis (2003, pp. 40-43) there are four generally accepted types of FMEA. These types are used depending on the situation and the reason for the FMEA.
System FMEA
This kind of FMEA is often used early in the development process and focuses on failure modes in the interaction between different systems or the elements of a system. A system FMEA can be a support in the process of selecting the concept to proceed with. It also helps to locate failure modes early in the development process, which leads to reduced costs.
Design FMEA
A design FMEA is conducted on products before manufactured. The main goal for a design FMEA is to find flaws in the product design leading to failure in one way or another. There are three sub-categories to the design FMEA: Environmental FMEA, Machine FMEA and Attribute FMEA.
Process FMEA
When trying to find deficiencies or problems in an assembly or manufacturing process a process FMEA is a good approach.
Service FMEA
In the same way as the design FMEA the service FMEA is performed before the product reaches the customer. In this case the product is a service and the FMEA focuses on mistakes and errors in the service caused by system or process deficiencies.
6.8.3 The general process of conducting an FMEA
Below a brief summary of the general process of conducting an FMEA is shown (Stamatis, 2003, pp.36-38). This is a general process and may vary slightly with the different types of FMEA. The principle is still applicable to all types.
1. Select team and brainstorm
Gather a team that is cross-functional and have experience from many different disciplines to perform the analysis. This increases the chance of finding as many deficiencies and errors as possible. Do not make the team too large, it must be easily managed to make the process efficient.
2. Functional block diagram and/or process/flowchart
To make everyone in the group understand the process, product or service to be analysed it is a good idea to illustrate the function through a block diagram or flowchart.
3. Prioritize
After understanding the product it is time to prioritize what part or function of the model to focus on. Often this step is skipped when the focus of the FMEA is already set by initiation. 4. Data collection
In this step failure data is gathered and processed and put in the FMEA as Failure modes. 5. Analysis
This is where the knowledge and experience of the group is used to fill in the rest of the form. There are different approaches to this; it may be quantitative or qualitative. Brainstorming may be used or any other method that suits the group and the goals for the group. The goal for this step is to grade the different failure modes in their chance of occurrence, severity and detection rate.
6. Results
This step is derived from the analysis and each failure mode is given a risk priority number (RPN) per failure mode that gives an indication of the severity of the error.
7. Confirm/evaluate/measure
After the results have been received it is time to measure the failure or success. This evaluation is made through three basic questions:
o Is the situation better than before? o Is the situation worse than before? o Is the situation the same as before?
The answers to these questions are put in the form and used to recommend actions and to see the results of those actions in the corresponding column of the FMEA form.
8. Do it all over again
Regardless of what the result turned out to be the team needs to keep on repeating the FMEA procedure to keep making incremental improvements. This is one of the basic ideas of the FMEA.
FMEA in this project
In this project FMEA have been used as a complementary tool for identifying failure modes and probable areas of improvement. The kind of FMEA most suitable for the needs of this project is the design FMEA which is also the one used in the project.
In step number 5 (analysis) in the general FMEA process, the method used for gathering failure modes was brainstorming. This was the most appropriate way of conducting the FMEA when lacking
information such as reclamations and failure reports.
The fact that the project group only consists of two members is not ideal for performing an FMEA. If having a larger project group the opportunity of using the FMEAs full potential increases.
6.9 Pugh matrix
Evaluation of concepts is a natural step in any development process. A tool that helps to evaluate concepts is the Pugh matrix. For a more elaborate explanation of this tool and its possible uses Ulrich and Eppinger (2008, pp.130-139) describes it thoroughly in their book Product and design
development.
Figure 21 on the next page shows a principal sketch over the type of Pugh matrix used in this project. In this matrix the concepts are compared with a reference concept. This reference concept may be a rivalling product or the instinctively best of the concept. The concepts are compared with the demands from for example a specification of requirements stated earlier in the project. The Pugh matrix can be used in two ways; either it can be used as a first rough sorting out, or it can be used to evaluate in a more exact manner which of the concepts that are the best. In both cases every concept
To make this tool effective and fair the concepts must all have the same level of abstraction. This is important in any evaluation to get proper results.
Demands Weight Reference Concept 1 Concept 2
Demand 1 3 0 +2 0
Demand 2 2 0 -1 -1
Sum +4 -2
Figure 21 - The principle of a Pugh matrix.
6.10 Design for Manufacturing and Assembly, DFMA
DFMA is a powerful tool for companies to cut down cost by streamlining the process of manufacturing and assembly. This tool requires knowledge about the company’s internal processes and costs.
The DFM part of the term refers to the manufacturing process within a company. DFM can best be described as a way of thinking and something that needs to be integrated throughout the entire product development process. The DFM already begins in the concept development phase where the first major decisions must be made with manufacturing cost implications in mind.
A major part of using DFM successfully is acquiring the costs tied to the manufacturing process. These costs are not always easy to find due for example lack of time. Instead, estimations have to be made about the cost. This in turn leads to many decisions being made in the absence of accurate cost data. In this process suppliers and manufacturing experts play a big role in trying to estimate the cost. Experience among the employees is also important to make these estimations that will ease the decision making process. It is important to get input from the entire development team in order to succeed in the work with DFM.
In the process of making decisions based on DFM, trade-offs between manufacturing costs and other issues, as for example product quality, will be inevitable.
The process of DFM is described by Eppinger (2007, p. 212) in five general steps listed below: Estimate manufacturing costs
Reduce costs of components Reduce costs of assembly
Reduce the costs of supporting production
Consider the impact of DFM decisions on other factors
These five steps together contribute to lowering the costs of manufacturing but most of them also need a lot of knowledge about costs and production times. If these factors are not known a good thing is to start with reducing the cost of assembly. This step focuses on the way the product is assembled and the geometry of the parts included. An effective way of doing this is using a tool called DFA.