An insight to Level Communication
through the use of Cameras
A Project Report by:
Jonas Lewis
Gotland University Semester: Spring 2013
Program: Game Design and Graphics
Course: Examensarbete i speldesign, helfart (tsd713-50795-v12) Mentors: Adam Mayes, Fia Andersson
Date: 2013-02-05 Version: 7.0
Abstract
The following paper is a documentation and project report of the construction of a project called Synergy. It details the underlying notion, investigation, procedure, and learning that lead to the construction, as well as the reflection upon a level design. Which purpose was to impose a heightened level of authorial control to its creator; thereby more fluidly conveying a creator's ambitions to its audience through the use of cinematographic cues. Upon the project's completion further investigations was done in respect to the finished product whereby I found that others had constructed similar systems, though not for the same cause.
Table of Contents
Introduction...4
Project Report Format Disclaimer...4
Purpose of the Project...5
Question...5
Scope of the Work...5
Background...6
What is Level Design?...6
Cameras Communication...7
Project Execution...9
Plan and Ambitions ...9
Construction...9 Prototype...10 Test...10 Final...11 Results...12 Result Analysis ...12 Prototype...12 Test...12 Final...13 Breakdown...17 Cave 1...17 Cave 1 Zoom...18 Cave Transitional...18 Cave 2...19 Ridge 1...20 Ridge 2...21 Dropshaft...21 Lower Ridge 1...22 Ramp 1...23 Ramp 2...24 Desert 1...25 Town 1 (Entrance)...26 Town 2 (Market)...27 Town 3 (Oasis)...28 Crash Site 1...29
Crash Site 2 (Satellite Side)...30
Tower 1...31
Discussion & Conclusion...32
Post-project Investigation Discussion...33
References...35
Bibliography...36
Glossary...37
Introduction
Many months prior to this paper, a notion was born in my mind. The idea was that a level design is only as good as the cameras presenting it. What this meant to me, was that unless a designer is in charge of both the world he creates, and how his users perceive that very same said world, he could not feasibly be in control of the experience that he wished to convey. Essentially watering down an ambition, as well as the transference of ideas between the designer and the users.
This however is not an entirely untouched area of work. Previously developers have played on the notion in such games a Pandemonium(Toys For Bob, 1996), Klonoa: Door to Phantomile (Namco, 1997), God of War series(SCE Santa Monica Studio, 2005, 2012), and the Silent Hill series
(Konami, 1999, 2012). These games regard for camera use would lay the foundations of my work, as well as cautioning me of aspects not to implement in my construct.
The following paper aims to outline the planning stages, my working process, the result of my work, as well as my overall investigation on the subject matter. The latter of which largely occurred retroactively to my level construction.
Project Report Format Disclaimer
The structure of this paper follows a somewhat non-conventional layout, specifically in regard to the discussion, conclusion and the analysis within these sections. The reason for this, was the somewhat unusual approach to the work, where a faze of further investigation followed the conclusion of my practical work.
Also, at the end of the paper, a glossary is included, please refer to this in the case of not understanding shorthand's, terminology and/or paper specific definitions for particular words. Finally, it is my opinion that seeing my work beforehand strongly enforces a pre-emptive understanding in what my work was about. As such, I point you towards the following;
Appendix:”Synergy(2012) Demonstration”.
Purpose of the Project
The purpose of this project is to obtaining an insight into level communication through cinematographic cues, thereafter constructing a level that presents the findings of this insight.
Question
Can one construct a level that communicates the creator's intentions to a user akin to the linear story telling of films and how would one approach this ambition?
Scope of the Work
The forefront focal point of my work was restricted by a few key aspects.
First; the camera work had to only take place in a third-person perspective, this would act as a a constant variable, so to keep a consistent medium of communication to the player. Essentially, this can be described as not wishing to change the language by which I communicated to the user. This choice was made, as the majority of films produced are 3rd person experiences.
Secondly; My work had to be restricted to a genre, primarily focusing on the Adventure game genre. Traditionally this type of game demands exploration, and the discovery of hidden items, content or areas, act as rewards for embracing such exploration. (Adams and Rollings, 2007)
...Adventure games traditionally offer puzzles rather than combat challenges, and their characters are seldom defined by numeric attributes... (Adams and Rollings, 2007, pp.510) This means that the game had to at least present a level of openness when it came to decision making within the game spaces, or a perceived false level of openness. Something perhaps similar to Final Fantasy Adventure/Mystic Quest (Square, 1991). Where the game environment elude to being grand in scope, but the player is in fact restricted by the tools they have to progress, and the linear structure which enables only one resolve to event problems or environmental progression. These two key aspects acted as the supporting beams for my entire process from planning to construction, and I aimed to rigidly hold myself to these two prospects exclusively.
Background
What is Level Design?
To quickly summarise what level design is, I will open with a quote from Ernest Adams book, Fundamentals of Game Design.
Level design is the process of constructing the experience that will be offered directly to the player, using the components provided by the game design: the characters, challenges, actions, game world, core mechanics, and storyline if there is one. (Adams and Rollings, 2007, pp.58)
Level design in a practical sense is the creation of spaces what a user may interact with, or observe. In most cases a level design is the result of one or more creators, striving for the same or similar ambition. As a general rule of thumb, it is also fair to say that a level design is restricted by the premise of a game design. The level design can not ask for aspects, or functions non-existent within the game space. Nor may it require the player to do the impossible to reach a desired position or outcome within the level. (Adams and Rollings, 2007)
Architecture is the result of a creative or financial endeavour, where creators work together or alone to achieve a unified ambition. By nature, Architecture is restricted by the laws of physics, and the very fact that the spaces it produces are in most cases meant to be used in meaningful ways. An interesting approach by Christopher W. Totten, who I borrow terms from later when elaborating on my own design.
Architecture has for centuries revolved around creating human experiences through space... (Totten, 2011)
Architecture is for creating pleasure by creating spaces that feel safe, while level design is about creating spaces that create a sense of danger that is pleasurable to battle and overcome. If to architects the house was the machine for living, the game level should be the machine for living, dying, and creating tension by exploiting everything in between. (Totten, 2011)
The above quotes considered, level design can essentially be called game-architecture. The final important aspect in relation to my project is the fact that it had to be replicable. This meant making it a very specific type of Adventure style game. The level design would have to support the camera in telling a very distinct and specific narrative. In this case, narrative is not meant to be story
focused, but rather a communication focused. I decided to loan from the mediums narrative focused genre, the RPG: ”In most such games[Computerised RPG's], the stories and challenges are
prescripted, so the player will experience the same things each time he plays,” (Adams and
Rollings, 2007, pp.510). Specifically the approach where the experience is prescripted, just as film would otherwise be.
For all intensive purposes, this projects approach towards level design is more along the line of how theatres and film would approach set-piece design. It is the architecture of the environments and contexts within them, rather than the construction of intricate conceptual challenges.
Cameras Communication
The scope dictated that the level take place in a Third-person camera. The following is a definition by Adams and Rolling:
3D Third Person
The player can see his avatar onscreen, usually from an over-the-shoulder view in which the camera is behind and somewhat above the avatar. Players can see some distance ahead of the avatar, though not as far as in the first-person view because the camera is tilted downward. In this case, you must not present the player with dangers at a very long range (for example, an enemy with a snipe rifle) because the player won't be able to see them until it's too late.
Players may also see a little of what is behind and to the side of the avatar. In these types of games, the camera must move to follow the avatar both predictably and
unobtrusively. (Adams and Rollings, 2007, pp.457)
However for my ambition to be achieved I would have to loan cinematographic techniques from film. This was approached through the use of a few quite common cinematographic techniques to create a sense of intrigue in the user, thus communicating to the user what one may or may not want them to consider meaningful. This meant that I would also end up considering aspects such as
pacing, matching shots and varying the angle and size of shots to better convey the parts of my level and a whole. (Lewis, 2009, pp.234)
It is worth noting that cinematography in and of itself builds on aspects from centuries worth of work within a variety of fields such as those of fine arts. As well as heavily reliant on the
understanding of human cognition and gestaltning. One only needs to observe oneself in the process of interrupting framed phenomena of any kind to realise this. Rethinking Challenges in Games and
Stories (Adams, 2007) deals with the notion that level design can be viewed as 18th century landscaping. These spaces designed to induce intrigue, captivating a sense of exploration in their layout. In effect, they fall into the adventure game genre, which refers back to my outlined scope in the previous section.
See; Appendix:”PriorPark.jpg” for pictorial referees of 18th century landscaping.
Project Execution
The method for my work was composed of two major sections. A planning stage where I drafted a design document, with every aspect of the camera design specified within, as well as the goal of what each camera intended to communicate to the player.
The second major section revolves around the construction of the plan. This section is the process which I took to construct the actual ideas. Along side this, I also outline specific changes made in the design, in areas where I felt my plan was lacking. The design of the level was iterative through the creation of three forms. Prototype, Test, and Final. Where the longest stage of development was devoted to the Final build.
The construction of the levels themselves took place under the UDK framework. The build I was making use of at first was the 2012-01 build, where by after, for the Final Level Construction I moved into the 2012-02 build. The actual necessity of this transition however was moot, and had no implication on the results.
Plan and Ambitions
First and foremost for this section I will point towards Appendix:”SynergyDocJonasLewis.pdf”. The paper itself was the framework for the construction of all three iterative versions for the level. There are further elaborations found in Appendix:”AdvancedGameProjectPost-mortem.pdf”, where previously I have outlined certain aspects of this section.
Construction
The construction of the Prototype and Test versions are further elaborated in Appendix:”Advanced
GameProjectPost-mortem.pdf”, initiated in February, 2012. The construction of the Final build
came to a close in late May, 2012. The focus of this section will be the Final build. Cameras movement was constructed through the combined use of the UDK Kismet, which is a graphically based programming environment as well as object properties available in UDK.
With more time, conventional programming could have been approached, it was however dismissed as a viable option early on.
Prototype
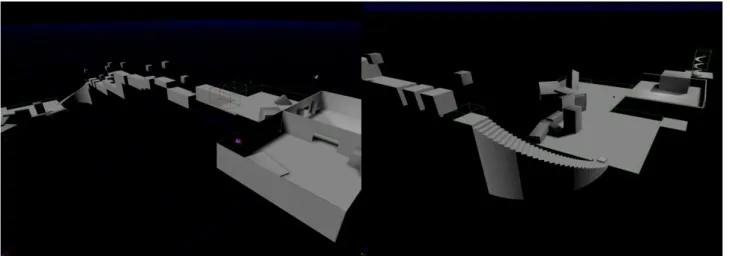
The prototype build started out as a simple whitebox build, to show that the ambitions themselves were possible. Through this build, the foundations were being created in regard to a desired skill-set needed to accomplish the documented design. At this time in the process, it was about coming to terms with what to expect from the camera that would need to built, along with the understanding of the relationship between the spaces and the avatar.
Test
The Test build was a construction more polished than the Prototype. It was constructed from the ground up, based on the learning from the previous build. This was done for two reasons, foremost to put my knowledge to the test, but also to heighten the overall quality.
7
Illustration 1: Prototype Overview
The Test build was also the first stage for many of the cameras. Having to work around aspects such as how to practically apply the camera's movement to the avatar.
The construction at this point retained the whitebox format of its Prototype brethren. The spaces however were finalised, with respect to the scale needed for the cameras to move around when tracking the avatar.
Final
The step between the Test build and the Final build was an enormous one. As stated earlier, the Final iteration was built upon using the Test as the base, rather that starting from scratch, as what was done with the Test. This is the point where most on the fly design decisions were made to the level designs, as well as a few select cameras.
Time dedicated to the Final build was almost twice that of the combined time for two earlier
iterations. What this meant was not only the implementation of more refined graphical components, but also an array of positioning, and transitional tweaks for the cameras and environmental objects.
Results
The outcome of all this work, and the focus of the results lie purely in the Final iteration. What was produced was a level where cameras transitioned between one-another, in a fluid fashion. Each camera acting as its own shot or set-piece to convey a specific aspect of conventional level design to the player. Whilst, still acting as an underlying communicator akin to set theatrical set design. Though an overall noteworthy flaw was the lack of attention paid to light and shade cues as well as a small select few transitions. These inadvertently have the potential to act against the cameras communication at these instances most notably in the Cave sections.
Result Analysis
Prototype
It was through the build of the prototype that most of the practical investigation took place. It was the time where I found out what could, and could not be done with the tool-set I had at my disposal. This faze was also a crucial, as it laid down the framework for the iterations that followed.
This level in and of itself was more of a development playground than anything. An environment where I found my own footing for the project.
Test
Upon the rebuild, it is fair to say that the actual level became something tangible. There were now boxes that made up whole areas, furthering the understanding of what was actually being
constructed. This build defined objects relationships in terms of one-another, through scale, mass or positioning.
Changes were also made within this build. Foremost along the Ridge area, where I cut back the overall distance, and added a new section; the Dropshaft. This shaft was originally not defined. But though testing the Prototype level, I came to realise how monotonous the ridge section was. This is mostly because without other play elements, such as enemies, or puzzles. The section itself was mostly about walking, which in and of itself is not an interesting component.
Among other changes was the actual addition of the town section. Originally planned to be in the Prototype section, it was left out because I simply did not have the space for it in the original layout. Having moved the arrangement of the central desert section, the Test build made it viable to fit the town accordingly to the drafted design.
Additionally, collisions were constructed in this iteration, which would finalise the framework for the beginning of the Final build.
Final
Having the Test build as the back bone, the Final build was constructed from it. The changes
between the Final build and the Test are significant. For the most part this is because of the aesthetic changes. But the cameras in the level were all tweaked in accordance the content in the space.
These tweaks are at the heart of what presents the original plan as a finished production.
Cameras that received changes worth mentioning, include but are not limited to the following: Cave Camera 1
Ridge Camera 1
Dropshaft Camera 1
11
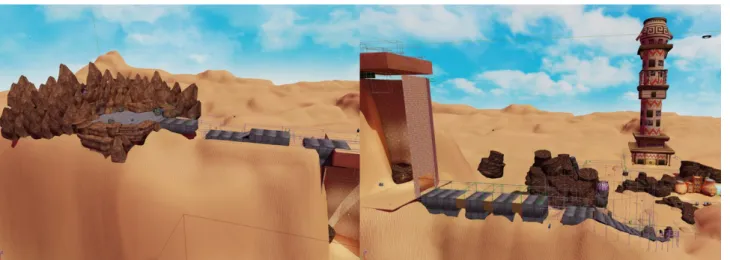
Illustration 5: Cave 1 Comparison
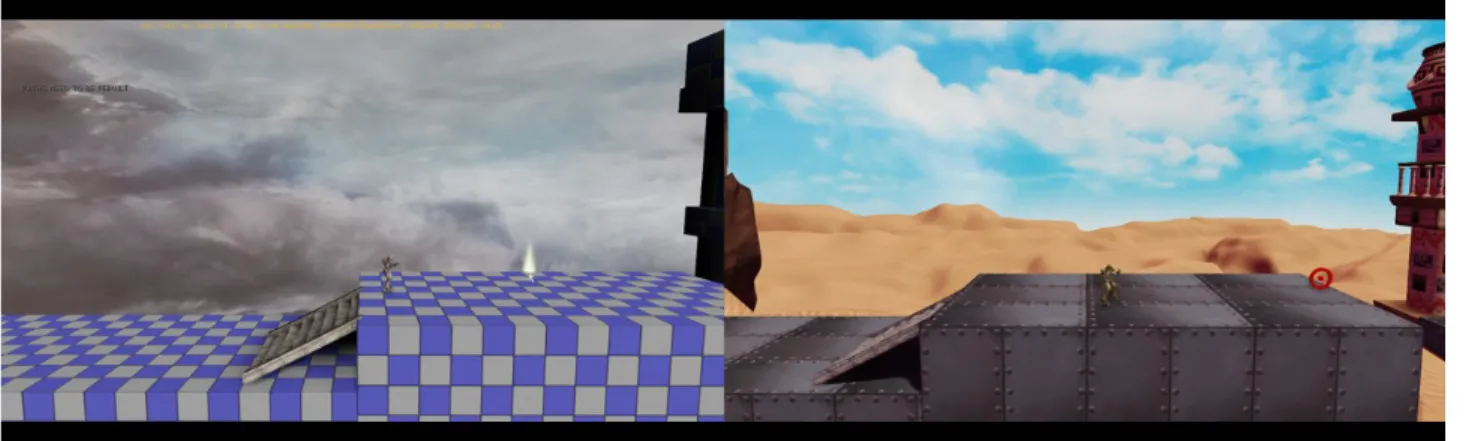
Illustration 6: Ridge Camera 1 Comparison
Into Desert Camera
Town Camera 1
Town Camera 2
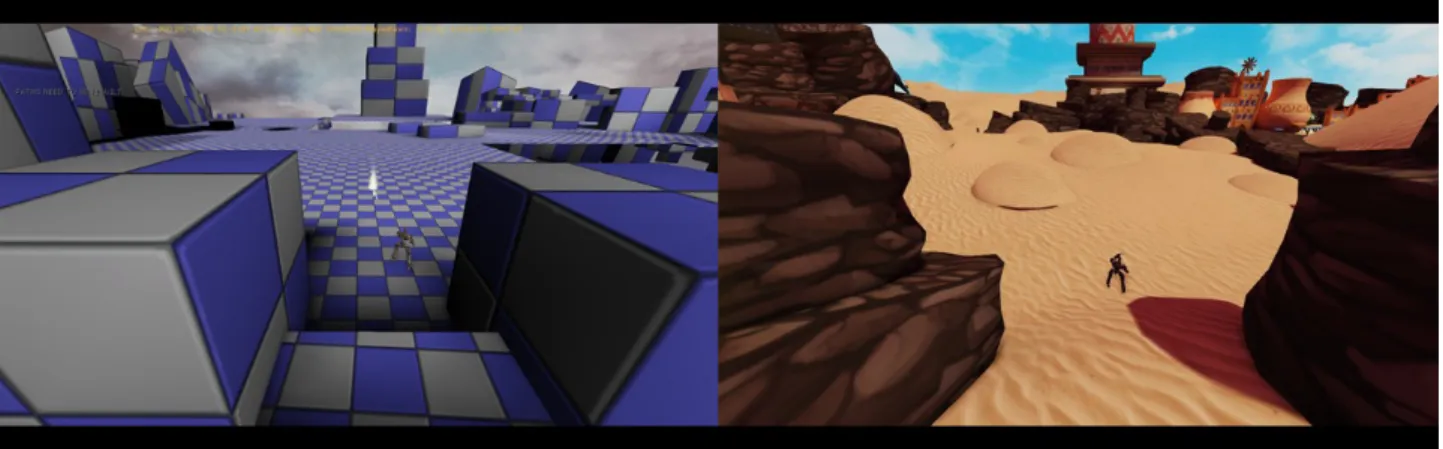
Illustration 8: Into Desert Camera Comparison
Illustration 9: Town Camera 1 Comparison
Town Camera 3
Tower Camera 1
At this point the level design changed very little. The biggest result of changes occurred from the difference between real assets and the original boxes that made up the areas.
Something that occurred when working in this fashion was that a lot of unplanned, new decisions that were made. The question would arise: Does this approach what I want to express? Tweaks would be made accordingly, until I found that the shot fulfilled entirely what I wanted to convey.
13
Illustration 11: Town Camera 3 Comparison
Breakdown
In this section, breakdowns of every Final build camera will be shown. The camera angles will reference back to the glossary, along with the space definitions. Small notes of context will also be added, but are reflections on ambitions rather than the actual interpretation. Certain descriptions are also only observationally defined.
Cave 1
Camera Definition: High-angle shot, Wide shot Space Definition: Intimate Space
Composition Type: Linear Perspective, Headroom, Framing
Context: The elevator beams frame the door. The avatar starts on the lit platform, the light draws the attention of the user. The user then draws their eyes to the door, due to the framing, and the
headroom left by the camera within the linear drawn perspective.
Cave 1 Zoom
Camera Definition: High-angle shot, Close-up shot Space Definition: Intimate Space
Composition Type: Headroom
Context: The camera zooms up, first to establish that there is a type of dynamic camera movement for the user. Secondly, to elaborate on the event of the opening door.
Cave Transitional
Camera Definition: Medium shot Space Definition: Intimate Space
Composition Type: Left Rabatment, (Profile)
Context: A lose mix of coverage and cutaway, we are leaving the elevator room, and progressing into the next section. The camera takes a rough 45 degree portrait view. Layering between the foreground, middle ground and background, contextualising the last room.
15
Illustration 14: Cave 1 Zoom Final
Cave 2
Camera Definition: Medium Shot, Panning (Room depth and width) Space Definition: Intimate Space
Composition Type: Right Rabatment, Rule of Thirds, (Linear Perspective)
Context: Camera now tracks the players movement by panning. The room starts by setting the exit in the rule of thirds, centred in the right rabatment. Upon opening the door, the following sections can be seen though a linear perspective, imposing the notion of a longer journey ahead.
Ridge 1
Camera Definition: Wide shot, Panning (depth and width) Space Definition: Prospect Space
Composition Type: Lead Room
Context: The player moves outside, the past two rooms are contextualised by the mountain behind the player. The majority of the view leaves the ground in front of the player as Lead Room towards the next destination. The camera positions communicates the player leaving the mountain behind them.
17
Ridge 2
Camera Definition: Wide shot, Horizontal Pan
Space Definition: Narrow Space, (Perceived Prospect Space) Composition Type: Rule of Thirds
Context: The player moves along the ridge. The shot establishes the coming locations, amongst them is the sliding in of The Tower, from the right. This is the first cue of its importance.
Dropshaft
Camera Definition: Wide shot, Vertical Pan (Majority) Space Definition: Narrow Space
Composition Type: Lead Room
Context: Upon dropping though the ground, the camera changes position, to show that the player will land at the bottom of the shaft. This Lead Room, with the abrupt action conveys a sense of impending doom. However, the Avatar will not die/lose.
Illustration 19: Ridge 2 Final
Lower Ridge 1
Camera Definition: Close-up shot, High-angle shot, Panning (depth and width) Space Definition: Narrow Space
Composition Type: Lead Room
Context: This sections puts the player in focus. The high-angle shot, in relation to the Close-up shot convey a sense of insecurity, along with the Narrow Space. This is supported by the shaking
sandstones that fall once stepped off. Again sliding into view, is another major place of importance, the Observatory. The Village is also made visible to implant another place of intrude for the User.
19
Ramp 1
Camera Definition: Wide shot, Panning
Space Definition: Narrow Space, (Perceived Prospect Space) Composition Type: Headroom
Context: The camera once again take on an establishing shot, The Tower once again becomes the major centre of importance, with The Observatory and Village taking second places. As the Player moves along, in the far top left of the screen, The Satellite sneaks into view. Now all places of importance have been presented to the User.
Ramp 2
Camera Definition: Wide shot, Panning
Space Definition: Narrow Space, (Perceived Prospect Space) Composition Type: Headroom
Context: Extension of the last section, the camera once more puts The Satellite into intrigue view, while The Observatory becomes Major. This is the point where the player will be informed that as soon as they come down onto the open desert, The Observatory should be the first place of interest, because it was the last set-piece to be presented.
21
Desert 1
Camera Definition: Medium Shot, Panning (depth and width) Space Definition: Prospect Space
Composition Type: Headroom, Lead Room
Context: The camera along with the prospect space now enable the User to exercise their choice of what they wish to explore first. At this point all areas of interest have been presented, as such the User would hereafter find their own way.
Town 1 (Entrance)
Camera Definition: Medium shot, Panning (depth and width) Space Definition: Intimate Space
Composition Type: Linear Perspective
Context: Intimate town entrance, the buildings around the Avatar contrast the open desert,
conveying a sense of security. The linear perspective acts to invite the player further into the town, more specifically the market ahead.
23
Town 2 (Market)
Camera Definition: Wide shot, High-angle shot Space Definition: Intimate Space
Composition Type: N/A
Context: The space is enclosed yet open. This would be a place full of buzz from NPC's, instilling a sense of safe chaos. The high-angle wide shot acts to show the player as insignificant amongst the buzz.
Town 3 (Oasis)
Camera Definition: Wide shot, High-angle shot Space Definition: Intimate Space
Composition Type: N/A
Context: Note that The Tower in the top left corner of the shot. It conveys an imposing presence, as such, it appears in most of the shots on one for or another. This is to contrast The Oasis, which is to appear tranquil and accommodating.
25
Crash Site 1
Camera Definition: Wide shot, High-angle shot, Panning (depth and width) Space Definition: Prospect Space
Composition Type: N/A
Context: The high angle shot is in place to give the User a good Scope over the satellite, and the Prospect space area. The angle of the camera has changed from Desert 1 for the sake of variation, but also to give the player a better look at The Satellite from its front side. The intention is that the lens on the satellite is a key component to gaining entrance to The Tower.
Crash Site 2 (Satellite Side)
Camera Definition: (Close)Medium shot Space Definition: Narrow Space
Composition Type: Headroom
Context: From this view of The Satellite, the player would be able to open the side, and gain entrance. Upon opening the entrance, smoke come from the inside. The narrow space, along with the close medium shot was designed to support a sense of insecurity about entertaining The Satellite upon opening it.
27
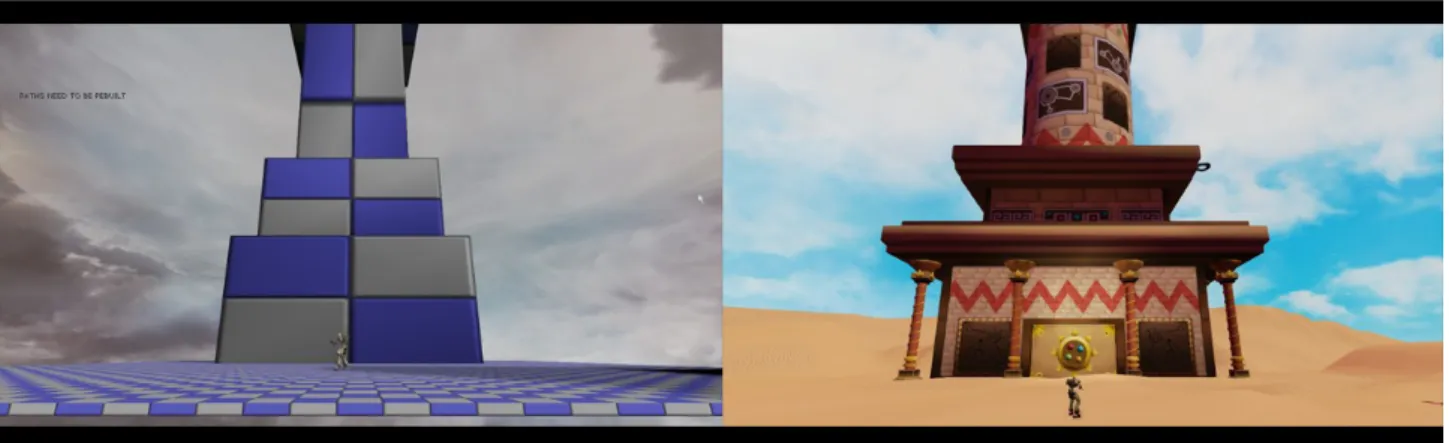
Tower 1
Camera Definition: Wide shot, Low-angle shot, Panning (depth and width) Space Definition: Prospect Space
Composition Type: Rule of Thirds, Lead Room
Context: The jewels on the door move, to draw the Users attention to the tower. The angle of the camera from its low angle, imposes on the player. The top of the tower can not be seen, this is a Lead Room cue, telling the User there are challenges ahead as well.
Illustration 31: Tower 1 Final Illustration 32: Tower 1 Final 2
Discussion & Conclusion
A level that communicates to the player in an effective fashion through directed cameras is something I wholeheartedly feel shows the utmost respect to its players. The cameras themselves helping to retain the designers original intentions as opposed to a free camera. All of which roll back to myself having a heightened level of authorial control.
This is however not to say that the level itself is perfect. My inability to construct cameras that for example track the players movement without displacing themselves is something that I could have used for example in Cave Room 1. Which would have added a greater level of fluidity to the overall camera movement. An aspect which now I fear may break the ambition depending on the users interpretation.
Another noteworthy aspect lies in the fact that similar cameras tend to be programmed with underlying A.I. to handle a variety of situations. Rather than my method of essentially creating zones where the camera changes as if it were dictated by cuts in a film.
The entirety of my work and this paper considered, I do not think it presumptuous to say that my original notion; that the cameras complement the level design they are tied to, was a feasible one. I still by all means believe this very notion to be true, however what writing this paper has made me realise is that there is a time, place and application for everything. By which I mean to say, that the choice to not follow this notion, would also be a dedicated design decision. Which in turn reflects how a designer wishes to instil control to an experience that they wish to create and convey. The very choice, and being aware that one makes a conscious choice about this type of decision would also mean: That no experience that takes consideration to this notion and disregarded it, would be susceptible to the watering down of their ambition. Resulting in alternate solutions when striving to retain the transference of ideas between the designer and users.
Post-project Investigation Discussion
After having finished my level build and project, certain aspects of my investigation came to light as either flawed or unsubstantial. Throughout this section I present the lacking material that would have changed the way I approached my project, in terms of planning and camera design. I will also mention a particular product that caused the work itself to become somewhat outdated in
comparison.
Upon completing my project, I was made aware of a product in the market place that had
completely blind-sided my radar. In Autumn of 2010, Nintendo in collaboration with Team Ninja released a game by the name Metroid: Other M.(Team Ninja and Nintendo, 2010) What makes this game significant to any of the other titles presented in the Introduction, is that it filled both criteria of my scope.
Traditionally the Metroid series (Nintendo, 1986, 2012) is known for its adventure style game play, in a third-person perspective, where the player for there own benefit is encouraged to traverse sections of the world in search of upgrades, progression is also linked to this manner of play.
Metroid: Other M is significant in that it put players into an environment that for the most part
rewarded exploration, whilst making use of a Context-Sensitive Perspective.
The second, and probably most significant hindrance however, would be that I was unaware that the camera I aimed to build was in fact already defined.
Context-Sensitive Perspective
One other 3D perspective sometimes found in action games is the context-sensitive perspective. In this case, the camera moves around depending on the circumstances of the moment, controlled by AI. One of the best examples of this comes from ICO, shown in Figure 13.12. The camera, seeking to provide the best angle from which to show the action, changes its angle as the avatar moves from room to room. This works well for slower games, but in fast games, especially if the player is fighting for his life, it is a distraction. If the camera moves – especially if it jumps suddenly – the player will become disorientated and is likely to make mistakes. Context-sensitive perspectives are great for offering visual variety, but in high-speed action you should stick to more fixed and predictable points of view. (Adams and Rollings, 2007, pp.458)
This begs the question whether ICO(Team Ico, 2001) had been applicable? I believe part of it would have been. ICO by all means present some impressive qualities, it however centres around the protagonist and the person he guides. The camera itself put more work behind having the two characters in view, rather than communicating the levels path or context. Which in and of itself does not relate to what I was aiming to archive. Though the Context-Sensitive Perspective as a term is ambiguous enough not to exclude my notion.
Finally, an interesting approach which the scope of my report does not account for but should be elaborated on in vague philosophical reasoning.
The system itself revolves around giving the designer as much control as possible in presenting their narrative/world, essentially boils down to creating an omnipresent author in the context of games. The designer is in charge of of the events, how they unfold, and in the most clear way; how they are presented. What this means is that the user then remain as the only obstacle in the
transference of ideas.
The second most significant thing this eluded to, is that you can create an omnipresent narrative, where the user still has a flexibility in how they execute or perceive the story, but are still bound by the overlying understanding that there is already a result accounted for, regardless of the
possibilities.
This works as long as users read environments and do so only in accord to the camera presenting the parts. Each camera acting akin to a page in a book. That would mean that you could move back at will, but the outcome would always remain the same ahead.
For further studies, questions have arisen; such as whether or not the way users are presented worlds through cameras changes the way they perceive the world and narrative? Does perception between a third-person avatar effect the understanding differently from our current understanding of first-person perspectives? Can cinematographic approaches viably sustain enjoyable play?
For people who have chosen to read this, and perhaps iterate on my work; I hope some insight on how you wish to approach the problem has come to light.
References
BooksErnest Adams, Andrew Rollings, 2007. Fundamentals of Game Design. Pearson Education Inc. Jerry Lewis, 2009. Filmmaking For Dummies 2nd Edition. Wiley Publishing Inc.
Games
Konami, 1999,2012. Sillent Hill Series. [Video Game] (Sony Playstation, Mixed Platforms) Namco, 1997. Klonoa: Door to Phantomile. [Video Game] (Sony Playstation)
Nintendo, 1986. Metroid. [Video Game] (Nintendo Entertainment System)
SCE Santa Monica Studio, 2005, 2012. God of War Series. [Video Game] (Sony Playstation,) Square, 1991. Final Fantasy Adventure/Mystic Quest. [Video Game] (Nintendo Game Boy) Team ICO, 2001. ICO. [Video Game] (Sony Playstation)
Team Ninja and Nintendo, 2010. Metroid:Other M. [Video Game] (Nintendo Wii) Toys For Bob, 1996. Pandemonium. [Video Game] (Sony Playstation)
Websites
Ernest W. Adams, GDC, 2007. Rethinking Challenges in Games and Stories. [online] Available at:
<http://www.designersnotebook.com/Lectures/Rethinking/rethinking.htm> [Accessed 2 November 2012 ].
Christopher Totten, Gamasutra, 2011. Designing Better Levels Through Human Survival Instincts. [online] Available at:
<http://www.gamasutra.com/view/feature/6411/designing_better_levels_through_.php> [Accessed 2 November 2012 ].
Bibliography
Websites
Mark Haigh-Hutchinson, Gamasutra, 2009. Real-Time Cameras - Navigation and Occlusion. [online] Available at:
<http://www.gamasutra.com/view/feature/132456/realtime_cameras__navigation_and_.php> [Accessed 2 November 2012 ].
Luke McMillan, Gamasutra, 2012. The Metrics of Space: Tactical Level Design. [online] Available at:
<http://www.gamasutra.com/view/feature/176933/the_metrics_of_space_tactical_.php?> [Accessed 2 November 2012 ].
Mat Rix, GDC Vault, 2012. A level design post-mortem. [online] Available at:
<http://struct.ca/share/fun/MattRix_LevelDesign_GDC2012.pdf> [Accessed 2 November 2012].
Phil Wilkins, GDC Vault, 2011. Iterating on a Dynamic Camera System. [online] Available at:
<http://www.gdcvault.com/play/1014606/Iterating-on-a-Dynamic-Camera/> [Accessed 2 November 2012].
Glossary
Terminology that is self-defined for the purpose of this paper.
Avatar
-Digital body that is manipulated by the User.
User
-Person playing as the avatar.
Player
-Avatar and User in a combined state.
The following terminology refers to shorthand's, industry tools and industry concepts.
UDK
-Unreal Development Kit, a game creation tool developed by Epic Games. <http://www.unrealengine.com/udk/>
[Accessed 2 November 2012 ].
Whitebox
-A stage in level development, that is a basic block out of a space using only simple geometric shapes. The goal is to get a silhouette of the intended design.
Kismet
-A graphical interface for front end programming. <http://udn.epicgames.com/Three/KismetHome.html> [Accessed 2 November 2012 ].
RPG/Role Playing Game
-A game in which the player controls one or more characters, typically designed by the player, and guides them through a series of quests. Character growth in power and abilities is a key feature of the genre. (Adams and Rollings, 2007, pp.G9)
Borrowed terminology from Designing Better Levels Through Human Survival Instincts (Totten, 2011).
Narrow Space -
A small enclosed space where the occupant feels confined and unable to move. These spaces create a sense of vulnerability in the player's inability to properly defend themselves.
Intimate Space
-These spaces are neither confining nor overly large. While they can be large in overall scope, everything in the space should be immediately accessible to the player and within reach of their avatar and their inherent abilities.
Prospect Space
-While this space is the exact opposite of narrow spaces, it produces a somewhat similar effect. Coined by architectural theorist Grant Hildebrand, Prospect Space describes a
spatial condition that is wide open, within which the occupant is exposed to potential enemies.
Refuges
-Refuges are places like caves and tree covered areas where early humans could look out into the Prospect spaces of wilderness and evaluate potential threats.
Height -
The key distinction is the security of the high point and the nature of the area around it.
Terminology borrowed from Filmmaking For Dummies 2nd Edition (Lewis, 2009).
Coverage
-Coverage is catching the same action from different angles so that the continuity of the shot
is logical. It can be done with several cameras or, as is often done on low-budget
productions, by placing the camera in a different position and repeating the action. (Lewis, 2009, pp.220)
Cutaway
-A cutaway is a shot of something that actor looks at or something that is not part of the main shot – such as a clock on the wall or another actor reaching to what's going on in the scene. (Lewis, 2009, pp.220)
Wide shot
-A wide shot (WS) reveals where the scene is taking place. -Also referred to as a long shot or
master shot, a wide shot helps orient the audience. A wide shot also gives the actors room to
move within a shot, without the camera having to follow them. (Lewis, 2009, pp.223)
Medium shot
-A medium shot (MS) is a standard shot that usually shows a character from a belly button to slightly above the actor's head. A medium shot is more intimate than a wide shot, but
provides more breathing space for the actor than a close-up. It's also used when you have an actor holding something in the frame or elaborating with his hands. (Lewis, 2009, pp.224)
Closeup shot
-“A close-up shot (CU), or single, is usually from above a person's chest or a nape of her neck to just slightly above the top of her head. If you get in closer, so that the actor's head fills most of the frame, you have a tight close-up. Going in even tighter, to a person's eyes or mouth gives you an extreme close-up. Close-ups create a sense of intimacy and the feeling that you’re involved in the in the scene. They also reveal emotion in the eyes or the hint of a smile.” (Lewis, 2009, pp.226)
Highangle shot
Lowangle shot
-Low angle shots make subjects look more imposing. (Lewis, 2009, pp.227)
Pacing
-The length of shots and scenes gives the entire film a pace – a feeling of moving fast or slow. (Lewis, 2009, pp.234)
Matching shots
-You want to join static shots with static shots, and moving shots next to other moving shots. If you have a fast-passed car-chase scene and the camera is moving wildly to follow the action, a sudden static shot of a car sitting quietly at a stop light will be jarring. (Of course, that may be the effect you want.) (Lewis, 2009, pp.234)
Varying the angle and size of shots
-A jump-cut happens when shots that are too similar in appearance are cut together, making the picture look as if it has jumped, to that the actor has popped from one spot to another. In order to avoid a jump-cut, you need to vary the angle and size of the next shot. One way to avoid a jump-cut is to shoot a cutaway of an actor's reaction or of a significant object on set that you can use to tie two different shots together. An appropriate cutaway can often save the day. (Lewis, 2009, pp.234)
Composition Terminology
Left/Right Rabatment
-It’s the perfect square found inside any rectangle (the rabatment’s sides are all equal to the short side of the rectangle).
<http://emptyeasel.com/2009/01/27/how-to-use-rabatment-in-your-compositions/> [Accessed 2 November 2012 ].
Rule of Thirds
-The rule of thirds suggests that the viewer’s eyes naturally go to certain points of interest in the photo and not to the center.
<http://enchantingkerala.org/digital-photography-school/rule-of-thirds.php> [Accessed 2 November 2012 ].
Linear Perspective
-Lines of perspective, like paths, can be used to direct attention to a focal point in a composition.
<http://daphne.palomar.edu/design/gestalt.html> [Accessed 2 November 2012 ].
Headroom
-Headroom is the amount of space between the top of someone's head and the top of the frame.
<http://www.videomaker.com/article/9231> [Accessed 2 November 2012 ].
Leadroom
-(Note: Used interchangeable with Lookroom which is a static objects variant of Leadroom.) Moving objects such as cars require a similar buffer called 'lead room.' Allow extra space in front of a moving car so that the viewer can see that it has someplace to go. Without this visual padding, the car's forward progress will seem impeded.
<http://www.videomaker.com/article/9231> [Accessed 2 November 2012 ].
Camera Pan
-Moving the camera lens to one side or another. Look to your left, then look to your right - that's panning.
<http://www.videomaker.com/article/14221> [Accessed 2 November 2012 ].
Appendix
Jonas Lewis, Youtube, 2012. Appendix:”Synergy(2012) Demonstration” [online] Available at:
<http://youtu.be/Ptt2nFUUQTg> [Accessed 12 November 2012 ].
Appendix:”PriorPark.jpg”
[online] Available at:
<http://www.designersnotebook.com/Lectures/Rethinking/PriorPark.jpg> [Accessed 20 November 2012 ].
Appendix:”AdvancedGameProjectPost-mortem.pdf”
Advanced Game Project Post-mortem
Advanced Game Project
Course Head: Adam Mayes
Jonas Lewis 31/03/2012
Table of Contents
Abstract...3 Introduction...4 Methodology...5 Plan...5 Execution...7Week 08 Planing/Proposal (Appendix:3 - Weekly Summery 1)...7
Week 09 Project Initiation (Appendix:4 - Weekly Summery 2)...7
Week 10 Iteration Refinement (Appendix:5 - Weekly Summery 3)...7
Week 11 Iterative Rebuild (Appendix:6 - Weekly Summery 4)...8
Week 12 Iteration and Finalisation...8
Execution Analysis...8
Results...9
Results Analysis...9
Discussion & Conclusion ...10
Abstract
Throughout the past five weeks, we were asked to plan, execute, and report our finding for a game design orientated project where the results were to be tangible, and presentable in a format so to show that a iterative process took place in the production of a product; the final result.
Introduction
During the five weeks of which this production took place, we initially planed, and partook in weekly seminars whilst producing our projects products. During weekly seminars, we sat down in groups, and discussed our individual project successes and downturns. In the hope that others experiences and knowledge might contribute to one-another problems. As well as checking off that we were not stagnating in our work.
The writing of weekly summaries tied into this process where we were to analyse our previous weeks progress and hold a light reflection on our progress, which essentially served as a formal version of the points that were to be taken up during the seminars.
Throughout this paper I intend to present my project from its embryonic-like planning stage to its fully developed product form. Be it even though it lacks one limb in the end.
I will be analysing my working process and results, to further my understanding of what I have done in the past five weeks, as well as you, the reader.
Methodology
Prior to the course, considerations about merging my further learnings of the UDK framework with the course outlined end result. On top of that, my ambition was to make preparations for my coming game project.
Plan
Reading over Appendix:1, an in-depth look of my initial plan can be found. Bellow however, an exert from that project plan can be found. It outlines my goal-set for each passing week, and the work required to do so.
“
Week 08 planning/Proposal
• Write Project Plan; outlining purpose, reasoning, and goals for the project. • Write ; talk about what I achieved in the past week.
Week 09 Project Initiation
• Tweak Level Design Document; add missing pages to document, so to outline all intended areas for the final build.
• Continue Work; having started with “Iteration 1” in the previous course, I continue to finalise the design, by adding the missing aspects.
• Research; considering I do not have all the skills I need just yet, some time will be invested into finding out how to do some of the camera work in UDK.
• Write ; talk about what I achieved in the past week.
Week 10 Iteration Refinement
• Iteration 1 Upgrade; taking the finalised first draft of “Iteration 1”, and tweak it, so that under the current design, everything works as it should.
• Write ; talk about what I achieved in the past week.
Week 11 Iterative Rebuild
• Rebuild; Taking knowledge and ideas from “Iteration 1”, I rebuild everything from scratch, so to create “Iteration 2”. World size and camera focal lengths are among the revisions.
• Write ; talk about what I achieved in the past week.
Week 12 Iteration and Finalisation.
• Iteration 2 Final; having rebuilt the level I proceed to make sure everything is up to standard. The level itself should be playable from start to finish, with near zero hitches.
• Write ; talk about what I achieved in the past week.
• Presentation; if we are to hold them, that is.
As stated in Appendix:1, I decided to hold my plan somewhat vague, to keep my work flow flexible. Though another guideline for my progress can be found in Appendix:2, which is my level design document. It acts as a specification for what my environment needs to act and function as. But more so, it puts a lot of focus on the camera workings.
The problem or notion I set out to solve and work towards can be paraphrased as the following;
“Effective communication though camera work within level design.”
A sub-goal being that this communication was not only to convey effective play cues, but narrative context.
The basic idea was to build a level where positioned cameras communicate environments and settings a-kind to the idea of backdrops communication within cinematography. Whilst still retaining the playability and functionality of a camera needed for a 3rd person action/adventure
Execution
Appendices 3 through to 6 outline detailed descriptions of my work execution though the weeks, as well as mention the hitches I encountered along the way. In this section short outlines of my achievements each week will be described.
Week 08 planning/Proposal (Appendix:3 - Weekly 1)
The initial week was project planning, I had a clear outline of what I wished to do, and the week more or less went to the structuring of that project plan. I was also lucky enough to had have started on my work in my previous course 3D V: Realtime 3D. This however only extended to a vague start on the overall white box environment for 'Iteration 1'. I at this time also found myself concert about weather or not the time ahead of me would be enough.
Week 09 Project Initiation (Appendix:4 - Weekly 2)
Having the first week pass for the project work, I had dedicated time to putting up my white box, and testing my first sets cameras. I also found myself in a bit of a hard place, because some of my planned ambitions for some of the camera work were being unaccommodating, meaning I would have to dedicate more time to research, in particular to the UDK Matinee system.
This week was also the first time I tried to use the SeqAct_CameraLookAt command in UDK. Which proved difficult to find any information about, and ultimately left me having to postpone my thoughts of using it, while continually trying to find more information about it.
Though with these hick-ups, progress still felt good. I was to refine 'Iteration 1' in the coming week.
Week 10 Iteration Refinement (Appendix:5 - Weekly 3)
This week was a great week for progress. I managed to clean up my camera work in 'Iteration 1', as well as rid my cameras of a horrible shacking feature that was present when the player moved with a camera attached. I had now come to terms with how UDK wanted to work, with the thing I wanted to do, and as such, the whole experience started to become a more smooth ride.
The one major fall for this week was the total lack of wrapping my head around the
SeqAct_CameraLookAt command, an essential part to a set-piece I wished to have where a camera follows the player from the centre of a spiral staircase. What ever I tried was to no avail, even now that I had my head wrapped around Matinee and all the other cameras. But I did plan to continue my research about the spiral staircase camera in the following week, as I felt it was a key aspect I could not do without.
Though the above issue aside, I felt that I had prepared enough for the rebuild, and was ready to tackle it head on.
Week 11 Iterative Rebuild (Appendix:6 - Weekly 4)
'Iteration 2' started with me sorting out some of my measurements, as well as make small
changes to the actual level design, such as adding a new set-piece in a section I felt was a tad too mundane. All other aspects were smooth sailing, as I knew what I needed to do, and how to do it. Nothing was no longer unclear, as I had done adequate work leading up to this moment.
That said, the spiral staircase still gave me trouble, and by this point, I was starting to lose hope in it ever being achievable in the time I had left.
Week 12 Iteration and Finalisation.
Though this week lacks a , I continued my work as intended. All the polish was added to the level, and the week itself was rooted in pure refinement. I had however by now given up entirely on the spiral staircase, as I wanted to dedicate my time in the best way possible, which was to make what looked already good, look better.
My work did become finished, and the presentation gave me some insight on my own efforts. I was also made aware of some aspects that might need some reconsideration, especially in regard to how the cameras control in regard to character movement, which I have taken on-board for the next stage of use this level design will serve.
Execution Analysis
In regard to my plan, and my progression, I would say that overall I successfully did what I set out to do. From holding my deadlines on when I had to be done with Iterations, to each weeks small progressive steps.
Though my initial plan was vague, I also think my work show that I did not stray from my intentions. Even if it is fair to say that following a vague outline is easier than a definitive one, I would believe the opposite. However, my choice having resonated with the way that I work best, the outcome is not so surprising. But whilst using a vague plan, even so, a risk that could have transpired was that I was lead astray, something which thankfully did not occur.
My early concerns about the constrained time are also worth noting may have been born from project plan's openness. It would be fair to say, that these concerns were laid to rest, with every week that passed, as I could measure my progress against the plan, and see that I was in fact on schedule.
Results
The final product I ended up producing was a playable level, where for the most part, the camera moved in a fluid fashion, whilst the level design and the players objectives were
communicated effectively in each shot, according to my planning.
Aside from the very blatant physical result, I acquired a great skill-set, and changed understanding of the UDK framework, something which at the start of the project, I was only slightly familiar with.
It should also be mentioned that the product I produced, will go on to be the base iteration for my end of year game project, where the design, and camera set-ups are to be used in the game my group will be showing at the Gotland Game Conference 2012.
Results Analysis
As I have reflected upon slightly in earlier segments, I think the progression from idea to result was a consistent progression. My clear vision being a key factor to my success, having chosen a topic that I feel strongly about personally, as well as work whose progress had me carrying the weight of others success, in the case of my end of year project group.
Also worth mentioning is that; along the way of building, and testing I did encounter some design issues, where I changed the design of the level or a specific camera, something that I never reflected back into any sort of record. Which in terms of the result as a whole, outside of the product produced, might not stand high on anyone’s best practice listing.
Another noteworthy aspect is the reality of the time I wasted. Not only on trying to find out how to create or complete specific designs. But also out of my sheer casual attitude to the work.
Discussion & Conclusion
I am at a loss of what else to say. I am pleased with my effort, and work. I have a hard time imagining it could have gone better. At least disregarding the spiral staircase issue.
Even so, I must mention that the lack of the spiral staircase still lingers as an unarchived goal, and something that I wished I had achieved in the time I worked with this project. That said, I do not consider the resulting product weaker for this reason, it is purely my own crushed ambition in not having attained control of the aspects needed for it to function. I am still also convinced it is possible, though that I have yet to come across the knowledge of how I go about doing so.
I also strengthened my understanding for progressive iterative work, and the importance of planning. Two aspects which, by nature, from time to time, I chose to disregard under the notion of “Doing it right from step one.” If this experience is anything to go by, then, perhaps in the future, I will reflect on the successes here, and act accordingly against such notions.
Appendix
Appendix:1 - Camera Level Design Project Plan (After Appendix:6)
Appendix:2 - Level Design Document: Synergy (See: Appendix:”SynergyDocJonasLewis.pdf”)
Appendix:3 - Weekly 1 Appendix:4 - Weekly 2 Appendix:5 - Weekly 3 Appendix:6 - Weekly 4
Appendix:3 Weekly 1 Planning Jonas Lewis 27/02/2012 HGO
Not really much to say, I did some planning. Overall I had a clear vision of what I wanted to do, so I just ran with it. Bellow is an exert from my planning documentation, that outlines what a chose to work with, and why.
“Initially, my intention was to develop a level design that was 'interesting'. The more I thought about the word 'interesting' the less apparent the meaning of the word became. So I chose to focus on aspects that the genera of game that I will be working on for my end of year project do not usually seem to consider.
Most 3rd person Action/Adventure games tend to give the player control of their camera, but what is the purpose of this? In part, I can agree that it is a users right, when placed in a open world, to have the freedom to look at whatever they wish. However that says nothing specific about the level design. It forces environments into a place where they must conform to the idea that they may be viewed from any angle. Thereafter hoping the user does 'the right' thing.
What I wish to do, is put more power in the hands of myself as a designer, to use cameras in the same way film would, to convey specific scenes or set pieces. In turn making me, the designer foremost responsible for the users experience. What this means is that every 'shot' will have a purpose in communicating the overall feeling and meaning of the world, and the story taking place in it. ”
Aside from the above, I have already started my project in the previous course, giving me a bit of a head start. That said, it is in no way something that undermines my planning. As for now, I am concerned I have planned to do to much, In too little time. But I will only really be sure of it by the time I am halfway though the project.
Appendix:4 Weekly 2 Jonas Lewis 05/03/2012 HGO
In the passing week, I have been putting together my white box and my initial test camera. As of now, I have left most of my work up to a very simple camera system, refraining from the use of the Matinee functions within UDK.
Overall what I have found is that for some of the things I desire to do within the level with the cameras can not be done using a quick and dirty approach. Hence in the coming days, I will be dedicating time to learning how to use Matinee.
The major pothole I fell into was that I wanted a camera to follow the player by only turning its tilt and or swivel. I am under the idea that this can be done by using a command known as SeqAct_CameraLookAt, the problem however is that for it to function with any object in the scene, all objects involved have to be dynamic. Cameras are not dynamic, unless they are part of a Matinee, and as such, if I have understood the things I have read correctly, learning Matinee should solve everything.
Other known issues is that my map at the moment, based on my design is a tad out of scale, an aspect which will be revised in the coming rebuild.
Reflectively, I think my work overall is making okay progress, though actually starting my work was the hardest part. In terms of scheduling, I do believe that time has yet to become an issue. That said, I do still see myself making a mad dash in the last week to finish what I have set out to achieve. Knowing that however, prepares me to at least attempt to circumvent the issue.
In the week to come I will be putting my focus on making this first build everything I need it to be. The second build will be more sophisticated, sporting a more detailed white box environment as opposed to my current one, that is very much made out of cubes in different shapes and sizes.
The two builds will make for a good demonstration of contrast in the last weeks in terms of my findings for the presentation at the end. Other than that however, I do not know what else to mention.
Appendix:5 Weekly 3 Jonas Lewis 14/03/2012 HGO
In the past week I set out to do what I thought I would, which was to tweak the work on my first iteration so that the second iteration could be built this coming week.
I am not sure if I have brought it up before, but one of my major gripes with the cameras has been a shaking feature that comes with the cameras as sort of a standard. Or so I thought. I managed to get rid of it in the past week, and for the most part, the camera does exactly what I wish it to do at all times. This along with a few other small fixes, as well as myself coming to terms with how UDK operates made for a relatively smooth cruise in the past week.
However this is not to say I have been entirely revealed from issues. One of which is my failure to get a spiral staircase camera to function as I wish it to. The major problem is that I do not even know where to begin with it. Currently I have thought out a 'dirty' method of solving it, but giving the one camera a series of trigger volumes so to know where the player is at all times. Though this is not something I really want to resort to, and as such I have refrained from constructing it as of yet.
The problem lies in something I believe I did mention in the past week, which was I am a tad unaware of how a particular nod within kismet works. The CameraLookAt nod, which if I have understood my investigation correct, is normally used for say, having a cannon aim at a target. My ambition has been to have the function work the same for a regular camera. I have tried a range of trail and error approaches, but nothing quite works. I managed to wrap my head around matinee, but again, cannot get it to cooperate with other functions, without one or the other taking priority. Asking around in different online communities have left me with suggestion that I am better of programming a specific camera for it, that is however outside of my skill set, and not something that I will be able to within the constrained time remaining.
All the above said, I feel I am ready for the rebuild, now in the coming week. I will be making a few major changes such as adding functional doors, trigger events and a few measurement changes to some aspects of the terrain. All of which I feel I will have very few problems with at this current stage.
I will also still be investing time into finding out how to make the spiral staircase camera, as it is something I really want, if only because I believe it to be a easy thing that I have yet to actually get my head around.
Appendix:6 Weekly 4 Jonas Lewis 19/03/2012 HGO
About the spiral staircase... as it would seem, progress as stagnated, from what already was a halt.
Now that I got my major grip out of the way, I am not really sure what else to say considering the last meeting was not so long ago. I went underway with my rebuild for my level design. Taking into account all the changes I wished for, and so far I can say I am far more pleased with this iteration that I was with the last, which is good, because that is how iterations should work. I am using Matinee for all or most of my planed movable objects, which makes the whole level in itself feel more complete.
I really do not think that I will encounter much to any difficulty at this stage. All I have to do is nip and tuck it real tight, so that it actually feels as complete as I want it to. Well at least as tight as a conceptual white box can be.
I suppose I have started to think about what I intend to do with my presentation. Considering I kinda find Power Points to be the bane of humanity, I will most likely just sit and show off my level within UDK, and talk about my iterations, troubles and successes in a more casual than structured fashion. If that fills the criteria that is, but I will probably take this up during the meeting all the same, just to make sure.
Most likely going to start writing my paper in this coming week or so, along side the touch up work on my level, as it is not entirely finished just yet. But it is no hard task to juggle.
In closing, I am not really sure what else to say, everything is rolling on smoothly, and I have not a trouble in the world. I will most likely, probably, yes, be done in time for the hand in and presentations, and I believe that I have enough material to write my paper on when the time comes for me to do so. The only thing I have not done, though it was not in the plan as such, was talk to someone about the composition and so forth of my work, and the cameras in the world. I never set it as a top priority of any sort. In fact, it was probably my lowest of priorities therefore it did not happen.