Beteckning:________________
Faculty of Engineering and Sustainable Development
Keys to Effectively Create Realistic Fur in Autodesk Maya
Annica Normann June 2012
Bachelor Thesis, 15 hp, C Computer Science
Creative Computer Graphics
Supervisor: Stefan Seipel
Examiner: Sharon Lazenby
Keys to Effectively Create Realistic Fur in Autodesk Maya by
Annica Normann
Faculty of Engineering and Sustainable Development University of Gävle
S-801 76 Gävle, Sweden
Email:
annica.normann@gmail.com
Abstract
The tools for creating realistic fur using a computer have continued to develop since the first computer-generated fur was accomplished. Tools for creating fur can be found inside of the software Autodesk Maya. Rendering fur is often a very time consuming process and therefore this thesis investigates how the relationship of realistic fur versus render time can be improved. When creating fur, there are several aspects to take into account, for example shadowing, length, color and irregularities.
This thesis assesses the question through a case study and includes experimental research which was attempted simultaneously. It valuates the results through a survey. The qualitative research does not include animated fur, only still images of computer-generated fur. This research will hopefully improve the knowledge and act as a guide for others who are creating fur.
Keywords: fur, Autodesk Maya, rendering, realistic, settings, survey
Table of Contents
1 Introduction... 1
1.1 Background ... 1
1.1.1 Fur on Film ... 1
1.1.2 What is Realism? ... 3
1.2 Aims of Research ... 4
1.3 Limitations... 4
1.4 Research Questions ... 4
2 Theoretical Background... 4
2.1 Modeling and Rendering Fur... 5
2.1.1 Modeling Fur ... 5
2.1.2 Fur-styling ... 5
2.1.3 Lighting and Reflections... 6
2.1.4 Rendering Fur ... 7
2.2 Autodesk Maya... 7
2.2.1 Tools and Attributes ... 8
3 Methods ... 10
3.1 General Approach... 10
3.2 Autodesk Maya Attributes... 10
3.3 Rendering ... 11
3.3.1 Maya Software... 11
3.3.2 Mental Ray ... 11
3.4 The Survey ... 12
4 Results... 13
4.1 Rendered images ... 14
4.2 Computer Information ... 15
4.3 Systematic Evaluation ... 15
5 Discussion ... 18
5.1 The Fur ... 19
5.2 Render Time ... 19
5.3 Other Aspects ... 20
6 Conclusion ... 20
References... 21
Appendix 1: Fur Survey ... 22
Appendix 2: Fur Survey - Question Results ... 32
1
1 Introduction
In the growing industry of 3D and visual effects, the possibilities of what they are able to do and continue to make it realistic is developing all the time. And as realism improves, the tools and most importantly the render-time also improves. The industry, which depends on a number of different aspects, is a time-consuming business and saving time means saving resources. It can also be very important to speed up the process when creating, for example, a film to be able to release the material earlier.
Rendering computer-generated fur is one of those render-heavy “effects” which is developing more and more. Fur is on many animals, and can be used for humans as well, and without it on computer generated animals, it will take a great deal from the realism. This thesis will be addressing the question of what makes the fur appear realistic, although it has been computer generated, and also explore what the characteristics of fur are. It is also going to focus on how realistic fur can be created using Autodesk Maya 2012.
To visualize the problem, a few samples will be created and compared using a survey. What will be compared are the methods, realism and render-time to reach a conclusion on the most effective method to create fur.
1.1 Background
The method fur is generated inside the computer has been immensely transformed since the start of Computer Graphics (CG). At the beginning, it was modeled in a method that today is very insufficient and time-consuming compared to the tools we use today which can do most of the work for us.
1.1.1 Fur on Film
This thesis is developed for improving knowledge as described below, in the Aims of Research section, with film production in mind. There is a huge amount of computer generated fur in film today and it has all been a process from developing the first fur to become the fur it is today. There are many more options available with different methods and results, however overall a great change to how it all began. Industrial Light & Magic, a motion picture Visual Effects company owned by Lucasfilm, were among the first in generating photorealistic hair and fur. It was demonstrated by the digital lion and monkeys in Jumanji which was produced in 1995. [1]
Some of the most seen and famous fur on film, that mixes filmed material with Computer Graphics, today are e.g. the wolves in the Twilight films [2], the lion and the mouse in the Chronicles of Narnia [3] and the beasts in John Carter. [4] Most of the films made are demanding more from the existing tools since what the artists want to do is so different and it is difficult to apply that into one uniform toolset. For John Carter they “developed new grooming tools.” [4]
2 The Rhythm and Hues Studios created the great lion Aslan for the Chronicles of Narnia, in 2006 see Figure 1. Because of the long hairs on the lion’s mane, there was great difficulty in getting it exactly right and to be able to control the fur. They made observations of real lions and came to the conclusion that; “Most animal fur is very stiff. Animal fur almost always moves in clumps, apparently due to hair-hair interaction.” In some scenes, there was simulation of the fur, grass and cloth which demanded interaction between the mane and the cloth but also made the scene more render expensive. For the thicker clumps of fur, Rhythm and Hues did a blend between Lambert and the Kajiya shading model, for better realism. Kajiya shading will be discussed in 2.1.4. Also, for a photorealistic fur, they had two strategies for Image-Based Lighting (IBL) where one of them was a less expensive strategy. [3]
Figure 1. Aslan in The Chronicles of Narnia (Rhythm and Hues Studios)
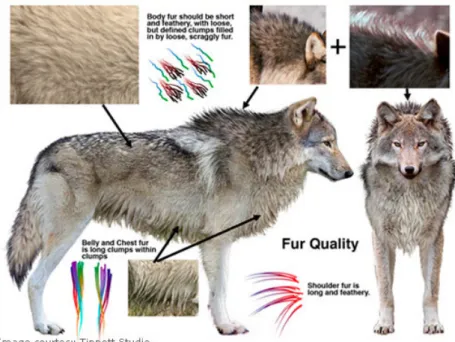
The Twilight wolves in Figure 2 are a good example of successful computer- generated fur in film. The artists of Tippett Studio went to see real wolves to study them up close as Rhythm and Hues had done for Aslan. As they were working with the fur, they saw that they needed to divide the fur on the wolves into color groups to visualize that the fur needed to be different in different areas. The artists recognized that “It's not about replicating a wolf hair for hair; it's about getting the feel of a wolf.”
The shading was a big issue and it was important to get it correct. For New Moon, it was necessary to change the whole fur shader to fit the wolves, with one shader for close-ups and one for the wolves at a distance. [2]
3
Figure 2. Reference images from the Twilight – New Moon production.
1.1.2 What is Realism?
This may seem like a redundant question with an obvious answer; however, realism goes far beyond just creating exactly what you see. There are hardly any film productions or commercials made today where color and light has not been manipulated, however we may still consider it realistic. Some claim that in order to achieve a realistic result you may need to exaggerate the colors or something else.
Also animation and other aspects contribute to making a realistic production.
Most people know how something looks and feels like, and it is a bit difficult to describe how something appears real on the big screen. Feel is a powerful sense which further helps us define reality, however it is not available.
James A. Ferwerda, Associate Professor in the Munsell Color Science Laboratory in the Chester F. Carlson Center for Imaging Science at the Rochester Institute of Technology, describes in his paper how we can evaluate the realism in Computer Graphics by looking at three aspects [5]:
• “physical realism – in which the image provides the same visual stimulation as the scene
• photo-realism – in which the image produces the same visual response as the scene
• functional realism – in which the image provides the same visual information as the scene”
Real physical realism is not only expensive and excessive but also, the devices used to display the images are not (although they are improving) good enough to deliver that level of realism. Ferwerda reasoned the models graphics and vision researchers, working together, “will hopefully be able to develop both a better
4 understanding of the complex processes underlying visual perception, and to use this knowledge to develop fast, realistic, rendering algorithms that balance accuracy and efficiency, but always maintain visual fidelity.” [5]
1.2 Aims of Research
The aims for the research are to improve the knowledge on how fur on animals should be created to obtain a realistic look. This thesis is also going to address the problem with render-time and how to keep it at a minimum.
Through working with Autodesk Maya, the process will hopefully lead to clues on realism when creating and designing the fur.
1.3 Limitations
Moreover, this thesis might mention, but will not cover, how fur is affected by animation. If the user is not satisfied after using Autodesk Maya with the advice from this thesis, it might also mention some other options. Since this thesis is focusing on still images and will leave the animation out, it is obvious that something might be lacking; “For film production, it is important to see that the overall appearance holds up not just for a still image, but also when the hair is animated.” [6] This is true, however more applicable to longer hair, for example for human hair. It is because it can be critical to see how the hair flows and moves in order to attain the intended look of it.
1.4 Research Questions
To manage this thesis, three research questions have been constructed which will be subject to discussion.
• What are the characteristics that make computer generated fur appear real?
• How do you accomplish this by using Autodesk Maya 2012?
• How can you keep realism high but render-time low?
2 Theoretical Background
A huge amount of work and studies has been performed in this area where a great deal of material was available. The method fur/hair is modeled and the methods for rendering are today very different from when it all started and is still developing. The shading, shadows and light scattering events are some of the areas where evolution has been obvious and there are still issues to be dealt with.
Fur is (similar to hair) important for characters to become more realistic and it
5 also involve a great deal of design. How the tools should work and the appearance is up to both the artists and the technicians, but the result needs to be somewhat predictable when working on the fur or hair.
In the article, An Artist Friendly Hair Shading System the authors (from Walt Disney Animation studios and University of California, San Diego) describe a shader used for e.g. the animated film Tangled. The authors argue that “The appearance is the result of a creative process and the most important criterion is that it is aesthetically pleasing and that it fits within the universe of the character. This definition subsumes
“photorealistic” as a special case, but in general it is much broader.” [6]
2.1 Modeling and Rendering Fur
At the beginning, fur was modeled using a more manual method, today it is more easily generated automatically with just a push of a button. Fur may, at first hand, appear as something that is very easy to apply and gain a realistic look; however it is actually very complex. In the past, much research has also been focusing on achieving a, so called, correct result (using physically based shaders) which does not allow too much controllability. It is becoming more and more important that also the creators (artists) have tools that are intuitive and encourages the creative mind. [6]
2.1.1 Modeling Fur
The characteristics of fur that are most discussed and appear to be the most important to achieve are the shadows, color, length, light, shape and gravity. Light foremost include the Specularity (and Anisotropy) or light scattering in the fur. All of the characteristics are important, however, it is the irregularities that make the fur appear more photorealistic and can convince the human eye. Adding to this is aspects concerning density, mapping, transparency and other details.
The authors, of Adv. Productions Inc., Iones A, Krupkin A, Volodarsky S, Zhukov S, of Fur and Hair: Practical Modeling and Rendering Techniques lists a series of effects that can be useful when creating fur; “curls – grouping hairs to simulate hair clumping; tension – within curls, and tension to the given control hairs;
length variation – change the lengths of individual hair strands; waviness – controls how wavy hairs are related to just interpolated ones.” [7] These appear to be good clues and are elements in Maya that the user is able to manipulate. Just adding simple straight hairs does not make a very realistic animal.
2.1.2 Fur-styling
As mentioned, fur is defined by many characteristics and through studies of previous work in this field it appears that in order to style the hair in the precise manner there needs to be good predictable tools. An article about hair, An Artist Friendly Hair Shading System claims that “physically based shading models fail to provide intuitive artist controls.” This implies that the tools are not sufficient to inspire an artist to create the fur/hair and lack in logic. It is better for the artist to have greater control over what he or she is creating. They have created a hair shading model of their own
6 which has been used by famous companies such as Walt Disney Animation Studios.
[6]
When creating fur, there are different tools that can be used with different user interfaces. There are tools that use the computer to cut virtual hair similar as a hairdresser, perhaps thinking this might seem natural and most comprehensive.
However according to the authors, Iones, Krupkin, Volodarsky and Zhukov, of Fur and Hair: Practical Modeling and Rendering Techniques, this is not at all as good as the intention might had been; “after a series of experiments, we found that these concepts are too vague and difficult to control by an end-user.” [7] The authors instead favored what they discuss in their conference, Individual Control Splines. Also, they wanted some control hairs as opposed to a multitude of individual ones which takes far too much time and energy to achieve a good result.
However as opposed to this are the authors, Gang Yang, Hanqiu Sun, Enhua Wu, and Lifeng Wang of Interactive Fur Shaping and Rendering Using Non-uniform- Layered Textures, whom have developed tools with similar features as described above, for example combing the hair, and then claiming it to be a more intuitive method to create fur/hair. The article further suggests that Autodesk Maya is not the ultimate tool for creating fur since the fur cannot be shaped while seeing a realistic preview rendering of it. [8]
Another characteristic that is common with fur is a clumping effect which is apparent when the fur is dry but also, most significantly, when the fur is wet. Armin Bruderlin from Sony Pictures Imageworks (in Culver City, CA) describes, in the article A Method to Generate Wet and Broken-up Animal Fur, a possible method for creating fur that is affected by water and separated fur in patches. It addresses the issues when fur comes in touch with water and also how the patches are affected by animation, with reference to the film Stuart Little. [9]
2.1.3 Lighting and Reflections
When handling objects which include a multitude of smaller objects attached to it, such as trees with leaves or fur with a huge amount of hairs, there are many things to consider. Iones, Krupkin, Volodarsky and Zhukov suggest that the “hair illumination model” and lighting on the fur/hair is a complex issue; “hairs are anisotropic and highly specular, and they produce haloing effects under backlight conditions.” [7]
They acknowledge the difficulties of aliasing, shadowing and self shadowing, and discuss the importance of shadowing as a part of realistic looking fur/hair. And they also use something called a “shadow buffer; “Shadow buffers are created for all light sources, that helps to account for both shadows and self-shadows.” [7] These are also important to take into account when creating fur. Anisotropic Specular is even more important and visible in fur or hair that is animated.
Steve Marschner at Cornell University describes that it is not feasible to model each strand (fiber) and later compute the reflection on each one of them, since they are too many. “Instead, hairs are modeled as 1D curves with a small thickness.” [10]
7 2.1.4 Rendering Fur
Rendering has been created in a number of methods. Some of these methods were more successful than others and led to a progression of the same.
Kajiya and Kay at Institute of Technology in Pasadena in 1989 developed a rendering method for fur by using three dimensional textures, which is noticeably well known since there are many references to their article. It is often referred to in studies about fur and rendering fur. Kajiya and Kay solved the problem of rendering fur with
“a method for rendering scenes with fine detail via an object called a texel;a rendering primitive inspired by volume densities mixed with anisotropic lighting models.” [11]
This method also solved problems with aliasing that occur when objects that have a high level of detail are modeled.
Kajiya and Kay looked at several other methods for creating and rendering fur, including the one by William Reeves. Reeves’ was one of the first to successfully render complex scenes by using particle systems in 1983. [12] Particle systems solved most of the issues that surface-based fur had and the particles also had the advantage of being easily motion blurred. This method also reduced computation time.
In their article, Real-Time Rendering of Human Hair Using Programmable Graphics Hardware, the authors, Martin Koster, Jorg Haber and Hans-Peter Seidel, at MPI Informatik Saarbrücken, describe algorithms for rendering fur, taking into account that the hair is anisotropic, shadowing and other characteristics. The rendering was accomplished using fragment programs tested on several different graphics boards. [13]
Terasawa and Kimura, from College of Economics at Nihon University in Tokyo, believed that the rendering process should be divided into a “local phase” and a “global phase,” where the local phase represents what the features of a smaller specific area are and the global describes details such as the shape. [14]
2.2 Autodesk Maya
Autodesk Maya is a well known software used by students and companies all over the world. It has many strong points but also a few setbacks. This thesis is looking first and foremost at the fur tool and what is possible to achieve with it. However when working with fur that is intended to be of the longer style, then it is better to use the hair tool for a more satisfying result and for better controllability. This is also suggested by Autodesk in their manuals. [15] To add manageability to short fur, it is also possible to use “hair” as control curves and use them to control the behavior of the fur.
In Autodesk Maya the process of creating fur can be divided into 6 main steps:
• Create or select a model on which to add fur.
8
• Create a texture for the skin/surface (underneath the fur).
• From the menu, add a Fur Description/Fur Preset to the model.
• Manipulate parameters, settings and use other tools, e.g. Paint Fur Attributes.
• Render an image to view the outcome of the fur.
• Repeat step 4 and 5 until the correct appearance is achieved.
These are, as stated, main steps in a very simplified version. There is a huge amount more details to this than can be mentioned here.
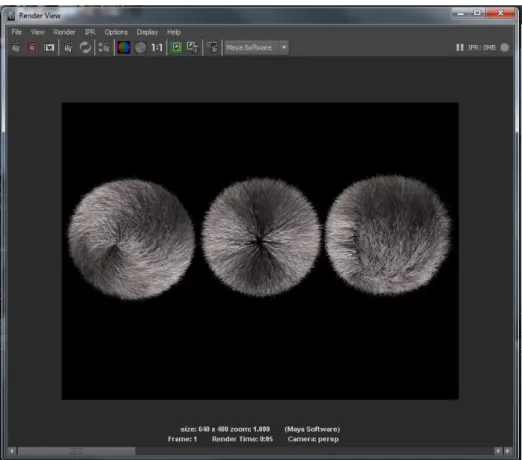
When applying Maya Fur to different surfaces (NURBS, Subdivisions or Polygons), the fur can be seen to behave quite differently. Most obvious is that the direction of the fur is different depending on surface type. This behavior is noticeable if fur is applied to spheres. Question is whether there is a surface type that is more suitable for fur. According to Autodesk, they suggest to always use Polygons when possible. [15] The fur hairs settles on the Polygons straight out, seams are at the top and bottom as in Figure 3 and actually might be a good predictable starting point.
Rhythm and Hues Studios created the fur for the mouse Stuart in Stuart Little and used NURBS patches to apply it to. [16]
Figure 3. Fur attached to NURBS, Polygon and Subdivision.
2.2.1 Tools and Attributes
Autodesk Maya offers a wide range of settings and Presets. The Presets are in a form of fixed fur samples to be used for example a bear, raccoon, sheep or squirrel. The Presets deliver a standard that needs to be adjusted and is not as perfect as it could be
9 at the first appearance, see Figure 3.
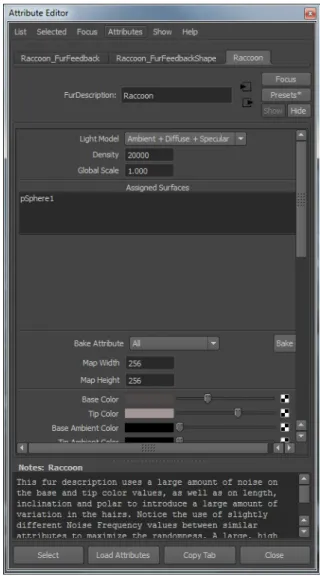
The tool that is most focused on manipulating fur is called the FurDescription node, see Figure 4. The node appears as a tab in the Attribute Editor when the fur is created. This contains all of the attributes with parameters to manipulate a realistic appearance of the fur.
Figure 4. The Attribute Editor for FurDescription.
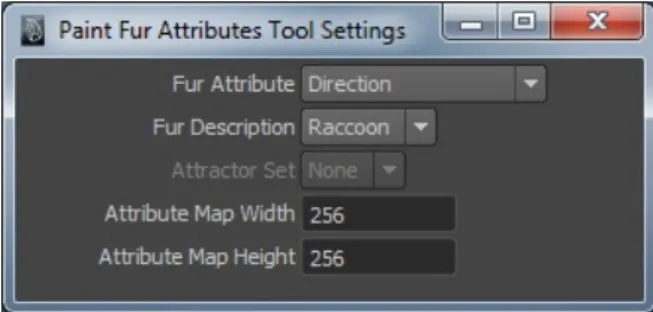
Although, it is possible to manage a good appearance by toggling the switches under the FurDescription tab, it has its limits. It is not possible to change the direction of the fur in the middle of a patch. There is also the Paint fur attributes tool which allows the user to manipulate the fur even closer. It is used similar to a brush and then paint the attributes (Length, Scraggle, Baldness etc.). It is possible to see how the tool affects the fur; either see the strands being manipulated or choose to display color feedback. This tool works similar to a comb and scissors and is very useful for when something specific is needed, for example shorter hair in a particular area or more/less clumps in another area, see Figure 5.
10
Figure 5. The Paint Fur Attributes Tool box.
It is essential that the fur, even the Presets, is adjusted in order to achieve that realism that is not possible by using a predefined Preset setting.
3 Methods
Part of this thesis project is a case study that includes experimental research. This study has investigated the tools for fur and also used them experimentally to identify the most effective method to create realistic fur. The data obtained during the experimental process of this thesis is mostly qualitative. Some research was needed to find out more about fur. While research and experiments were made, tests were attempted and recorded simultaneously in Autodesk Maya on rendering. One of the great issues was moving from knowledge to actual implementation of it. Another possible problem was the decision whether an image was realistic or not. However, this was resolved with a survey to receive other opinions and point of views.
3.1 General Approach
Through using Autodesk Maya and a survey, this thesis approached the research questions stated at the beginning of the thesis. A huge amount of studies in this area have shown that there is a great interest in fur and managing references was not an issue.
3.2 Autodesk Maya Attributes
Autodesk Maya was used for producing the fur patches for the survey. The images were rendered using different settings and varying use of tools. There were experiments made on how much I could push the limits of each “step” of the settings.
The first step was adding fur and changing all the parameters available to achieve a fur that was as close as possible to the real fur. An image was rendered, see Appendix 1, page 24, bottom image.
Then, the second step was to add noise to these parameters for a more uneven look. A second image was rendered, see Appendix 1, page 24, top image.
The third and last step was to add the use of Paint fur attributes tool for an even
11 more customized look of the fur. These three steps were rendered using both Maya Software and Mental Ray, see Appendix 1, page 23, top image.
Although the Paint fur attributes tool is a little difficult to handle at the beginning, it was good for this project for closer manipulation of the fur. It should almost be mandatory to use on the fur since the possibilities when using it increases largely.
3.3 Rendering
Autodesk Maya offers two rendering engines for rendering fur; Maya Software and Mental Ray. Mental Ray is known for creating more realistic renderings, however at a cost in render time. Maya’s Fur plug-in works with both engines and delivers a great result in both. Rendering can easily amount to a great expense in time and if rendering a sequence, it is likely that it has to be rendered more than once, especially when working towards a client. Therefore cutting render time can be important and that involves images with a high level of detail, such as those that contain fur. It is also desirable to eliminate any problems with aliasing which is common when rendering those sorts of images.
Important item to remember is to press the "Bake" button in the Fur Description node in order to save all the changes where they will appear when rendered.
3.3.1 Maya Software
Using Maya Software for rendering is pretty straightforward and easy to use. For Maya Software, it is important to remember to add fur shadowing to the lights, otherwise it will not render. Maya Software can create a great result at a low cost in render time. An advantage with Maya Software is the object and fur can be kept separate when rendering, otherwise different layers will be needed. The function of rendering the object and fur separately is located under Fur render settings.
3.3.2 Mental Ray
Mental Ray has a many more options available as opposed to Maya Software. It is also known for creating more realistic images, thanks to Raytracing. When working with Mental Ray, it becomes obvious that the quality settings are dependent on each other.
Some options are only available when another option is chosen.
The Mental Ray render settings contain a list of quality presets that are supposed to be optimized for different needs. The best, superior to Draft and Preview, is known as the Production one, however there is also the choice of manipulating all the settings on your own, which is known as Custom. However, the superior Preset is called Production: Rapid Fur which dramatically shortens the render time compared to just Production, see Figure 6.
12
Figure 6. The Render Settings window.
If Raytracing is used in Mental Ray, the render time will increase, however by combining it with the Raytrace acceleration, the same good result can be achieved without losing quality, and in less time. [15]
3.4 The Survey
For this thesis, it is suitable to conduct a survey to collect others’ opinions and ideas on how they perceive real fur compared to computer generated fur. The survey was executed via a webpage offering free surveys though with some limitations.
To avoid biased opinions the survey only shows patches of fur, at a high quality.
The patches are a mix of real fur and fur re-created in Autodesk Maya. The participants are also unaware of what animals the fur images are from. All the questions are marked as mandatory to receive access to the next question however there was no time limit on any part.
The survey consists of four parts and finish with two questions. The questions were:
• What made you think the fur was real or fake?
13
• What do you think characterises realistic fur?
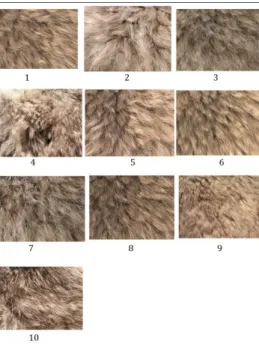
The first part of the survey shows the participant nine images of different types of fur simultaneously and is asked to point out the real fur patches. The second part shows the participant eight images of rabbit fur, one at a time, and is asked to mark if it is “real” or “fake.” The third part is a reprise of the second part but in different order. The fourth part shows the participant all of the ten patches of rabbit fur as shown in Figure 7 and he/she is asked to point out the real fur.
Figure 7. Part four in survey 2.
Unfortunately due to practical issues, the test was forced to be divided into two separate tests which led to a significant loss in answers on the second part, although it was clearly stated both parts needed to be completed. The first test contained part 1-2 and the second test contained part 3-4, plus the questions.
Although there were some issues by using this form for the survey, it received a huge amount of answers and results. It is valuable information that contributes to the knowledge needed in this thesis although it was difficult to control how the participants answered.
The purpose of the survey was to find out if it was possible to create fur in Autodesk Maya that was convincingly realistic. The expectations on the results were that it should be difficult or impossible to tell which of the images are real.
4 Results
The results of this study have lead to a huge number of new questions that needs
14 answering. It may not be ground-breaking but perhaps it contributes to the knowledge and can help others working with fur.
The Theoretical background about how fur appears and what the characteristics are the most important has revealed a great deal. There are many factors needed to create fur inside the computer and the tools are not yet perfected. The fur tool inside Autodesk Maya has many great features and is quite intuitive to use, however it lacks features in the Paint fur attributes tool, as it is difficult to handle.
More realism often means more render time and this is true of the Mental Ray rendering engine, however it is possible to render sufficient fur using Maya Software.
In this particular project, there were only patches of fur and nothing else present in the images that could affect the result of the renderings.
While I was investigating computer generated fur, focusing on render time and Autodesk Maya, I also found a heated question about how the tools performed. There is a great deal of research made in creating realistic fur, however the tools are yet to become intuitive and easier to use for artists. In my studies, I found that the tools may be “coupled” (When manipulating one tool, others will be affected as well and that is not always what is needed). Full control is needed in order to achieve the required result. However, managing this is not as easy as it may seem. The authors of the article An Artist Friendly Hair Shading System conducted a survey and also ran a test were participants could provide their opinions on how they wanted the tools, as well as how the tools should perform. However, they also found that: “it is important to note that there is no universal ‘artist friendly’ system. Different artists often have different needs and concerns regarding the final appearance.” [6]
4.1 Rendered images
I found that Maya Software renders an image every time at about half the time as Mental Ray. For this specific purpose, the images did not need the extra qualities available with Mental Ray. Both render engines produced a satisfying result with no less realism.
Figure 8. Left image: fur with Mental Ray and right image: fur with Maya Software.
15 The image to the right in Figure 8 is also the image that received as many votes on it being real as it was “fake,” i.e. computer generated. These images display the same Fur Descriptions, however in different angles and with different amount of manipulation. And for this fur, there were three different sets of fur (Fur Descriptions); one for the main fur coat, another for the darker parts of the fur and the last one for the bright colored hairs that are a little longer than the rest. There is no default lighting in the scene, only a three point lighting system. Manipulation has been accomplished by using Paint fur attributes tool, pulling at the parameters under the Fur Description node and adding Noise, Amplitude and Frequency under the Details tab in the same node.
The quality settings for rendering with Maya software were Production highest quality and for Mental Ray it was Production, Rapid Fur plus Raytracing.
4.2 Computer Information
The computer used for modeling and rendering the images has these details:
Manufacturer: HP Model: z600
Processor: Intel Xeon Quad-core 2,0 GHz Graphics card: Nvidia quadro FX4800 Memory: 8 GB
4.3 Systematic Evaluation
By using a survey (see Appendix 1) and comparing real fur to computer generated fur, I was able to evaluate the quality in the computer generated images. The images of real fur worked as a kind of “ground truth” when the participants of the survey compared the real fur with computer generated fur. It was very interesting to see the collected opinions from people not involved in this project.
The surveys gained a huge amount of results with many answers in just a short period of time (a few days). On part 1, there were 52 responses and on part 2 there were 34 responses.
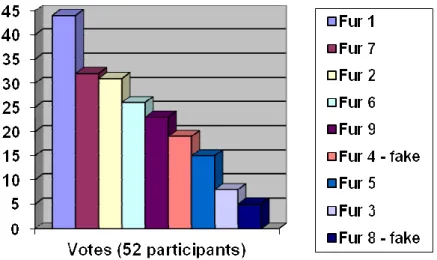
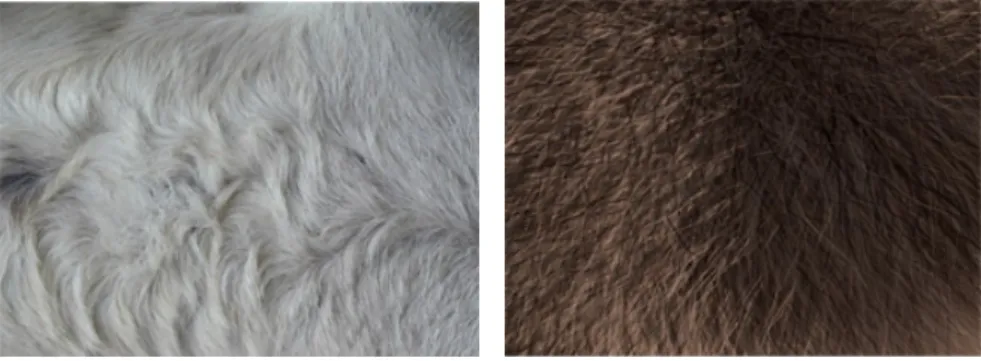
For part one inside the first survey, the results show that it is not necessarily easy to identify the real fur patches from the computer generated. This part asked which fur patches are real and it was possible to choose more than one option. The participants were able to separate the real from the computer generated pieces positively, especially regarding the two patches in Figure 10. The patches represented in Figure 9, to the left: the most convincing real Fur 1 and to the right: the least convincing computer generated Fur 8. In this test, there were 9 patches out of which only two were not real fur. The most realistic “fake” fur, Fur 4 in Figure 9, received more than a third of the participants’ votes. Fur 3 was in fact real but lacked in image quality
16 compared to all other images which had a good resolution and that was probably the reason that it received such a low amount of votes. These tests demonstrate that it is not very easy to evaluate realism from just patches of fur.
Figure 9. Diagram for the first part in survey 1.
Figure 10. To the left: Fur 1 and to the right: Fur 8.
Part two and three in the survey were similar in the fact that both contained 8 images each and they were all images of rabbit fur. Three of these images were of real fur and eight were computer generated. They were mixed up and since there were ten images available, many images were shown a second time in part three. This was intended to bring variation to the tests, but also to “trick” the participants to make another decision for the image the second time even though they had seen it before.
The results can be seen in Figure 11 where the diagram displays the votes, which are represented by percent of votes on the option “real.” About 60-75% of the participants managed to pick out the real images of fur.
17 0
10 20 30 40 50 60 70 80
V otes in percent (52 participants)
Votes in percent (34 participants)
Fur 1 Fur 2 Fur 3 Fur 4 - real Fur 5 Fur 6 Fur 7 Fur 8 Fur 9 - real Fur 10 - real
Figure 11. Diagram for the second and third part of the survey.
For the fourth part (which is in survey 2), another 10 images containing all of the patches of fur shown in part two and three were shown. In Figures 12 & 13, the real fur patches received the most votes which reveal that when seeing all the fur images at the same time helps to evaluate which are real. This part, like part one, asks for which fur patches are real and it was possible to choose more than one option.
Figure 12. Diagram for the fourth part in survey 2.
Figure 13. The real fur patches. Fur 4, Fur 9 and Fur 10.
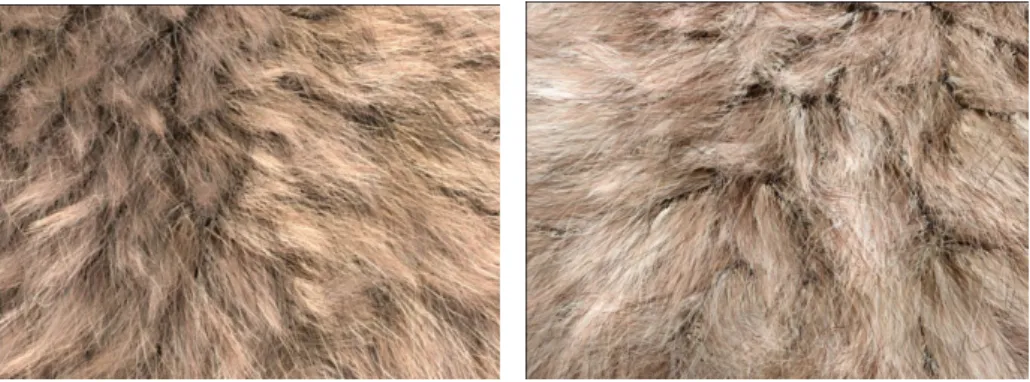
18 The images seen in Figure 14 are the ones that managed 50% votes on “real” in part two or three of the survey. However, the fur that obtained a 50% on the first part of the survey received less than 30% the second time it was shown. It can be summarized that these two images were the most successful.
Figure 14. Fur 2 (left) and Fur 7 (right) from the diagrams in Figure 11 and 12.
There were many good opinions from the survey. Many individuals pointed out variations and irregularities as very important and others commented on the characteristics that I have discovered. Some of the opinions were about color nuances, noise and grain in photos, lighting, shadows, feeling, the "not perfect" look, layers of different fur coats, reflection of light and clumps. One even believes, it is not possible to create realistic fur in CG. Although many opinions are reasonable, the votes on which fur patches were real differed from how they thought about realistic fur. All people have preconceived ideas about how something looks and feels which is very normal, however this survey reveals that the "truth" level does not match.
5 Discussion
It was very interesting to see the result of this thesis and the research questions. Most ideas that I had about computer generated fur proved to be insufficient and would not have led to any valuable results. Since I thought it was obvious which fur patches in the survey was real or not, I did not expect the votes on the fake fur (suggesting it was real) to be as many although the percent of voters were well under the percent of votes for the correct answer. The most surprising and successful result was one piece of fur, where all tools had been used and great effort was put into this image. It received a positive result of equal votes of it being real as of it being fake.
It is interesting to see that as the progress in this area is providing us better and improved programs, it is becoming more of an industry for real artists. Before, it was very technical and the artists could not use the tools, however now it is being taken over by artists, with some aid by technically oriented individuals.
Autodesk Maya may not be the best 3D software around, however it is well known and a reliable software. As it happens, it was the software that I was familiar
19 with and could manage.
I have also found that “Scraggle” is an important and valuable characteristic of realistic fur. As stated before, it is the irregularities that make the fur and Scraggle contributes to this quite effectively.
Most film productions seem to have in common to create their own programs for fur or adjust existing ones, so there is no universal great program for this type of CG.
They also develop shaders for their fur or hair, which are often called “ad hoc shaders.” [6]
When learning about 3D, film and other creative areas that use specific programs with specific tools, there are often many tutorials out there and it is common to study these when learning the tools. However, the tutorials can only present the tools that are available and not much more than that. It is the exploration of the tools that can lead to new approaches of using the tools and lead to new productions.
5.1 The Fur
Although, it was not easy to create realistic fur it was easier than I thought to trick the viewers into believing it was real. However the tools are not intuitive or sufficient enough to create the fur. Fur has many characteristics, as discussed, however to re- create them you need to be very creative and know the characteristics well to be able to design them. Because that is what it is about, designing fur that looks realistic.
There is no easy method, the settings needs to be constantly adjusted until you reach a satisfactory result.
5.2 Render Time
This is a difficult question to answer. It is not easy to achieve a correct evaluation since it is the maps, sizes and amount of details that makes the fur render expensive. In order to keep the render time down without developing a whole new fur generator, shader and renderer, there needs to be an evaluation of the scene on how much detail is needed, as well as what can possibly be left out.
Some of the items that increases render time are higher resolution to maps. High resolution results for delivery to e.g. a client, and increase in segments on the fur strands and higher tessellation values.
As we have seen, there has been a huge amount of research in this area; therefore it is still being perfected. Many are focusing on hair for humans since that is even harder to master. Artists in the industry appear to be interested in having tools that allow for manipulating the fur/hair very easily and without one tool having much effect on the others. As many would acknowledge, they want to change one little thing, however it is not possible without affecting others; in other words decoupling.
20 5.3 Other Aspects
Physically based shaders fail in controllability for artists. Since it is focused on creating something that is according to reality, not everything can be manipulated to your own preferences. This includes not being able to exaggerate features of the fur or hair. Controllability is something that might be necessary especially for animated productions and also for others simply because they want to be able to create the look that they are after, whether it is considered real or not.
Autodesk Maya does not use physically based shaders.
6 Conclusion
A great deal has been researched in this area and it is well on its way to perfecting the methods and rendering time for realistic fur and hair. In industry, fur is still developing to achieve better tools for it, and most of all, realistic fur. Maybe it would be a good idea to find out how to customize the tools where they are intuitive to use and the artists are able to customize those tools for their own method of working.
One specific item that this thesis has found out is often you want to create realistic fur fast, and the tools should not be too complicated to create the fur. It should be possible to attach a ready realistic looking fur and then adjust the features after the specific need.
The characteristics of fur are complicated to describe and put into use in Maya.
This is because it is how the different features of the fur are combined and in which environment it exists that is of importance. Hence, it is difficult, if not impossible to write a correct manual on creating computer-generated fur.
Autodesk Maya is a sufficient tool for creating fur. It has many attributes that allow for a great deal of adjusting and it is easy to understand after working with the tools. Advanced users may discover areas which do not measure up to their specific vision.
The question about render time did not receive much attention in this thesis, but has been an important factor in creating the fur. There are attributes and settings available to improve the appearance of the fur and at the same time keep the render time down, as described.
For future attempts, the surveys could be improved to attain a more accurate result, as well as explore more about what makes fur appear realistic. The research and exploration should further include other applications for a more accurate and interesting result. This should also include other render engines in achieving appealing render images.
21
References
[1] Lucasfilm, Inside Lucasfilm - Company history, 2012.
[2] R Dunop, New Moon, 2009.
[3] B Hiebert. J Dave. T Kim. I Neulander. H Rijpkema. W Telford, “The Chronicles of Narnia: The Lion, The Crowds and Rhythm and Hues,” in SIGGRAPH '06 ACM SIGGRAPH 2006 Courses, 2006.
[4] V Frei, JOHN CARTER: Peter Chiang – VFX Supervisor \& Co-founder – Double Negative, 2012.
[5] J A Ferwerda, “Three varieties of realism in computer graphics,”
Proceedings SPIE Human Vision and Electronic Imaging, vol. '03, pp.
290-297, 2003.
[6] I Sadeghi. H Pritchett. H W Jensen. R Tamstorf, “An artist friendly hair shading system,” ACM Transactions on Graphics (TOG) - Proceedings of ACM SIGGRAPH 2010, vol. 29, no. 56, pp. 56:1-56:10, 2010.
[7] A Iones. A Krupkin. S Voldarsky. S Zhukov, “Fur and hair: practical modeling and rendering techniques,” in Information Visualization, 2000.
[8] G Yang. H Sun. E Wu. L Wang, “Interactive fur shaping and rendering using nonuniform-layered textures,” Computer Graphics and Applications, vol. 28, pp. 85-93, 2008.
[9] A Bruderlin, “A method to generate wet and broken-up animal fur,” in Computer Graphics and Applications, 1999.
[10] H Lensch M Goesele. Y Chuang. T Hawkins. S Marschner. W Matusik. G Mueller, “Realistic Materials in Computer Graphics,” 2005.
[11] J T Kajiya. T L Kay, “Rendering fur with three dimensional textures,”
ACM SIGGRAPH Computer Graphics, vol. 23, pp. 271-280, July 1989.
[12] W T Reeves, “Particle Systems - a technique for modeling a class of fuzzy objects,” ACM SIGGRAPH Computer Graphics, vol. 17, pp. 359-375, July 1983.
[13] M Koster. J Haber. H P Seidel, “Real-time rendering of human hair using programmable graphics hardware,” in Computer Graphics International, 2004.
[14] M Terasawa. F Kimura, “Rendering objects with small elements based on their micro and macro structures,” in Computer Graphics International, 1998.
[15] Todd Palamar. Eric Keller, Mastering Autodesk Maya 2012, C. O'Connor, Ed., Wiley Publishing, Inc., 2011, pp. 664-674, 793-813.
[16] N Magnenat-Thalman, “Photorealistic hair modeling, animation, and rendering,” 2004.
22
Appendix 1: Fur Survey
23
24
25
26
27
28
29
30
31
32
Appendix 2: Fur Survey - Question Results
Result Details Answers: 34
What made you think the fur was real or fake? and What do you think characterises realistic fur?
- It's a lot to do with lights and shadows. A lot is in the lighting. In most common lights there is something off with 3d rendered fur. It's hard to pinpoint exactly what. I think it has with contrast to do. in 3d contrasts are a lot sharper. and highlighted fur tends to get highlighted out of hand and you can see individual strains lit up. While in animals, healthy well groomed they have a certain gloss night highlight. Depends on animals of course. Also it generally depends on setting. Of the instance that you see the fur in, if it's believable that they have the fur you have given them. Mostly when I looked at the pictures one on one I looked for the highlights, the strains, took a step back and looked at the whole picture as one. And compared what I saw to other 3d or real furs I've seen.
- 1
- Different styles with some straight and some fluffy in the same fur made me think that it was real I think the colors vary in several nuances in realistic fur
- The ones that look real have more irregularities in direction, curve and shading. - Chunks of fur pointing in different directions looks more real than individual strands pointing in different directions. - The curves of the strands suggest the presence of a genetic code that gives them their characteristics. While irregularities are needed for realism even here, I would say it's more important that the strands seem to have the same characteristic. - I would say the shading of real fur is darker near it's base, because it's thicker, more dense and more in shadow there.
- I was looking for photograph errors, such as noise and grains to determine if it was real or not. A computer rendered image have a crisper image quality.
- The lighting was a big part of how real or fake the fur looked (whether the lighting looked real or not). Also, the furs that I thought looked most fake were the ones where the "starting point" of the hairs looked strange (the roots). I think realistic looking fur has a lot to do with the lighting. Too "generic" lighting makes the fur look flat and more like paintbrush strokes.
- I think the light is a big part of it, it has to be a realistic feel to it. I think I believe the fur is fake if I think I can see the same patch reappear several times in the same image.
- Not an imageanalys per se, just a feeling I got. Randomness.
- känsla :)
- The real fur has a small amount randomness to it (change in characteristics and variation in style and color) that is difficult to define. Somewhat difficult to see in the images though as the compression destroys some detail or they are too small :)
33 - Synthetic patterns, less variety and the perfection of individual hairs. Realistic fur:
chaotic but mostly flowing in a certain direction, lots of variety. not perfect.
- Riktiga pälsdjur har oftast ett undre lager av päls som är finare än den yttre pälsen.
- Real fur has imperfections and randomness to it. The resolution and quality of the pictures gave it away at times. The fake fur was very lumpy and thick. The lighting and depth also looked unrealistic.
- För att det såg rufsigt ut på vissa och lite finare ut på andra.
- Movement and some structures creating shadowing of certain colors and depth.
- I don't know. The texture
- The randomness in the fur. The shadows also.
- Texture
- I am really bad at shorthair fur. I think that all was realistic and it was hard to guess!
Good Luck
- Vet inte helt! Jag valde säkert fel men den såg riktig ut.
- Its about thickness and length as well as colour. They all have to work in harmony ^^
Hard to explain as there are a lot of different furs in the world...
- I believe the jagged fur was real. Real fur is characteristic by having a thicker shorter layer closer to the skin and then a longer layer. In one image I saw, close to the right button, some dirt stuck in the fur, so I thought it must be real.
- When the fur has different characteristic hair like some are mashed together like beginning to "deadlocks" and some are free not sticking...really hard to tell when on such a small picture, especially when some of the pictures was bad quality.
- Primarily the way they reflect light.
- Real fur has short and long hairs with fluffy fur on the sides, I think that characterises realistic fur also.