Doc. title Upgrade of PV Lab and Implementation of Automatic Measurement System Project name/ID (Thesis Report) Status of document Final
Main Author Yasir Karim Qureshi Project ID (CRID) —–
Additional Author(s) CR Program
Distribution
Keywords DAQ system, PV Lab, Measurement System Attested by Reviewer Panagiotis Bakas (ABB), Mikael Ekström (MdH)
Approved by Georgios Demetriades (ABB), Lars Asplund (MdH) Final Approval Date 2012-06-02
Summary:
This report is focused on the implementation of a data acquisition system that will be used for measuring different parameters which are needed in solar panel behavior analysis. To accom-plish the DAQ system a DAQ board has been designed and implemented. This DAQ board ac-quires measured climatic parameters that affect the PV module behavior and voltage and current of a PV module. The DAQ board may take measurements of multiple analog and digital signals that come from various sensors including solar radiation, temperature, wind sensors and other measurement devices. The DAQ board may also output analog signals for controlling other de-vices.
The DAQ board is the basic part of the DAQ system and several of them can be connected via a single communication bus (RS485). A unique slave ID can be assigned to each DAQ board on the communication bus, which allows the control of all boards via a GUI application installed on a master computer. Therefore, the DAQ system can be used for monitoring a PV module instal-lation as well as logging the measured data in a data storage server.
This report outlines the details of the DAQ system design which are helpful in utilizing or up-grading this system. These details also include programming of DAQ board and implementation of MODBUS communication protocol within the DAQ system.
CONTENTS 1 Introduction 6 1.1 Purpose . . . 6 1.2 Scope . . . 6 1.3 Definitions . . . 6 1.4 Structure . . . 7 2 Problem Description 8 3 Requirements 8 3.1 DAQ board Hardware Requirements . . . 9
3.1.1 Multiple sensors input . . . 9
3.1.2 Discrete signals input/output . . . 9
3.1.3 Analog signals input/output . . . 9
3.1.4 Filtering and Protection . . . 9
3.1.5 Communication . . . 9 3.1.6 Trackability . . . 10 3.1.7 PCB size . . . 10 3.2 MODBUS Protocol . . . 10 3.3 Firmware Requirements . . . 10 3.3.1 Slave ID . . . 10
3.3.2 Serial Peripheral Interface (SPI) . . . 10
3.3.3 External Discrete Inputs . . . 10
3.3.4 Electro-mechanical Relays - Discrete Outputs . . . 10
3.3.5 MODBUS protocol compatibility . . . 11
3.4 GUI Application . . . 11 4 Solution 12 4.1 Hardware Overview . . . 12 4.1.1 Inputs . . . 12 4.1.2 Outputs . . . 12 4.1.3 Communication . . . 13 4.1.4 Programmability . . . 13 4.2 Technical Specifications . . . 13
4.3 Hardware Design Considerations . . . 14
4.3.1 Inter-device Communication . . . 14
4.3.2 External Communication . . . 16
4.3.3 Built-in Sensors . . . 16
4.3.5 Power Supply . . . 18 4.3.6 PCB size . . . 18 4.4 Software Overview . . . 20 4.5 MODBUS (MB) Protocol . . . 20 4.5.1 Introduction . . . 21 4.5.2 General Description . . . 21 4.5.3 Communication . . . 22
4.5.4 Request and Response . . . 22
4.5.5 PDU Structure . . . 23 4.5.6 Data Encoding . . . 24 4.5.7 MB Data Model . . . 24 4.5.8 Function codes . . . 25 4.5.9 Further Reading . . . 26 4.6 Firmware . . . 26 4.6.1 Slave ID . . . 26
4.6.2 I/O Components Mapping . . . 26
4.6.3 Data Allocation and Addressing . . . 27
4.6.4 Flow Diagram . . . 28
4.6.5 Serial Port (RS-485) Configuration . . . 29
4.6.6 Source Code Files . . . 30
4.6.7 Programming Tools . . . 30
4.7 GUI Application Software . . . 32
4.7.1 GUI General Overview . . . 32
4.7.2 GUI Application Usage . . . 33
4.7.3 Flow Diagram of GUI Application . . . 33
4.7.4 Source Code Files . . . 34
4.7.5 Programming Tools . . . 35
4.8 Example MB Request/Response Messages . . . 35
4.8.1 Example 1 “Reading Coils” . . . 35
4.8.2 Example 2 “Reading Input Registers” . . . 36
4.8.3 Example 3 “Writing Holding Registers” . . . 37
5 Results 38 5.1 ADC test results . . . 38
5.2 Results with GUI application . . . 38
5.3 Data Logging . . . 39
5.4 Data Manipulation . . . 40
7 Future Work 41
8 REFERENCES 42
9 Enclosures 44
A Schematic and PCB of DAQ Board 45
A.1 Schematic of DAQ Board . . . 45
A.2 PCB Design . . . 45
A.3 PCB images of DAQ Board . . . 45
B Software for DAQ system 45 B.1 Firmware for Server (Source Code) . . . 45
B.2 Software for Client (MATLAB files) . . . 45
CHANGE HISTORY 46 REVIEW HISTORY 46 LIST OF TABLES 1 Definitions of typical terms and abbreviations . . . 6
2 Technical specifications of DAQ system board . . . 13
3 Enclosure size for DAQ board . . . 18
4 MB Data Model . . . 24
5 Public Function Codes Definition . . . 25
6 I/O Components Mapping as MB Data Model . . . 27
7 The memory locations on DAQ board . . . 28
8 Serial Port Configuration . . . 30
9 Tools used for the Firmware . . . 31
10 Example 1 (Reading coils) . . . 36
11 Example 2 (Reading Input Registers) . . . 36
12 Example 3 (Writing Holding Registers) . . . 37
13 ADC Test Result . . . 38
LIST OF FIGURES 4.1 DAQ board with labels . . . 12
4.2 SPI port utilization . . . 15
4.3 Pin connections at PORTD . . . 15
4.4 Pin connections at USART port . . . 16
4.6 ICSP port . . . 17
4.7 UL PC 200/63 HT with DAQ system board . . . 19
4.8 Communication between DAQ boards and Computer . . . 20
4.9 MB Communication Stack . . . 21
4.10 General MB ADU Frame . . . 21
4.11 Function code and Data block relation . . . 22
4.12 MB transaction without errors . . . 23
4.13 MB transaction with errors . . . 23
4.14 MB Function Code Categories . . . 25
4.15 DIP Switches for Slave ID . . . 26
4.16 Data Allocation . . . 27
4.17 Flow Diagram of DAQ board . . . 29
4.18 MPLAB IDE v8.66 . . . 31
4.19 GUI Application’s Window . . . 32
4.20 Flow Diagram of GUI Application . . . 34
5.1 Response from DAQ board . . . 39
5.2 Preview of DAQ_dev_001.txt . . . 39
5.3 MATLAB’s Command Window . . . 40
1 INTRODUCTION
1.1 Purpose
The purpose of this report is to explain the building blocks of a data acquisition (DAQ) system along with complete hardware and software details. The wiring and connection diagrams related to the DAQ board may also be helpful in redesigning the board. Note that the DAQ board works as slave/server and is specifically designed to gather data from outdoor sensors.
1.2 Scope
This report describes the hardware architecture and the programming of DAQ system in detail. The report covers the following main topics related to the DAQ system:
• Technical specifications and hardware design of the DAQ board, • MODBUS protocol implementation within the DAQ system, • Programming of a single DAQ board (Firmware)
• GUI application software for the master computer • Tools for programming the DAQ system
This report can be utilized to understand and implement the specific DAQ system. The report describes both the Hardware and Software for the DAQ system. The report does not describes the installation of the DAQ system with PV modules.
1.3 Definitions
Table 1: Definitions of typical terms and abbreviations
ADC Analog to Digital Converter
DAC Digital to Analog Converter
ADU Application Data Unit, a term used in MODBUS protocol to
describe structure of a single MODBUS message. PDU
Protocol Data Unit, a term used in MODBUS protocol to describe packet of bytes within ADU for function code and data.
CRC Cyclic Redundancy Check. It is a technique to check accuracy
of received data at master or slave terminals. Communication
Protocol
In general, a set of rules determining the format and transmission of data in a system.
D-sub D-subminiature, a common type of electrical connector
named for their D-shaped structure of metal shield
DAQ abbreviation used for Data Acquisition
Firmware
Software (programs or data) that has been written onto read-only memory (ROM). Firmware is a combination of software and hardware.
I/O input / output
IDE Integrated Development Environment
ICD3 In-Circuit Debugger 3[5]
ICSP In-Circuit Serial Programming[1]
IP Rating Ingress Protection Rating
LED Light-emitting diode
LSB Least Significant Bit
MSB Most Significant Bit
Master device client device or a device with command user interface
Slave device server device or a device responsible to respond the requests
of master device
MB abbreviation used for MODBUS
Op-Amp Operational Amplifier
OSI model
Open Systems Interconnection model. This is the
communication standard for computer networking in terms of abstraction layers.
PCB Printed Circuit Board
PLCC Plastic Leaded Chip Carrier
Port
A set of I/O pins which are used for sending or receiving binary data. The port may be a part of any microcontroller or a device board. A simple microcontroller may have one or more than one port and each port can be a set of various (normally 8) I/O pins.
PV Photovoltaic
RS-232
A standard defining the electrical characteristics and timing of signals for serial communication between 2 devices within short range.
RS-485
A standard defining the electrical characteristics of drivers and receivers for use in balanced digital multipoint systems with long range.
SMT Surface Mount Technology
SPI Serial Peripheral Interface[2]
USART
abbreviation for Universal Synchronous Asynchronous Receiver Transmitter is an individual or (part of an) integrated circuit used for serial communications over a computer or peripheral device serial port.
Xtal term used in electronic schematics, short for Crystal
1.4 Structure
This report has the following structure:
terms, abbreviations and acronyms used.
Problem Description Section 2, describes the issues that need to be addressed by the DAQ sys-tem.
Requirements Section 3, provides necessary information about the requirements that need to be taken into account when designing and implementing the DAQ system.
Solution Section 4, provides the description of the solution, thus the design and programming process of the DAQ system. This also includes GUI application software for the master computer and MODBUS protocol implementation within the DAQ system.
References Section specifies source material for further reading. Enclosures section 9 provides supplementing information.
2 PROBLEM DESCRIPTION
Sunlight is one of the freely available resources of energy and Photovoltaic (PV) Modules have made it possible to convert that energy to electricity. PV Systems have greatly gained the attention of power generation industry. Although PV Modules are functioning properly but their behavior under outdoors operating conditions is still matter of research. Therefore, in order to study the behavior of PV modules in real time situation, an embedded device capable of operating out-door is needed. The basic purpose of this device would be to acquire data from various outout-door sensors including PV module voltage and current and transmit this data to a remote computer system. Such functionality makes this system so called “Data Acquisition System”. Several such DAQ boards could be installed along with PV modules to log data that can be used for analyz-ing the performance of PV system under different climatic conditions. In addition, it should be pointed out that the DAQ board should be kept safely enclosed and unaffected by weather con-ditions.
Along with this, the DAQ board will also need a system software (firmware) to make it fully func-tional and controllable. The system software would initialize and enable all the features of the DAQ board. The DAQ board would be designed specifically for outdoor usage, and all the DAQ boards will share the same bus to communicate with the master computer. In order to have a good transmission of data from multiple sources on the single bus, the DAQ system would re-quire a communication protocol like MODBUS protocol to ensure error free data transmission between the master computer and the slave DAQ boards. A GUI application for the master com-puter should also be developed in MATLAB software. This would allow the user to control sev-eral slave DAQ boards through the master computer by using their unique IDs assigned for the same communication bus. The firmware for the DAQ boards and GUI application for the master computer would enable the DAQ measurement system to function properly in an user friendly manner.
3 REQUIREMENTS
The DAQ system is an automatic measurement system and is split in two major parts, Hardware and Software. The hardware part includes the design of the DAQ board which would be installed outdoor along with PV modules. The software includes the programming of the DAQ boards
(firmware) and GUI application software for the master computer which would be operated in an indoor location remote from the PV modules and the DAQ boards. The slave DAQ boards and the master computer should communicate over RS-485 serial bus using MODBUS protocol. In order to properly implement the DAQ system, several hardware and software requirements should be fulfilled, which are described in the following sections.
3.1 DAQ board Hardware Requirements
In order to be flexible, the DAQ board must possess the following capabilities: 3.1.1 Multiple sensors input
The device must be capable of gathering analog data from multiple sensors quickly and effi-ciently. Thus, several analog inputs should be included on each DAQ board in order to allow the measurement of multiple signals per DAQ board.
3.1.2 Discrete signals input/output
The device must be capable of reading as well as outputting discrete signals. The discrete signals should not damage the device in case if high voltage (more than 5 volts) is observed as input. Discrete outputs may be utilized to turn on/off electromechanical relays.
3.1.3 Analog signals input/output
The device must be capable of reading as well as outputting analog signals. The analog signals as input should also be passed through the filter in order to be protected against high voltages (more than 5 volts). The analog signals then should be processed and converted to digital in 12-bit or higher resolutions. The analog signals as output can be used for digital calibration of actuators and solar trackers.
3.1.4 Filtering and Protection
The DAQ board would be connected to various sensors externally to acquire environmental data. Thus, it is required to integrate filtering circuit at the inputs of the DAQ board in order to protect it from unexpected high voltage (more than 5 volts) signals.
3.1.5 Communication
Long range: As the device would be used to acquire data from outdoor sensors, it must be ca-pable of communicating with a remote computer system in the range of 1m to 1km.
Multipoint: The device must be capable of communicating with other interconnected devices on a common bus. This would reasonably decrease the overhead due to number of cables for all the devices.
Inter-device: Communication with add-on components on the device should also be possible through commonly applied standard interfaces like SPI[2]. SPI is a common communication
standard which is used by a number of ADCs and DACs. Along with this, one SPI port for external communication would also make this device flexible enough to connect with add-on SPI devices. 3.1.6 Trackability
The device must be capable of being uniquely identified and tracked over the serial communica-tion bus. Manually assignable slave ID number through DIP switches would be a good opcommunica-tion. 3.1.7 PCB size
The dimensions for PCB of the device must be compatible with readily available enclosures. This will allow the device to be protected for safe outdoor operation.
3.2 MODBUS Protocol
MODBUS protocol would be used for common communication between DAQ boards and the master computer within the DAQ system. In order to implement MODBUS protocol, a set of MODBUS drivers for both computer and the DAQ boards are required.
3.3 Firmware Requirements
The firmware developed for a single DAQ board should work the same on all the other identical devices. The DAQ board should work as a slave device and respond to the requests sent by the master computer. The DAQ board should also be capable of restarting itself in case of not having proper response.
3.3.1 Slave ID
The slave ID would be useful in tracking each DAQ board over RS485 serial bus. All the DAQ boards would possess a set of eight DIP switches which would be used to set their IDs. The firmware should be capable of acquiring the ID through these dip switches.
3.3.2 Serial Peripheral Interface (SPI)
The ADC and the DAC chips on the DAQ board would use SPI port to communicate with the microcontroller. Thus the firmware should be capable of handling SPI communication.
3.3.3 External Discrete Inputs
The DAQ boards would be capable of accepting some external discrete inputs from other devices. The firmware should be able to acknowledge these inputs.
3.3.4 Electro-mechanical Relays - Discrete Outputs
The DAQ board would possess electro-mechanical relays which should be controllable (turned ON or OFF) from the computer.
3.3.5 MODBUS protocol compatibility
The I/O components of the DAQ board should be carefully mapped to the MODBUS data model which will ensure the MODBUS protocol compatibility.
3.4 GUI Application
The GUI application should be programmed in MATLAB software and it should provide all the necessary functions for acquiring every possible information from the DAQ boards to the user of the master computer.
4 SOLUTION
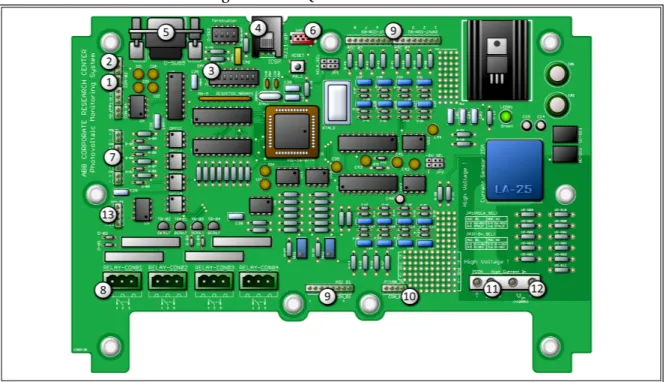
Solution to all the specified hardware requirements is the DAQ board which is based on the re-sults from a previous group project[3]. The DAQ board is shown in figure 4.1,
Figure 4.1: DAQ board with labels
4.1 Hardware Overview
The DAQ board is a multipurpose monitoring device which can not only acquire analog data from various sensors but also allows to control actuators through electromechanical relays. The board includes the following functional capabilities:
4.1.1 Inputs
# Input Unit/Type Level/Range Quantity Label (fig. 4.1)
01 Analog Signal voltage 0 ... 5V 12 9
02 PT100 resistance 1 ... 400Ω 2 10
03 Discrete signal voltage 2 ... 10V 4 7
04 High voltage voltage 1 ... 1kV 1 12
05 High Current current 1 ... 25A 1 11
06 DIP switch Tag / ID 0 ... 255 1 3
4.1.2 Outputs
# Output Unit/Purpose Level/Range Quantity Label (fig. 4.1)
01 Analog Signal voltage 0 ... 4.095V 2 13
4.1.3 Communication
# Standard Bus Type Range Label (fig. 4.1)
01 RS-485 serial 1-to-many 1m...1km 2
02 RS-232 serial 1-to-1 1m...15m 5
03 SPI[2] serial 1-to-many 3m 6
4.1.4 Programmability
# Method Source Type Debugging Label (fig. 4.1)
01 ICSP[1] ICD3 default yes 4
02 Bootloader RS-232 optional no 5
4.2 Technical Specifications
The technical specifications of the DAQ board are listed in table 2, where all the major hardware components (including I/O components) are listed. The labels for components as mentioned in table 2 are same as the labels on PCB of the DAQ board presented in appendix A.3. The de-tails about various hardware components can be found in referenced datasheets, as outlined in table 2. Moreover, the details about supplementary hardware components can be found on the schematic design in appendix A.1.
Table 2: Technical specifications of DAQ system board
Category Components Description
Microprocessor 1x PIC16F877 [4] - High performance, 44-pins, PLCC package, - 20 MHz clock input, 200 ns instruction cycle, Label on PCB: - Pinout compatible to other 44-pin 16C & 16F series,
U1 - USART, SPI and I2C on-chip Serial Ports
ADC 2x LTC1290 [6] - 8+8 Single-Ended Inputs, Uni/bi-polar functionality, - 12-Bit Resolution, SPI interface, 13µs conversion time, Labels on PCB: Linked connectors:
U2 INPUT-CON-01 (quick connector)
U3 INPUT-CON-02, INPUT-CON-03 (quick connectors)
DAC 1x LTC1446 [7] - Dual channels output, 12-Bit Resolution, - SPI interface, 14µs Settling time, Power-on Reset Label on PCB: Linked connector:
U9 CON-03 (quick connector)
Communication 1x MAX232 [8] - Dual EIA-232(UART) Driver/Receiver Label on PCB: Linked connector:
U4 D-SUB9 (male connector)
1x MAX485 [9] - RS-485/RS-422 Transceiver Label on PCB: Linked connectors:
U5 CON-01 and CON-02 (quick connectors)
Relays 4x V23092A [10] - Slimline PCB Relay SNR, Single pole form A(NO) Labels on PCB: Linked connectors:
SNR-01 RELAY-CON1 (MSTBA3, phoenix connector 5.08mm pitch) SNR-02 RELAY-CON2 (MSTBA3, phoenix connector 5.08mm pitch) SNR-03 RELAY-CON3 (MSTBA3, phoenix connector 5.08mm pitch) SNR-04 RELAY-CON4 (MSTBA3, phoenix connector 5.08mm pitch)
Optocouplers 4x TIL111M [11] - General purpose 6-Pin phototransistor Optocouplers Labels on PCB: Linked connectors:
OPTC1 CON-05 (quick connector) OPTC2 CON-06 (quick connector) OPTC3 CON-07 (quick connector) OPTC4 CON-08 (quick connector)
Sensor 1x LA 25-NP [12] - Current transducer, Closed loop Hall Effect sensor Label on PCB: Linked connector:
LA25 PCON (MKDSN1, phoenix connector 5.08 pitch ) @ Iin
Voltage 1x LM7805 [13] - Supplies regulated 5V to on-device components. Regulators Label on PCB: Linked connector: (source input)
U14 CON-01 and CON-02 (quick connectors)
1x LT1027 [14] - Supplies regulated 5V for referencing. Label on PCB: Connected ADCs:
U12 U2 and U3
Other Ports 1x RJ-11 6-pole - dedicated to ICSP only,(@ ICSP)
1x Micromatch 6 - Available for add-on devices with SPI link,(@ CON_SPI)
4.3 Hardware Design Considerations
The core element of the DAQ board is the PIC16F877A[4] (44-pin, PLCC package) microcontroller which controls the data acquisition and performs all the communication operations. However, additional hardware devices are needed for interfacing the microcontroller with measurement sensors and other external devices. Such hardware perform the reading of analog signals or gen-eration of analog control signals.
4.3.1 Inter-device Communication
The PIC16F877A microcontroller can communicate with other hardware components either by
using any built-in standard communication port (like SPI, I2C, USART etc) or by directly using
I/O pins. For efficient use of available I/O pins, the SPI port is utilized as common port for inter-device communication with ADC and DAC chips along with equal number of I/O pins for abling or disabling the respective chips. Figure 4.2 shows utilization of SPI port along with en-able/disable I/O pins on the DAQ board.
The discrete signals on other hand are constant signals (in the range of 0 to 5 volts where 0V = OFF and 5V = ON) which result from any push button or as an actuation response from other devices. The discrete signals on the DAQ board are treated indirectly through I/O pins at PORTD of the microcontroller and no standard communication port is used.
Figure 4.2: SPI port utilization PIC16F877A LTC1290 LTC1290 RB2 (38) RB3 (39) RB1 (37) /CS (15) LTC1446 RC3/SCK (20) RC4/SDI (25) RC5/SDO (26) SCK (18) DOUT (16) DIN (17) SCK (18) DOUT (16) DIN (17) /CS (15) DIN (2) /CS (3) SCK (1) (ADC) (ADC) (DAC) Master Slave Slave Slave U2 U3 U9
External discrete signals (resulting from push buttons or actuator response) at the input (CON-05,
CON-06, CON-07 and CON-08) are isolated from I/O pins of the microcontroller through optocou-plers to protect the microcontroller from high voltages and different grounding. Internally,
dis-crete signals operate on transistors for switching the relays (SNR-01, SNR-02, SNR-03 and SNR-04)
of the DAQ board.
Figure 4.3: Pin connections at PORTD
PIC16F877A RA0 (03) RA1 (04) /EN (19) RD0 (21) U6 RD1 (22) RD2 (23) RD3 (24) RD4 (30) RD5 (31) RD6 (32) RD7 (33) RA2 (05) A0 (02) A1 (03) A2 (04) A3 (05) A4 (06) A5 (07) A6 (08) A7 (09) 1Y0 (18) 1Y1 (16) 1Y2 (14) 1Y3 (12) 2A0 (17) 2A1 (15) 2A2 (13) 2A3 (11) /EN 1 (01) /EN 2 (19) B0 (18) B1 (17) B2 (16) B3 (15) B4 (14) B5 (13) B6 (12) B7 (11) 1A0 (02) 1A1 (04) 1A2 (06) 1A3 (08) 2Y0 (03) 2y1 (05) 2Y2 (07) 2Y3 (09) U7 74 H C2 44 74 H C2 45 D is cr et e In pu ts D is cr et e O ut pu ts D ip S w it ch es
The PORTD of the microcontroller is also indirectly connected to the dip switches (D-SW1) which can be used to manually set up the ID for DAQ board. Since PORTD serves the dual purpose of acquiring the DAQ board ID from the dip switch and operating as a general I/O port, it is desirable to control the data flow (either input or output) for distinction between dip switches and discrete
signals. This is done through the use of octal buffer driver (U5) and octal bus transceiver (U6).
Figure 4.3 describes the pin connections at PORTD of the microcontroller.
4.3.2 External Communication
DAQ system board has driver ICs for RS232 and RS485 communication standards. These driver ICs share and utilize the USART port of the PIC16F877A microcontroller and thus only one com-munication standard can be utilized and programmed at a time. Figure 4.4 shows pin connec-tions at the USART port of the microcontroller. Since RS485 is the multipoint communication standard, it is used to simultaneously connect more than one DAQ board on the same bus in DAQ system.
Figure 4.4: Pin connections at USART port
PIC16F877A RB4 (41) R2OUT (09) RX / RC7 (29) U4 TX / RC6 (27) T2IN (10) T2OUT (07) R S2 32 R S4 85 RO (01) DI (04) /RE (02) DE (03) R2IN (08) B (07) A (06) U5 MAX232 MAX485 4.3.3 Built-in Sensors
The DAQ system is specifically designed to study the behavior of photovoltaic modules under various weather conditions, hence it is desirable to measure the power output of these modules. In order to calculate the power output of each photovoltaic module, the module’s current and voltage must be measured. This is done with one hall effect sensor LA25[12] and one voltage divider circuit to measure current and voltage respectively.
LA25 is capable of measuring current up to 25A whereas, the voltage divider circuit is configured and limited up to 1000 Volts DC, which is the maximum allowed voltage that current PV modules can handle. Both of the LA25 and the voltage divider circuit give output voltage signals in range of 0 to 5 volts which are connected to the ADC (U2) at channel 6 and 7 (assuming 0 as first chan-nel) respectively as shown in figure 4.5. The input for high current and voltage measurement of photovoltaic modules is attached at connector PCON of the DAQ board.
Figure 4.5: Connections at ADC (U2) channels 6 and 7 LTC1290 LA25 CH 6 (07) (ADC) U2 CH 7 (08) Voltage Divider 4.3.4 In System Programming
the DAQ board is fully compatible with ICSP[1] and it can easily be programmed/reprogrammed using ICD3[5] provided by Microchip Inc. This was added in order to be able to reprogram the microcontroller without dismounting it from the PCB. ICD3 is a debugging/programming device which is connected to the ICSP port of the DAQ board. ICD3 can supply power to DAQ sys-tem in case that no external power is available during the reprogramming or the DAQ board is unmounted from installation place. Figure 4.6 shows ICSP port and its pin connections to the microcontroller.
Figure 4.6: ICSP port
PIC16F877A /MCLR (02) VDD (12/35) GROUND (13/34) PGD/RB7 (44) PGC/RB6 (43) (1) (2) (3) (4) (5) ICSP port (RJ11-6P) Bottom view
4.3.5 Power Supply
The DAQ board has one voltage regulator[13] (U14) which supplies regulated 5 volts to all the active components of the board. The voltage regulator requires 7.5V - 18V to operate and draws less than 1A. A power supply with 9 - 18V 2A DC output can be connected to CON-01 or CON-02 port of the DAQ board. For indoor testing of the DAQ board, a variable power supply (model: Velleman PS 603) is provided by ABB CRC. This power supply can output 0 - 30V 2.5A DC. A regulated 15V output from this power supply is used for the DAQ boards.
4.3.6 PCB size
As mentioned in requirements subsection 3.1.7, the dimension for PCB of DAQ board is such that it can fit inside the readily available standard size enclosure. Table 3 lists the suitable enclosure size for DAQ board.
Table 3: Enclosure size for DAQ board
Dimension Length Width Height
mm 255 180 63
inch 10.0 7.1 2.5
Although, any enclosure with IP rating 67 and provided dimensions can be utilized for safe out-door use of DAQ board but the one (enclosure) currently being used for the project is shown in
4.4 Software Overview
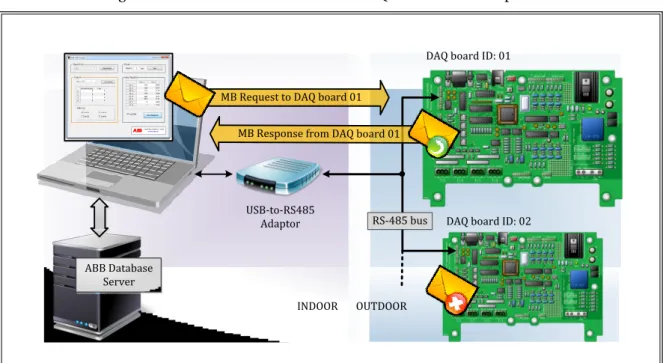
The data acquisition (DAQ) system is a smart measurement system which uses several DAQ boards as slave devices to acquire the measurements of multiple analog and digital signals that come from various sensors including solar radiation, temperature, wind sensors and other en-vironmental sensors. These measurements are then sent to the supervisory computer (master device) where the measurements are stored and displayed on the graphical user interface (GUI) application. The communication between the DAQ boards and the computer is realized via us-ing MODBUS (MB) protocol, on request and response basis over RS-485 serial bus as shown in figure 4.8.
Figure 4.8: Communication between DAQ boards and Computer
DAQ board ID: 01
DAQ board ID: 02 USB-to-RS485
Adaptor
MB Request to DAQ board 01
MB Response from DAQ board 01
RS-485 bus
ABB Database Server
INDOOR OUTDOOR
The software for the DAQ system includes,
1. MODBUS drivers for computer and DAQ boards 2. Programming of the DAQ boards (Firmware) and 3. GUI application for supervisory computer user 4.5 MODBUS (MB) Protocol
A brief description about MB protocol is presented below. The provided information is extracted from MODBUS Application Protocol Specification[16] document. The detailed information about MB protocol is freely available at official website of MODBUS organization.
4.5.1 Introduction
MB[16] is an application layer messaging protocol, positioned at level 7 of the OSI model[24], that provides client/server communication between devices connected on different types of buses or networks. MODBUS organization is responsible to set standards for MB protocol. This protocol can be implemented on a variety of devices connected on different types of buses or networks in-cluding TCP/IP over ethernet and asynchronous serial transmission over RS-232/RS-485 as pre-sented in figure 4.9.
Figure 4.9: MB Communication Stack
4.5.2 General Description
The MB protocol works on application layer of the OSI model. The MB protocol defines a simple protocol data unit (PDU) which is independent of the underlying communication layers. The mapping of MB protocol on specific buses or network can introduce some additional fields on the application data unit (ADU) as shown in figure 4.10.
Figure 4.10: General MB ADU Frame
An ADU is a packet which holds a set of bytes with the combination of the following blocks, 1. Address information (for slave only)
2. Protocol data unit (PDU) (a) Function code
(b) Data (includes component address and data values) 3. Error check (CRC)
4.5.3 Communication
The communication between the master and the slave devices is done on request and response basis. The master device builds the ADU and sends it to the slave device via the communication bus. ADU contains the address of the slave, PDU and CRC code (the calculated check-sum of all the bytes within MB message). The PDU contains function code and data as shown in figure 4.11. The function code is an one-byte command which tells the slave device to take the appro-priate action. The data is the detailed supporting information which includes the address of the location (on the slave) where a read/write operation is to be performed and the data bytes.
Figure 4.11: Function code and Data block relation
The function code and the data blocks are also the part of the MB standard. The number of function codes that are supported by the slave device is the choice of the hardware vendor of that device. Valid function codes are in the range of 1...255 decimal. The function code “0” is not a valid code. Also, the range 128-255 is reserved and is used for exception responses.
4.5.4 Request and Response
The MB protocol bounds slave/server (DAQ board) devices to communicate in timely manner with master/client (computer) device and the transaction must be completed in a specified du-ration (normally 1sec) which is set by the master computer. Failing to keep the time will be a failure of response also. The client and server communication takes place in a very simple way in 3 steps. At first, the client initiates a request (1) which is then processed by the server (2). The server responds to the client accordingly (3). If the client has made a valid request then this trans-action will execute without errors. Otherwise the server will respond with a exception code. The figure 4.12 shows an transaction without errors.
Figure 4.12: MB transaction without errors
In case of an invalid request, the server returns exception code which is equivalent to the original function code from the request PDU. Moreover function code’s most significant bit is set to logic-1 as shown in the figure 4.logic-13. A time-out management is also desirable in order not to indefinitely wait for an answer which will perhaps never arrive.
Figure 4.13: MB transaction with errors
4.5.5 PDU Structure
The MB PDU size is limited by the size constraint inherited from the first MB implementation on Serial Line network (max. RS-485 ADU = 256 bytes). Therefore:
P DU = 256 − Ser ver addr ess (1 by te) − C RC (2 by tes) = 253 by tes
The MB protocol defines three types of PDUs[16] which are used by master and slave, that can be listed as
2. MB Response PDU, mb_res_pdu (initialized by slave only)
3. MB Exception Response PDU, mb_except_rsp_pdu (initialized by slave only) The mb_req_pdu is defined as:
mb_req_pdu = {function_code + request_data} where function_code = [1 byte] MB function code
request_data = [n bytes] This field is function code dependent. The mb_rsp_pdu is defined as:
mb_rsp_pdu = {function_code + response_data} where function_code = [1 byte] MB function code
response_data = [n bytes] This field is function code dependent. The mb_excep_rsp_pdu is defined as:
mb_excep_rsp_pdu = {exception_function_code + exception_code} where exception_function_code = [1 byte] MB function code + 0x80
exception_code = [1 byte] Exception Code[16] depending on the type of error. 4.5.6 Data Encoding
MB uses a ’big-Endian’ representation of addresses and data items. This means that when a numerical quantity larger then a single byte is transmitted, the most significant byte is sent first. For example Reg i st er si ze 16 bi t s v al ue 0×1234 t he f i r st b y t e sent i s 0 × 12 then 0 × 34 4.5.7 MB Data Model
MB has four primary tables which make the bases and forms the structure of its data model. These tables have distinguishing characteristics as listed in table 4.
Table 4: MB Data Model
Primary tables Object type Access Description
Discrete Input Single bit Read-Only Data can not be altered by application
Coils Single bit Read-Write Data is alterable by application
Input Registers 16-bit word Read-Only Data can not be altered by application
Holding Registers 16-bit word Read-Write Data is alterable by application
The distinction between inputs and outputs, and between bit-addressable and word-addressable data items do not imply any application behavior. It is perfectly acceptable and very common to regard all the four tables as overlaying one another.
4.5.8 Function codes
The function code is the main part inside a PDU which specifies the type of request. There are three categories of MB function codes which are Public, User-defined and Reserved function codes as shown in figure 4.14.
Figure 4.14: MB Function Code Categories
PUBLIC function codes User Defined function codes
PUBLIC function codes User Defined function codes
PUBLIC function codes 127 110 100 72 65 1
The Public function codes are well defined function codes and guaranteed to be unique since these are validated by MODBUS-IDA.org community.
The User-defined function codes are customizable codes which are not supported by MODBUS-IDA.org community. Any user can select and implement a function code that is not supported by the specification.
The Reserved function codes are used by some companies for legacy products and that are not available for public use.
Table 5 shows the public function codes which are currently supported by the DAQ board. Table 5: Public Function Codes Definition
Size Table Function Code (Hex)
Bit access
Physical Discrete Inputs Read Discrete Inputs 02 02
Internal Bits Read Coils 01 01
Or Write Single Coil 05 05
Physical coils Write Multiple coils 15 0F
16 bits access
Physical Input Registers Read Input Register 04 04
Internal Registers Read Holding Registers 03 03
Or Write Single Register 06 06
Physical Output Write Multiple Registers 16 10
4.5.9 Further Reading
A detailed documentation about MB protocol[16] is freely available at official website of MOD-BUS organization. The documentation also explains the function codes for diagnostics along with reading or writing the primary tables.
4.6 Firmware
The programming of the DAQ board is mainly focused on the implementation of the MB protocol in RTU (Remote Terminal Unit) mode. Thus, the DAQ board operates as a slave/server device and it responds to the requests sent by the master/client device (supervisory computer). The firmware does not only enable MB communication but it also maps the MB data model (section 4.5.7) over the inputs and outputs of the DAQ board. In this way, all the active components on the DAQ board can directly be accessed through any MB application software running on the master computer.
4.6.1 Slave ID
Every DAQ board that is connected to a RS-485 serial bus must have an unique address which is also called as slave/server ID. The slave ID is set through a package of 8 dip switches (figure 4.15) available on the board. These dip switches represent one byte (1 byte = 8 bits) in binary format from left (LSB) to right (MSB) order. Thus, the slave ID in a range of 1 to 255 can be assigned to the DAQ boards. Every time when the DAQ board is powered on or restarted, it acquires the slave ID from dip switches. The DAQ board treats dip switches as bits (of single byte) and places 1s or 0s according to the ON or OFF state of the respective 8 dip switches forming 1 byte value as shown in figure 4.15.
Figure 4.15: DIP Switches for Slave ID
DIP Switch no. 1 2 3 4 5 6 7 8 ON = 1 OFF = 0 (LSB) BIT: 0 1 2 …..……… 7 (MSB) ON OFF Now showing: 1000 0000 (Bin) = 0x01 (Hex) or 01 (Dec)
4.6.2 I/O Components Mapping
As discussed, the MB data model (subsection 4.5.7) has four primary tables which can be directly mapped to physical I/O components (i.e. ADCs, DAC, Opto-couplers and Relays) of the DAQ board. These I/O components interact with external devices like sensors and actuators . Thus, it is important to gain access of the I/O components on the DAQ board as defined by the MB protocol. The DAQ board has its I/O components mapped as listed in table 6. The components and connectors in table 6 represent the (real) labels on the PCB (figure A.3) of the DAQ board.
Table 6: I/O Components Mapping as MB Data Model
Table Quantity Mapped to Components Connectors
Discrete Inputs 4 Opto-couplers OPTC1, OPTC2,
OPTC3 and OPTC4
CON-05, CON-06, CON-07 and CON-08
Coils 4 Relays SNR-01, SNR-02, SNR-03 and SNR-04 RELAY-CON1, RELAY-CON2, RELAY-CON3 and RELAY-CON4
Input Registers 16 ADC U2 and U3 INPUT-CON-01,
INPUT-CON-02 and INPUT-CON-03
Holding Registers 2 DAC U9 CON-03
4.6.3 Data Allocation and Addressing
All the physical I/O components of the DAQ board are mapped to some fixed memory locations (within the PIC16F877A microcontroller) in the form of arrays. Whenever a MB request is re-ceived, new data is acquired from or sent to the I/O components. This new data is allocated to the respective memory locations as listed in table 7 replaces the previous data. Furthermore, the DAQ board maintains the acquired data in the memory locations and allows to read or write (if not read only, see MB data model table 4) these memory locations through MB protocol as shown in figure 4.16. In this way, accessing a memory location is the same as accessing the I/O component itself.
Figure 4.16: Data Allocation
READ / WRITE Memory (Arrays) Sensors PV Modules Lo ca ti on s External Data is allocated in Memory (Arrays) MB Protocol Accessible Memory Locations
Any memory location when combined with the slave ID and function code (listed in table 5), forms an unique address that can be used from the master computer (as illustrated in subsection
4.8). The addresses of the memory locations that are assigned to the I/O components of the DAQ board are listed in table 7 under the address column.
Table 7: The memory locations on DAQ board
Array Name Address Component Connection
00 OPTC1 CON-05
Discrete Inputs 01 OPTC2 CON-06
(Read only) 02 OPTC3 CON-07
03 OPTC4 CON-08 00 SNR-01 RELAY-CON1 Coils 01 SNR-02 RELAY-CON2 (Read/Write) 02 SNR-03 RELAY-CON3 03 SNR-04 RELAY-CON4 00 U2(CH0) INPUT-CON-01(1) 01 U2(CH1) INPUT-CON-01(2) 02 U2(CH2) INPUT-CON-01(3) 03 U2(CH3) INPUT-CON-01(4) 04 U2(CH4) CON_04(PT100) 05 U2(CH5) CON_04(PT100) 06 U2(CH6) PCON(Ii n)
Input Registers 07 U2(CH7) PCON(Vi n)
(Read only) 08 U3(CH0) INPUT-CON-02(1)
09 U3(CH1) INPUT-CON-02(2) 10 U3(CH2) INPUT-CON-02(3) 11 U3(CH3) INPUT-CON-02(4) 12 U3(CH4) INPUT-CON-03(5) 13 U3(CH5) INPUT-CON-03(6) 14 U3(CH6) INPUT-CON-03(7) 15 U3(CH7) INPUT-CON-03(8)
Holding Registers 00 U9(CH_A) CON-03(A)
(Read/Write) 01 U9(CH_B) CON-03(B)
The memory locations mapped to the I/O components is the choice of the programmer of the DAQ boards and thus the memory locations on the identical DAQ boards may or may not refer to the same location on all the DAQ boards. This is valid as long as
• the slave ID of each DAQ board is unique on the serial communication bus and
• the user of the master computer possesses proper memory location tables of all the con-nected DAQ boards.
4.6.4 Flow Diagram
The overall working of the DAQ board is simple. The DAQ board answers the requests sent by the master computer but only the valid requests are processed by the board. Otherwise an exception
code[16] is sent back to the master computer, that helps the user of the master computer to di-agnose the problem with unprocessed requests. Figure 4.17 shows the flow diagram of the DAQ board’s firmware.
Figure 4.17: Flow Diagram of DAQ board
Start
Initialization
Process the Request Wait for Request
Initialize I/O Acquire Slave ID Initialize MB1 protocol Is this a Valid Request? Perform Data Read/Write Initiate Response Obtain Exception code Validate CRC2
Validate Function Code Validate Slave ID
NO
YES
Send back Response Obtain Request Data Is this a Valid Slave ID?
Ignore the Request NO Initialize ADC Initialize DAC Initialize RS485 YES continue
4.6.5 Serial Port (RS-485) Configuration
The DAQ board is programmed with some fixed configurations for RS-485 serial communica-tion as listed in table 8. These configuracommunica-tions should also be the same for the serial port on the computer, in order to properly communicate with the DAQ board.
Table 8: Serial Port Configuration Properties Values Baud rate 115200 Data bits 8 Parity None Stop bits 1
Flow control None
4.6.6 Source Code Files
The source code of the firmware is attached in appendix B.1 of the report. The source code is mainly comprised on two C formatted files as,
1. “main.c”, this is the main source code file which produces the firmware after compilation. 2. “modbus_drivers.c”, this is the library file which defines the routines for the modbus proto-col. This file should be placed along with the main code file. The absence of this file would result in compiling errors.
All the other libraries (C formatted routines files) which are included in the main source code file, are the part of CCS[17] compiler.
4.6.7 Programming Tools
The firmware for the DAQ board has been written in C language using MPLAB IDE v8.66[18] as shown in figure 4.18. A demo version of a third party C compiler (CCS Compiler Demo[17]) was linked to MPLAB in order to compile the C code. However, CCS Compiler Demo[17] can be used as a trial version with full functional trial period of 45 days. The reason for selecting the CCS com-piler is that it includes full documentation and a variety of built-in C libraries for communication and mathematical operations, that facilitate the programming process.
After compiling the C code using the previously mentioned tools, an Intel HEX[19] object file which is a text formatted file with “hex” extension, is generated. This hex file is the firmware for the DAQ board and is uploaded to the microcontroller (PIC16F877A[4]) of the DAQ board using a programmer/debugger ICD3[5] provided by Microchip Incorporated. The table 9 presents com-prehensive lists of all the tools used for developing the firmware and programming of the DAQ board.
Figure 4.18: MPLAB IDE v8.66
Table 9: Tools used for the Firmware
# Tools Vendor Purpose
01 MPLAB IDE v8.66[18] Micorchip Inc. An integrated development environment
for writing, compiling and programming microcontrollers produced by Microchip
Inc. only.
02 CCS Compiler Demo[17] CCS Inc. A third party compiler for the
microcontrollers belonging to PIC family produced by Microchip Inc.
03 ICD3[5] Microchip Inc. A programmer and debugger for all the
microcontrollers produced by Microchip Inc. only.
4.7 GUI Application Software
The graphical user interface (GUI) application is a part of the DAQ system software which was de-veloped in MATLAB[20]. This application runs from MATLAB IDE installed on the master com-puter and interacts with the DAQ boards as illustrated in figure 4.8. The main purpose of this application is to acquire measurement data that is stored at accessible memory locations of the DAQ boards by using MB protocol.
4.7.1 GUI General Overview
The GUI application’s window is shown in figure 4.19 which is designed using GUIDE[22]. The GUIDE is a MATLAB graphical user interface development environment which provides a set of tools for creating graphical user interfaces (GUIs). These tools simplify the process of designing and programming GUIs.
Figure 4.19: GUI Application’s Window
The source code of the GUI application is not stand alone and it can only be executed inside MATLAB IDE.
4.7.2 GUI Application Usage
The GUI application (figure 4.19) is simple and easy to use. It has two input requirements, 1. Connection to the serial port (RS-485 serial bus)
2. Slave ID
There can be more than one serial port on a computer system. Thus, the GUI application’s win-dow displays all the available serial ports under the heading “Serial Port”. It should also be noted that the DAQ boards communicate using RS-485 serial bus whereas modern computer systems are not equipped with neither RS-485 nor RS-232 port. For this reason an USB-to-RS485 adaptor[21] is connected to the computer, which allows RS-485 communication of the computer with the DAQ boards.
The GUI application acquires data from the DAQ boards and displays it under the respective sections on the GUI window. There are four sections on GUI window as can be seen in figure 4.19,
1. Serial Port section shows all the available serial ports on the computer and gives the pos-sibility to the user to connect to the selected serial port.
2. Timer section is used to input a time interval in seconds between data acquisitions and start/stop the data acquisition. The time interval is a delay period between every automatic data acquisition from connected DAQ board. The default value for the time interval is 5 seconds.
3. Control section inputs slave/server ID and acquires the status of discrete inputs and coils from the connected DAQ board. It also has a subsection Write Coils which can turn ON or OFF any coil. It should be noted that the term coils correspond to the relays on the DAQ boards as listed in table 6.
4. Input Registers section displays the acquired measurement data from the ADCs of the DAQ board. This section also has a check box (Log Data) which enables data logging and gen-erates a text file. Moreover, the name of this text file contains the ID of the slave device from which data are acquired. For example if the slave ID is 1, then the file name would be “DAQ_dev_001.txt”). The ADC data is added into the generated text file whenever new data is acquired.
5. Holding Registers section interacts with the 12-bit DAC of the DAQ board. This section performs read or write operations on the channels A and B of the DAC[7].
4.7.3 Flow Diagram of GUI Application
The GUI application is an event based software. The GUI application’s window generates events for every mouse click on it’s interactive components like buttons, combo boxes, check boxes etc. Once an event is generated, an appropriate action is taken by the GUI application which is based on the type of the event. All the actions are defined in the application source code. Figure 4.20 shows the flow diagram of the GUI’s events and their actions. It should also be noted that a
single event can be triggered at a time and thus, all the actions related to the respective event are executed in a sequence which is defined in GUI application’s source code.
Figure 4.20: Flow Diagram of GUI Application
Start
Acquire Discrete Inputs
Acquire Coils Status Obtain a
Mouse Click Event
Acquire Input Registers YES
Connection Established? NO
Enter Loop Create GUI Window
Connect (Serial port)
Start (Timer) Input Registers Close Window End Obtain a Mouse Click Event Display Error Message
Get Status (Control) Slave ID Provided? NO YES A C B A B C E E C C Data Logging Enabled? D D YES
Write Coils (Control)
Stop (Timer) Exit Loop ON/OFF Relay Append Data
into the Text file
E E
E = EVENTS = ACTIONS
4.7.4 Source Code Files
The source code of the GUI application is written in MATLAB script format. The source code includes MB driver files and application source code files which should be placed altogether in a single folder on the computer. The MB drivers support only those functions (as listed in table 5)
which are supported by DAQ board. The GUI application is dependent on the following files, 1. “GUI_DAQ_system.fig”, this file is created with GUIDE for GUI window.
2. “GUI_DAQ_system.m” main application file which handles all the events of GUI window. This main file is dependent on the following MATLAB function files,
(a) “mb_driver.m” generates MB formatted messages/requests and returns responses of the DAQ boards to the application. This file utilizes two MATLAB function files,
i. “crc16_mb.m” generates and appends CRC-16 code to the MB messages and re-turns encoded message.
ii. “validate_crc.m” verifies consistency of received MB messages and returns true or false status.
(b) “init_port.m” initializes serial port and returns valid serial port object. (c) “Images.mat” matrix file containing converted ABB logo images. The source code for above mentioned MATLAB files is listed in appendix B.2. 4.7.5 Programming Tools
The GUI application for computer has been programmed in MATLAB[20] software. MATLAB is a programming environment for algorithm development, data analysis, visualization, and numeri-cal computation. The GUI application’s window is designed in GUIDE[22] which is the MATLAB’s graphical user interface development environment. A detailed documentation on how to use the GUIDE is available in MATLAB’s help section.
4.8 Example MB Request/Response Messages
MB protocol defines a standard frame structure (ADU, figure 4.10) for request or response mes-sages as discussed in subsection 4.5. The communication between the master computer and slave DAQ boards within the DAQ system fully complies with this standard. The computer broad-casts MB request messages to all the connected DAQ boards over RS-485 serial bus and then only concerned DAQ boards reply with MB response messages. Every MB request message is initiated for a specific DAQ board at a time as illustrated in figure 4.8. Furthermore, a MB request/response message is sent or received in byte-by-byte order and thus constituting packet of bytes.
4.8.1 Example 1 “Reading Coils”
This example illustrates MB request and response messages to read 4 coils (starting from address 0) of a DAQ board whose slave ID is 1.
mb_req_adu = 01 01 00 00 00 04 3D C9 mb_res_adu = 01 01 01 01 90 48
Table 10: Example 1 (Reading coils)
Request Response
Field Name (Hex) Field Name (Hex)
Slave ID 01 Slave ID 01
Function code 01 Function code 01
Starting Address Hi 00 Byte count 01
Starting Address Lo 00 Coils Status 3 - 0 01
Quantity of outputs Hi 00 CRC-16 Hi 90
Quantity of outputs Lo 04 CRC-16 Lo 48
CRC-16 Hi 3D
CRC-16 Lo C9
The status of coils 3 - 0 is shown as the byte value 01 hex which is 0000 0001 binary. The right most bit (LSB) in binary format represents status of coil 0 of the DAQ board and then each bit right to left order represents the status of coil 1, 2 and 3 respectively (excluding the four bits in MSB since the DAQ board possesses only four coils). The response shows that the bit representing coil 0 of the DAQ board is 1 and thus, this coil is ON.
4.8.2 Example 2 “Reading Input Registers”
This example illustrates MB request and response messages to read 3 (from a total of 16) input registers (7, 8 and 9) of a DAQ board whose slave ID is 2.
mb_req_adu = 02 04 00 07 00 03 01 F9
mb_res_adu = 02 04 06 00 02 0B 15 09 7C 19 F2
Table 11: Example 2 (Reading Input Registers)
Request Response
Field Name (Hex) Field Name (Hex)
Slave ID 02 Slave ID 02
Function code 04 Function code 04
Starting Address Hi 00 Byte count 06
Starting Address Lo 07 Input Reg. 7 Hi 00
Quantity of Input Reg. Hi 00 Input Reg. 7 Lo 02
Quantity of Input Reg. Lo 03 Input Reg. 8 Hi 0B
CRC-16 Hi 01 Input Reg. 8 Lo 15
CRC-16 Lo F9 Input Reg. 9 Hi 09
Input Reg. 9 Lo 7C
CRC-16 Hi 19
CRC-16 Lo F2
The contents of input registers from 7 to 9 are shown as 6 byte values of 0002, 0B15, 097C hex or 2, 2837, 2428 decimal, respectively. All the register are 16-bit in size and thus, each register showing 2-byte value.
4.8.3 Example 3 “Writing Holding Registers”
This example illustrates MB request and response messages to write in 2 Holding registers (0 and 1) of a DAQ board whose slave ID is 1. It should be noted that holding registers can be read or written unlike input registers which can be read only.
mb_req_adu = 01 10 00 00 00 02 04 00 C8 0D AC 76 BC mb_res_adu = 01 10 00 00 00 02 41 C8
Table 12: Example 3 (Writing Holding Registers)
Request Response
Field Name (Hex) Field Name (Hex)
Slave ID 02 Slave ID 02
Function code 10 Function code 04
Starting Address Hi 00 Starting Address Hi 00
Starting Address Lo 00 Starting Address Lo 00
Quantity of Input Reg. Hi 00 Quantity of Input Reg. Hi 00
Quantity of Input Reg. Lo 02 Quantity of Input Reg. Lo 02
Byte Count 04 CRC-16 Hi 41 Register Value Hi 00 CRC-16 Lo C8 Register Value Lo C8 Register Value Hi 0D Register Value Lo AC CRC-16 Hi 76 CRC-16 Lo BC
The holding registers (0 and 1) of the DAQ board are successfully written with values 00C8 and 0DAC hex or 200 and 3500 decimal, respectively.
5 RESULTS
At this point is should be pointed out that the DAQ system is tested for indoor functionality only. The final test results for the functionality of the DAQ system can be achieved after installing DAQ boards on the roof top along with the PV modules, since the DAQ boards are designed for oper-ating outdoor.
5.1 ADC test results
During the programming and testing phase of the DAQ board hardware alone, the 12-bit analog-to-digital converter (ADC) on-board chip[6] has been tested indoor and results are quite suffi-cient in terms of accuracy. These results are listed in table 13. The real values are measured through a calibrated voltmeter provided by ABB CRC 187A, instrument number A38.
Table 13: ADC Test Result
# ADC Reading Real Value Difference Error %
01 0.003V 0.001V -0.002 -200% 02 0.035V 0.032V -0.003 -9.38% 03 0.281V 0.284V 0.003 1.06% 04 0.901V 0.908V 0.007 0.77% 05 1.213V 1.219V 0.006 0.49% 06 1.678V 1.686V 0.008 0.47% 07 2.206V 2.22V 0.014 0.63% 08 2.826V 2.847V 0.021 0.74% 09 3.249V 3.271V 0.022 0.67% 10 3.873V 3.898V 0.025 0.64% 11 4.280V 4.304V 0.024 0.56% 12 4.935V 4.967V 0.032 0.64%
The results are acquired from the DAQ board by programming the microcontroller for setting and reading the output of the 12-bit ADC chip (U3). A voltage signal in the range of 0V to 5V is provided at channel 0 of the ADC chip for every reading. The error ratio is minimized program-matically by taking the average of 100 samples that are acquired in less than 1 second for each ADC reading. The results are summarized in the table 13.
5.2 Results with GUI application
So far, the results after indoor testing of the DAQ system with complete software are shown in figure 5.1, where GUI application shows the response of the DAQ board (whose slave ID is 1).
Figure 5.1: Response from DAQ board
5.3 Data Logging
The GUI application is also capable of logging data into a plain text file from input registers. These input registers carry data from ADC1 and ADC2 of the DAQ board. Thus, the ADCs data is saved into the text file (DAQ_dev_001.txt) if Log Data (check box) is checked on the GUI window (as shown in figure 5.1). A preview of DAQ_dev_001.txt file is shown in figure 5.2.
5.4 Data Manipulation
All the actions which are carried out by the GUI application, can also be performed from the MATLAB command window. This may facilitate significantly the processing of the data acquired from the DAQ boards. For this purpose a global variable with the name daq is created as soon as the GUI application starts it is a structure type variable that synchronizes with all the data acquired from DAQ board. Thus, it contains all the data acquired from the DAQ board and can be processed independently without the need of the GUI. A preview of daq variable in command window is shown in figure 5.3.
6 CONCLUSIONS
The DAQ system was designed, programmed and configured successfully. In addition, it fully complies with the given hardware and software requirements. All the features of DAQ board are functional. All the components of DAQ board are mounted normally except PIC16F877A which is mounted on the bottom side of the PCB. This is due to some misunderstanding which caused an error in the PCB design while referencing the PLCC-44 datasheet. This error has been removed from the PCB design (as can be seen in appendix A.2) but it exists in four readily produced PCBs. Furthermore, the DAQ system uses RS485 communication port (as shown in figure 4.4) to con-nect more than one DAQ board on the single communication bus that is concon-nected to a master computer. Concerning the developed software, it should be noted that the firmware for DAQ boards and GUI application software for the master computer work flawlessly. This enables the control of each DAQ board with a remote computer using the unique ID number which is set using dip switches on the DAQ board, as shown in figure 4.15. Finally, a USB-to-RS485 converter adapter is connected to the computer system in order to enable RS485 communication for the DAQ system as illustrated in figure 4.8.
7 FUTURE WORK
SMT components are becoming prominent in modern electronic devices due to their small size and power efficiency. Thus, the use of SMT components on the DAQ board can effectively reduce the PCB size and power consumption. Moreover, a pair of up to 24-bit ADCs can be used for more precise reading of analog signals.
8 REFERENCES
[1] Microchip Technology Incorporated, © 2003, In-Circuit Serial ProgrammingTM(ICSPTM)
Guide, Microchip Technology Incorporated, U.S.A,<Link to Datasheet>.
[2] MCT Paul & Scherer Mikrocomputertechnik GmbH, 1984, SPI - Serial Peripheral Interface,
Martin Schwerdtfeger, Ranzin, Germany, viewed 13 March 2012,<Link to website>.
[3] Yasir Karim Qureshi, Zeeshan Ahmed Khan, Fateh Muhammad Bilal, Ammar Ismail, Intissar
Mzalouat, 2011, SECRC/PT/TR-2011/271 - Photovoltaic Monitoring System, ABB AB Corpo-rate Research Center, Sweden.
[4] Microchip Technology Incorporated, © 2003, PIC16F87xA Data Sheet, Microchip
Technol-ogy Incorporated, U.S.A,<Link to Datasheet>.
[5] Microchip Technology Incorporated, © 2008, MPLAB® ICD3 In-Circuit Debugger User’s
Guide, Microchip Technology Incorporated, U.S.A,<Link to Datasheet>.
[6] Linear Technology Corporation, © 2012, LTC1290 - Single Chip 12-Bit Data Acquisition
Sys-tem, Linear Technology Corporation, Milpitas CA, viewed 22 March 2012,<Link to website>.
[7] Linear Technology Corporation, © 2012, LTC1446 - Dual 12-Bit Rail-to-Rail Micropower
DACs in SO-8, Linear Technology Corporation, Milpitas CA, viewed 22 March 2012,<Link
to website>.
[8] Maxim Integrated Products, © 2010, MAXIM +5V-Powered, Multichannel RS-232
Drivers/Re-ceivers, Maxim Integrated Products, U.S.A,<Link to datasheet>.
[9] Maxim Integrated Products, © 2009, MAXIM - Low-Power, Slew-Rate-Limited RS-485/RS-422
Transceivers, Maxim Integrated Products, U.S.A,<Link to datasheet>.
[10] Tyco Electronics Ltd., © 2010, General Purpose Relays PCB Relays - Schrack, Tyco Electronics Ltd., Berwyn,<Link to datasheet>.
[11] Fairchild Semiconductors Corporation, © 2005, TIL111M, TIL117M, MOC8100M, Fairchild
Semiconductors Corporation, U.S.A,<Link to datasheet>.
[12] LEM, © 2011 , Current Transducer LA 25-NP, LEM, Switzerland,<Link to datasheet>.
[13] Fairchild Semiconductors Corporation, © 2011, LM78XX/LM78XXA 3-Terminal 1A Positive Voltage Regulator, Fairchild Semiconductors Corporation, U.S.A,<Link to datasheet>
[14] Linear Technology Corporation, © 2011, LT1027 - Precision 5 Volt Reference, Linear
Technol-ogy Corporation, Milpitas CA, viewed 22 March 2012,<Link to website>.
[15] Fibox Oy Ab, © 2012, UL MNX UL PC 200/63 HT, Fibox Oy Ab, Finland,<Link to Datasheet>.
[16] Modbus Organization Incorporated, © 2006, MODBUS Application Protocol Specification
ver 1.1, Modbus Organization Incorporated, Hopkinton MA,<Link to Document>.
[17] CCS Incorporated, © 2012, CCS Compiler Demo, CCS Incorporated, Waukesha WI, viewed
[18] Microchip Technology Incorporated, © 2003, Development Tools Main Page, Microchip
Technology Incorporated, U.S.A, viewed 07 May 2012,<Link to Website>.
[19] Intel, © 1988, Intel Hexadecimal Object File Format Specification Revision A, Intel, U.S.A,
<Link to Document>.
[20] MathWorks Inc., © 1994 - 2012, MATLAB - The Language of Technical Computing,
Math-Works Inc., Natick, Massachusetts, USA, viewed 14 May 2012,<Link to Website>
[21] Advantech Co. Ltd, © 1983 - 2012, ADAM-4561 (1-port Isolated USB to RS-232/422/485 Con-verter), Advantech Co. Ltd, USA, viewed 14 May 2012,<Link to product page>
[22] MathWorks Inc., © 1994 - 2012, MATLAB GUI, MathWorks Inc., Natick, Massachusetts, USA,
viewed 14 May 2012,<Link to Website>
[23] Ing. Ivo Bauer, © 2002 - 2011, ModLink - Welcome to ModLink, OZM Research, Hroch ˚uv
Týnec, Czech Republic, viewed 15 May 2012,<Link to Website>
[24] Wikipedia, © 2012, Wikipedia The free Encyclopedia - OSI model, Wikipedia Foundation,
9 ENCLOSURES
Prototype design of DAQ board is shown in figure 9.1. This prototype was designed during the group project conducted for ARGUS[3] project in 2011. The final design of DAQ board is pre-sented in figure 4.1 which is the result of continuous tests and measurements from previous project.
A SCHEMATIC AND PCB OF DAQ BOARD
A.1 Schematic of DAQ Board A.2 PCB Design
A.3 PCB images of DAQ Board
B SOFTWARE FOR DAQ SYSTEM
B.1 Firmware for Server (Source Code) B.2 Software for Client (MATLAB files)
Please Note:
The schematic diagrams and software for the DAQ system are subjected to the confidential information and the sharing of such information publically or commercially, is prohibited.
CHANGE HISTORY
Rev. Chapter Description Date / Dep. /Name
01 All Initial document <yy-mm-dd>/ <dep.> /
<name>
REVIEW HISTORY
Rev. Chapter Reviewer(s) Date