How to develop graphic design for games
with low-pixel density
Tobias Kry
Bachelor Thesis in Game Design, 15 ECTS Credits
Game Design and Graphics, Spring 2013
Supervisors: Mikael Fridenfalk, Hans Svensson
Examiner: Hayashi Masaki
Abstract
This thesis is written for the Bachelor of Arts degree in Game Design and Graphics at Gotland University in Sweden. A method used in graphic design for games with low-pixel density was initially studied in the course Advanced Game Project and has in this work been further developed. In general, since regular size-reduction of pictures often results in visually incomplete bitmaps, the goal of this thesis is to provide a better overview on the process of reduction where the important features of the original picture are maintained throughout the reduction phase.
Table of Contents
1 Introduction ... 1
2 Procedure ... 2
2.1 Ideas and Inspiration ... 3
2.2 Initiating the project ... 5
2.3 Developing icons for in-game buttons ... 7
2.4 Finishing the tutorials ... 8
2.5 Wrap up the Art Guide ... 9
2.5.1 Final editing ... 9
2.5.2 Testing and Feedback ... 9
2.6 Research ... 12
2.6.1 Preferable references ... 12
2.6.2 Interface and menus ... 15
3 Result ... 17 4 Conclusion ... 19 5 Discussion ... 20 Tutorials ... 21 Software ... 21 Appendix 1 ... 22 Appendix 2 ... 23 Appendix 3 ... 24 Appendix 4 ... 25
1 Introduction
The original work of this thesis was performed in a small group of students, consisting of three people in total, engaged in the question of how to develop ideas and visual examples for 2D games. The main idea with the project was to create a rather simple art guide with just a couple of short tutorials on how to create the characters, environments and props for how they would look like in the final game. Everything should be made in low resolution pixel art with a simple, cartoonish design, and since this is a new way of working with graphics for the people involved, they had to get used to it during the short amount of time that was given. Additionally, since most people in the group basically did not have any background knowledge or experience on how to create an art guide, studying other artists’ work on art guides, observe the stages they have included and how they chose to put it all together were extra important in this project.
Since the plans of what to do for the final game was very clear for most people involved, through this art guide it should be possible to explain to other people who are new to the project, to follow the tutorials without any major problems. Research about pixel graphics art guides should be made, and the main question is: Could these guides and tutorials be made understandable enough so that any graphic artist could use them without any major
difficulties.
Most pixel games use either arena, side or top scroller navigation and is built up with an often very noticeably low resolution which may, in most cases, make the game less detailed and look less qualitative. However, this is one special thing and might even be seen as the charm of pixel games. An example of a very good pixel side scroller is the somewhat famous game Cave Story.
Figure 1: First, here is a
cropped (edge decreased) image of an in-game scene in the game Cave Story,
complete with the main character and a few enemies (the white lumps with cute eyes). This example is showing a remake of the game, made for the gaming platform Nintendo Wii.
Even though Fig. 1 is showing a remake of the original game, the quality in the resolution could still be seen as pretty low and the pixels are rather visible, especially on the edges. In the upper left corner of the image there is also the so called “user interface” located, including for example icons for both the weapon and the current health.
Figure 2: Another example of Cave Story. In this image there is a little more action
going on. There are also a few more icons and different stats displayed in the user interface.
2 Procedure
The final plan before the project could be initiated was to create an art guide for a low resolution sider scroller game. The big difference compared to the first idea was that most parts of the game, for example characters, parts of the environments and other objects, should mainly be made in 3D. Although, the ideas later on changed from low polygon 3D graphics to simple 2D, and should mainly focus on low resolution pixel art. This choice would also save considerably much more time in creating the graphics, since working with 3D generally requires a lot more time to complete, which there was currently no time for. The 3D graphics generally include the procedures of creating the models, unwrapping, and texturing. Even though there are methods of creating low polygon models very quickly, 2D concepts should be the most suitable for this project.
The big challenge during the process of this project would be to choose what to bring up in the different stages and what the most important things to focus on would be and to think about through the tutorials in the art guide. Then there are only the most necessary steps that should be included for creating the characters or the objects for example, and in addition if these steps would be enough for everyone to understand.
Another important thing is that people should be able to stick to the correct art style through the entire procedure, this depends however mostly on the artists themselves. Once every week the working progress of the project that was done during that specific week was documented. Here is a brief conclusion of the milestones that were set for every week and the planned procedure:
The first week should be spent on creating the ideas for a game and eventually the designing of the graphics could begin as soon as possible.
During the second week, the work should be spent on working with the graphics for the tutorials and the art guide itself.
The third week should mainly be used to finish up the last parts and then putting the whole art guide together.
Finally, the fourth week should be used to fix whatever that needed to be fixed. Eventually the document should be finished to be tested by different people.
2.1 Ideas and inspiration
During the very first week of the course there was not as much work done than expected, mostly because the very first ideas that was planned on being used were little too vaguely thought through and there were no actual solid plans. The best idea there was for the project at that moment was to only create short tutorials which should be parts of a simple art guide for an already existing game.
There was not very much time over for any real work during the start of the second week either; it was mostly wasted because there still were not any acceptable plans that were solid enough to keep working on (according to the examiner) even though this became the first week of working with the actual project.
The final choice that was made was to stick to the idea about creating an art guide. However, since the desire to create something from unique ideas, the choice to develop this plan and start working on ideas for a new and non-existing game remained, which there also were a little more certain ideas about. In the end of the second week the work could finally start with an idea for the project, without any further impediments.
Starting with a quick brainstorming to generate ideas for different graphical objects and what player interactions that will most likely be needed for the game. There would be a rather different set of characters in the game, if they should be only human or not human at all was not specified at first. The environment should mostly consist of underground caverns since a decision (affected by the background story) was made that the game should be in an
underground setting. The props would be consisting of ruins and debris from an old, buried city.
The major inspiration for the graphic art style and gameplay itself was mainly taken from the game Limbo (developed by Playdead [5]), which is made entirely in 2D, and the game Pid (developed by Might and Delight [6]), mostly made in 3D. Both of these games are side scroller platform games where the player controls a tiny character to basically solve puzzles which is used to avoid and/or defeat enemies and jump between platforms, which will eventually make the player progress through the levels. Another idea was to not make the game full of the usual shooting and other violent actions like in many other games in the same genre, but instead make the player defenceless against the enemies which will create a more
Figure 3: The three images are taken from the game Limbo, The player can not
directly protect himself from the enemies but has the ability to use objects in the environment to get past enemies as seen in the image on the far right (although, that time it did not end very well)…
Figure 4: The second game we used as a reference, Pid, is actually relatively similar
to Limbo, except that it’s for the most part made in 3D and has a very different design and background story. Also in this game the character is mostly defenceless against the enemies.
The idea was then to combine some of the major elements from these two games, like the dark, grimy, and somewhat creepy feeling in Limbo, and the technology such as props and characters from Pid. Together with a simple story different from either of these games and using the most interesting elements and functionalities as references, a new concept could be created.
2.2 Initiating the project
Starting with designing the characters; the main character should be fully human, though the focus was mainly placed on the NPC’s (Non Player Characters). Decisions on how they should look like were quickly determined; they should be rather cartoony robots and cyborgs (a creature or individual that consists of both organic parts and artificial machinery, which is controlled by the individual itself) with a simple design and a somewhat protruding
appearance, this should also make them fit into the theme of the game and its background story.
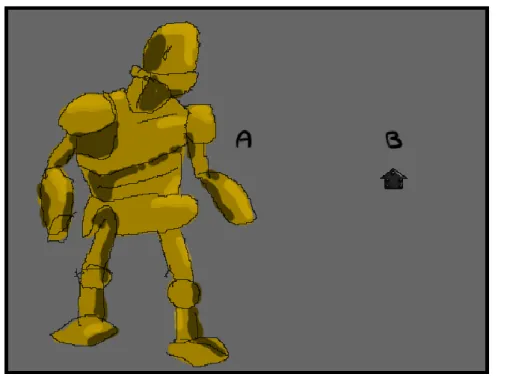
Figure 5: Here are some examples of all the first character sketches that were made
for the project. In I, which consists of the two first character sketches, there is one completely mechanical character (I A) and one cyborg (I B) with just a few
mechanical body parts.
However, the decision to mainly focus on creating the robot characters at first was made, and continuing with designing a couple of more sketches only containing robots with various designs. Finally, the second version (IV B) in IV was chosen to make an example for the first character tutorial. Later on the second design (III B) in III was also chosen to make one more character tutorial.
During the third week the character designing continued, and since the previous week was very short, this was basically the second week of working with the project in total. When a few more alternative versions for the mechanical characters were made, experiments with creating some 3D models began. These were based on one of the sketches just to see how it would work out. The decision to make the graphics in pixel art remained anyway. In the middle of this week, when the most interesting design for the first character was settled, creation of the in-game version for this character began. This was how the character would possibly look like in the game itself.
During the first stage of working on the character, when the line art was created, the original sketch was not perfectly used as a template which made the final result quite different from the sketch of course, although there are no major differences. In the beginning there were plans on having textures similar to the ones in Borderlands (see [7] in the Software section), although creating that kind of textures in low resolution pixel graphics would be close to impossible to accomplish.
During the creation of the character, from line art to coloring including some vague textures, shading and lighting, documentations were made of the main things that were needed to be done for the different stages and the things that would probably be most important to think about during the process were written down. One example of the documentations is a short description of what size the brush tip should be set to while the line art is being created. Another example is if there should be any glow on the line art itself and the procedure on how to do it.
Personal note: The first tutorial for this project became very brief and basic with very few detailed explanations about how to proceed (mostly because it was the first I have ever done and the stages of the procedure were picked out rather personally).
During my process of creating this character I took a very quick glance through a tutorial made by another artist that we planned on using for references, and I had a few of these things in mind that were mentioned in different stages of this tutorial.
The document itself can be found in “Pixel Art Tutorial - Shading [1]” in the Tutorials section.
Figure 6: This shows a picture of the line art for the first character created. This is
one of the earliest steps for most people in creating either high or low resolution art.
The examples in the image above (Fig. 6) are enlarged; the original characters are smaller to size, and these are only examples of a full tutorial for the art guide which originally contains more stages in between. The second one (B) is showing the full rendered character with colors, lighting, and shading, and it is most probably how the final character design would look like inside the game itself.
The common action to begin with is to create the line art using a one pixel size pencil tip, preferably following the design sketch as accurately as possible. Drawing with pixel art is a quite different way of working from what some artists are used to but in the end it will mostly work out well and the results may become partly better than expected.
Working in low pixel graphics could also make everything look very static and flat, which is something barely anyone wants to see in a final product. However there are multiple ways to correct these problems, for example just by placing the shadows and the lighting
During the shading process, attempts were made to create some kind of a rusty surface that would also work as a texture at the same time. The basic color was already perfect enough to fit the appearance of an aged and rusty metallic surface. Additionally, there were a lot of details that could have been added on this character, though this one started more as a test sample for working with pixel art in general and prepare for further tutorials.
2.3 Developing icons for in-game buttons
Another very important part of the game, except for characters, would be the buttons which helps the player to interact with the game. For movement of the character there should be at least three arrows which would be the main interaction keys. These arrows should indicate in which direction the character will move when being pressed; there should be one rightward movement, one leftward movement, and one for the upward movement which will make the character jump. This function is commonly very useful in most platform games.
The other button should be for the interaction of the telekinesis function (or “psychokinesis”, using the mind only to move physical objects or material): In the beginning of the game, the character finds a highly advanced technological bracelet which will give the user an ability to move and lift extremely heavy objects with basically no effort at all. The player will then use this ability to progress throughout the game.
Figure 7: This image contains the icons for both the movement and the telekinesis
function, shown in line art and in full rendered version.
Here is first the line art for the arrow icon (A) which should be used for the movement buttons. The bracelet icon (B) is included as well and is for the telekinesis button, also shown with line art. Icons C and D contain the same icons except with the final colors, lighting and shading effects. These were basically made with the same stages as the robot character in the previous image, although the icons have slightly different attributes.
There was also need for two more arrows, for left and rightward movement (as seen in icon Fig. 7C). These arrows have a different lighting in their texture. Since they use the same light source as the original arrow, the lighting had to be changed as well because otherwise it would not look correct.
In addition, the stages that were probably most necessary to have knowledge about during the creation procedure were captured and documented. An example would be that if one of the edges was too sharp it could be smoothed out with the help of the eraser tool.
2.4 Finishing the tutorials
When both the icons and their tutorials were finished, it was still necessary for the group to have at least one more tutorial for another character. This one was also supposed to be mechanical, although the general design would be very different and rather simpler than the design of the previous character, even though there were much more details on this one. Just as with the previous character and the icons, the same stages of the creation procedure was used to draw this one as well, however during the beginning while the line art was created, the original character design sketch was used as a template. Also, the coloring, shading and lighting process was slightly different since there were a couple of slightly different details in the texture.
Because there were more details on this character, especially on the arms, it would be tough to draw them in such low resolution.
Figure 8: This is the second character, shown here first in line art (A), which also
here is the first part of its character tutorial; and the final, rendered version (B), which is a much more detailed character than the previous one.
Both A and B in Fig. 8 are part of the last tutorial for the art guide. This tutorial basically follows the same procedure of creation as the other robot character as well. One exception is that the texture and the shading is a little more detailed and different which also made the creation procedure to be slightly different.
Additionally, the first robot character (see Fig. 6) was covered with both a rusty-like color and texture; it had no visible bolts, while the second character (see Fig. 8) has a more uneven surface and only a couple of rusty spots on its body, which makes a rather big difference between these characters.
These rust spots also clashes through the colors and the lighting which makes the texture look a little more advanced than it actually is, even though it is much more advanced than the first character. This character also has a bigger variation in colors and its own light source in the middle, which gives away a very weak light. This light will be more noticeable when the character is located in a dark environment.
2.5 Wrap up the art guide
2.5.1 Final editingWhen everything finally was put together into separate tutorials in the eventual final art guide document, the overall design of the theme needed a completely new appearance which
hopefully would look a lot more interesting than it did at the time. A single colored
background would not only create a very dull feeling, it would also be very unattractive. By saving a lot of time in the final stages of finishing up the entire art guide, an already finished background made for a previous project was chosen. This last project was mainly about designing characters and props as concept art for a game idea, the background image was taken with permission. Although the only thing that had to be edited were the scale, especially regarding width, to make it fit the dimensions of the new document it was used for. No
noticeable loss in quality was caused by this.
Although, the color was actually a bit too dark, which caused the images in the tutorials to slightly blend into the background, this could make them unclear to distinguish. To resolve this and to separate the images a little from the background, a tile of brighter color was put beneath the images, which made them more visible.
When everything was finally put together, including the background, the focus could be placed on the less important parts like the font for the text in the art guides. Since Photoshop already contains a huge set of default fonts, there was no need to search for anything online and download a new one. The font did not have to look like anything special, although the most important thing is that it should not be too hard to read either. Also since all the tutorials were fairly related, they could of course have the same font. This made the search relatively quick and easy, and it did not take too much time to find one that looked good enough. 2.5.2 Testing and feedback
During the very final and fifth week, the art guide (two documents containing the four tutorials, see Fig. 9) was given to a few very different people, three in total. They would then try to follow the art guide to see if they could understand it and hopefully create something similar to one of the characters or icons from the tutorials, and eventually give some feedback when they were done.
There were not too many people for the moment that got very much time over which they could use for testing the guides, due to the time they had to spend and focus on their own projects, although the people that tried gave similar feedback which was mainly about the
Figure 9: Here is an example of the art guide, showing one of the tutorials. The entire
art guide itself is too big to fit in one single page so its tutorials have been split up into four figures that are shown in the appendices 1 to 4.
For example, a programmer who tried one of the guides, and according to himself, he
basically did not know anything about how to use Photoshop (or any actual graphics software at all for that matter). The test did not result in a very great master piece in any way, although the guide was very properly used. This example was enough proof that the guides were too vague for an inexperienced artist and needed a lot more explanation, images and details in the texts.
Figure 10: In the image above, there are two of the results from some of the people
who tried to follow the art guides.
In A there is the first robot character which is drawn by the programmer who was very inexperienced with creating any kind of graphic design. In B there’s one of the movement arrows. This one was made by a more experienced graphic artist.
Even though the character pictured in Fig. 10A was created by using the tutorial very
diligently, and after a couple of questions during the process, the result came back as seen in the image above. It proves that there should be more specific information about the colors, shading, and lighting.
As in Fig. 10B, although working with pixel art has never been the main focus and is a very new method of drawing for the tester, the result did turn out almost as it was thought planned and the tutorial was rather carefully used here as well. At first the person needed some convincing, however. Just as with the result in Fig. 10A, the result in Fig. 10B also proves that more information would be very useful to give a more correctly rendered result, and the guide would most likely be a lot easier to use, especially if the artist is not very experienced.
2.6 Research
Now about the procedures that should have been used to create an art guide.
The first part of this section will mostly consist of images from tutorials made by more professional artists. The second part will show examples about the interface of the program and where the necessary tools and actions are hidden.
As it has been proven, the tutorials themselves should have been expanded and more detailed; also the different stages through each tutorial were clearly not enough. There should have been screen captured images from the interface of the program that was being used through the creation of the entire art guide; there will be such examples here as well.
Some of the “basic tutorials” did have an extra introduction stage which, more or less, very detailed describes what pixel art actually is, or even what pixels are in general. All the images in this section are taken with permission from the respective author/artist to be used as
examples in this report.
2.6.1 Preferable references
The first two images in this section will be describing the very first stages of the working process before starting with the actual drawing: introducing the program and modify the size and resolution settings for the document. However, some of these images contain a lot of text that is very detailed which may even be slightly unnecessary and should preferably not be part of our art guide.
Figure 11: In the first example in this section (the image above, part of Basics for
Beginners [4] under the Tutorials section) there is a relatively long section about the program that is being used for creating the tutorial.
A little briefer introduction would probably be enough here. A simple art guide should much rather include text blocks that is as short as possible because otherwise it may cause the tutorials to be uninteresting, to and for some people confusing to use.
Figure 12: If there was another program used to create the tutorial there
Figure 13: In the second example, which is also part of Basics for Beginners, there are
very clear descriptions on how to create a new document step by step. It also shows what the overall dimensions of the document should be set to before drawing. This is rather important because an inexperienced artist might for example start to draw outside of the preferred area of the canvas.
Fig. 14 shows a suitable layout used for the main tutorials. It’s a very good and specific example that shows multiple small pictures with a more or less brief description for each one which carefully goes through every step that will most likely be necessary to know while creating this kind of pixel art. The image shows a relatively accurate example of how a “simple” pixel art tutorial could come to look like – even though it’s considerably longer than the ones in our art guide. However, the length should not interfere with the creation process, although the tutorials should not be made too long either.
The Pixel Art Tutorial - Shading [1] could be considered to be too long and possibly too advanced to be a “simple tutorial”, even though it contains very little text in comparison to the one seen in Fig. 14.
Color palettes are a good tool that could be used whenever colors have to be specified in the art guide. However, if the color settings do not seem like they should need a significant part of the guide, there is no major need to include any too advanced palettes more than the one in the image below.
Figure 15: This image is a
copy made from the Pixel Art Tutorial - Colors [2] and here is the first character again with a color palette containing all the figure’s colors.
As mentioned before, the design for this character is relatively simple and there is not much difference in its color scheme. In the color palette in Fig. 15, the color numbered 3 is the flat base color. This color is commonly used as a basis from which the brighter colors for lighting (4) and darker colors for the shading (2) are developed. Although the lighting on the character is not accurately “pixel art” since the edges has been smoothed, which is rarely a method to go by in creation of pixel art.
Also, color number 5 is a base color as well, although it is not a very great part of the character itself; it’s used for the eyes and might sometimes become a major part of the character itself. The first color in the palette, number 1, is used for the outlines. A line art which is displayed in normal light would mostly be more optional with a darker color instead of being completely black.
Figure 16: Here are three 2D spheres made with three different shading methods by
following parts of the tutorial in Pixel Art Tutorial - Basics [3].
In Fig. 16, A has very simple shading with no actual details. This will make the texture look very flat and shiny. B is made with a little more uneven shading, making its surface look grimier and somewhat less shiny, like simple rock/stone texture. This could also be used to make a rusty texture. In Fig. 16C there is a more advanced and detailed shading, it’s a
combination of the shading techniques in both A and B. This gives a much better feeling to an uneven surface and would work better for an advanced rock texture (or a very rusty surface). 2.6.2 Interface and menus
The interface in Photoshop CS6 only has a different color from the previous versions (which is adjustable and can be changed to look like the older versions if that would be preferable). The rest, like the tools and menus for example, are for the most part visually identical to the previous versions. Compared to other programs however, there might possibly be a few other differences in the overall design as well.
Figure 17: Images similar to the one to the left should be included at
least one time in an art guide where Photoshop is being used. It’s a part of the Tool Menu in Photoshop and for the most part it basically looks the same throughout Adobe’s entire Creative Suite series.
The Tool menu contains (among lots of other instruments) the Pencil tool, located in the fly-out menu, as seen in Fig. 17. The menu also contains the Eraser tool, which is located at the bottom of the image. These are the most suitable and preferable tools that are commonly used while creating pixel art.
Figure 18: In the image to the left there is the
Layer Options menu in Photoshop CS6 which could possibly be an important part of a tutorial. The main components are numbered 1 to 4, where number 1 creates a new layer, the other numbers are the layers themselves; one for the line-art (2), and one for the shadows which is a “clipping mask” (3) for the shadow layer (4). This
information should be much more specified in the final tutorials of the art guide, of course.
Figure 19: The color settings may
not need to be too specified; mentioning basic colors instead of the numbers in the color editing slides could be enough (see image to the right), unless the guide is intended for color blind people. If so, every number is just as important.
Every color and all color settings have an important role in the creation of any digital art (except in grey and black & white images of course). As mentioned earlier in this section; if the colors does not seem like an important part of the artwork, there is no need to use any advanced color palettes, though it would be a very good idea to at least slightly specify each color in every tutorial to not make the artist confused about what color to choose during the procedure, and it might prevent the artwork itself from looking terribly awful in the end. Also, the examples of the menus in this section (see the section of Research: Interface and menus) are screen captured directly from the interface in Adobe Photoshop CS6, which is the program that was used while creating everything in the entire art guide.
3 Results
After the fourth week I finished my part of the project where I have made two documents in total containing two short tutorials each (see Fig. 20). The first document is about the character tutorials; in this case it was only the two examples I made during the project. The other document contains the tutorials for both the icons.
Figure 20: An example tutorial which is a part of the full art guide, see the
When it comes to the graphics in the art guide it appeared that they were actually very easy to understand and were not too confusing, in contrast to the descriptions which obviously were too vague for everyone to understand. One of the test subjects was a programmer who very rarely uses Photoshop for anything, and due to the lack of knowledge about the program. There were a couple of questions about the creation procedure, which were of course answered by me.
The guide that was tested proved to be quite functional, except for the minor
misunderstandings which could have been avoided if there simply were more steps in between. These steps should show small images that are screen captured parts of the tool icons from inside the interface of the program, which will guide the inexperienced artist through the entire procedure. The people who were testing the tutorials understood what had to be done; the common question was just how they would do it.
As previously mentioned, the stages through the art guides were not explained enough to currently be understood correctly. Most people who were trying to follow one or two of the art guides responded with the feedback that there were a couple of things that could be mentioned in these guides, which apparently were a little too vague for an inexperienced artist. Although people who are used to work with either Adobe Photoshop, pixel art, or both of these would not have any major problems at all in creating any of these characters or icons that were included in the guides.
Additionally, people who are very familiar with the game project itself, and perhaps pixel art in general, should basically have no problems at all in using the tutorials.
4 Discussion
As I have given the documents to a couple of very different people, the feedback they
responded with were that the steps in the art guides were a little too vague and that they could be more specifically explained. The texts could explain a lot more and there should be added a few more images that would show how the characters were evolving.
When I eventually got to think about this myself, I also noticed that the guides could possibly have been more detailed and probably longer than they currently were, especially for those who were not used to work with this kind of software. This depends of course on how familiar the artist is with using programs like Photoshop for example, and how much they know about working with low resolution pixel graphics.
Many artists may be unfamiliar with some key software used in image processing, even some of the most commonly used programs like the ones in the Adobe Creative Suite series, or may not have worked with any kind of pixel graphics at all. This shows that a very important thing to keep in mind should be how the art guides could be able to explain the stages and guide an inexperienced artist through the entire creation procedure without any misunderstanding. A simple solution would be to add more information into every art guide that normally would seem unnecessary for the creator.
To find out and learn more about art guides in general, I should study other art guides and similar that are made by other (and more professional) artists to see how they are doing and what stages that have been included even more carefully than I did before we started the project, since now I have had more personal experiences involving the problems that we were most likely to encounter.
Then the question for future study could be, while creating tutorials for an art guide: what are the most important things to think about and what should be included to make an artist understand who is not normally used to work with pixel graphics? Because even though the graphical parts are clear, enough does not mean that the coherent descriptions are sufficiently detailed.
5 Conclusion
In conclusion, I will first bring up a couple of thoughts about the mechanical characters in this section because they had a rather important impact on the ideas in general and in the creation of the project. Of course the mechanical characters also had an impact on the timeline that was spent on the design process.
The proper way to go in the creation of humanoid robot characters (or robots in general) is probably to make them less realistic, because they will require less advanced thinking in design and animation while still make it look descent, unless the artist already have got enough knowledge about mechanical creations. This also applies to 3D models when a character has to move its limbs and bend the joints in angles that would be necessary in the game. Since neither the people I worked with, not I had any real knowledge in advanced mechanics (except from the models we have made before in 3D), we could not create any further material from the knowledge we already had; either to take the risk and make the characters as functional as possible, which would possibly cause the animations to look a little too strange, or we could just give them a more cartoonish appearance. In other words, making characters too realistic may cause the process of the design phase to slow down remarkably. To make our own art guide as accurate as possible, we should have studied more pixel art tutorials and/or art guides, both before and during the working process. The tutorials in our art guide became unintentionally brief and vaguely detailed. This was probably caused by the short amount of time we had and the “communication problems” there was in the group from the beginning. Because of this, the main focus was put on the part of creating a few short tutorials that could be used for a future project.
All the tutorials in these documents are of course only a couple of examples of a full art guide in the end. The time that was given was a little too short to create a full art guide, even though there were plans on creating something that could be further developed and eventually being used for a possible game development project in the future.
However, before the tutorials in the current art guide are being “published” and used in any final art guide, they need to get carefully looked over a couple of extra times and be corrected. Preferably, this should be done by comparing them to other pixel art guides and tutorials made by people who know more exactly what they are doing, and also use them as references. As a final conclusion, every tutorial in the document as they look like for the moment would probably only be useable for people that are already familiar enough with the idea on the design and the overall concept itself. There would hopefully not be any problems or further misunderstandings among those of us who have been working with the whole project, nor for people who has been previously used to work with pixel art.
Tutorials
[1] Pixel Art Tutorial - Shading: http://kiwinuptuo.deviantart.com/art/Pixel-Art-Tutorial-Shading-184136991 (Visited 2013-04-20)
[2] Pixel Art Tutorial - Colors: http://kiwinuptuo.deviantart.com/art/Pixel-Art-Tutorial-Colors-184802567 (Visited 2013-04-24)
[3] Pixel Art Tutorial - Basics: http://kiwinuptuo.deviantart.com/art/Pixel-Art-Tutorial-Basics-196016837 (Visited 2013-04-24)
[4] Pixel Art Tutorial - Basics for Beginners: http://gasara.deviantart.com/art/Pixel-Art-Tutorial-Basics-for-Beginners-356743783 (Visited 2013-04-24)
Software
[5] LIMBO:
http://web.archive.org/web/20130429115215/http://en.wikipedia.org/wiki/Limbo_%28video_
game%29 (Visited 2013-04-29)
[6] Pid developer’s homepage:
http://web.archive.org/web/20130509012709/http://www.mightanddelight.com/ (Visited 2013-05-09)
[7] Borderlands, developer’s homepage:
http://web.archive.org/web/20130430041603/http://gearboxsoftware.com/ (Visited 2013-04-30)
[8] Adobe Photoshop - Creative Suite 6: used for the interface pictures and the graphics in this document that is not from any of the other tutorials.