VTI EC Resear
ch • 10 • 2000
D
E L I V E R A B L E F R O M T H EO D I G O -
P R O J E C T U N D E R T H EH O R I Z O N
I N I T I A T I V E E U R O P E A N C O M M I S S I O N R E S E A R C H D O C U M E N T A T I O NTeaching learner drivers
with disabilities
An operation manual for driving instructors
Torbjörn Falkmer, Lars Gustavsson,
Benny Nielsen and Björn Peters
Teaching learner drivers
with disabilities
An operation manual for driving instructors
Torbjörn Falkmer, Lars Gustavsson,
Benny Nielsen and Björn Peters
Table of contents
Page
Preface ... 1
The driving school... 2
Classroom ... 2
Office... 2
Training car ... 2
How to avoid occupational diseases and injuries as a driving instructor... 3
The seat ... 3 The mirrors ... 3 Exercise ... 3 Exhausts ... 3 Filling up ... 3 Environment ... 3
Testing and evaluation... 3
Adult teaching in driving schools... 4
Learning and motivation ... 4
Motivation is important in all training ... 4
Teaching aids... 4
The teacher ... 6
Objectives of the lesson ... 6
Teaching methods ... 7 Demonstrations ... 7 Instruction practice ... 7 Independent driving... 7 Index ... 8 EXERCISE 0... 9 EXERCISE 1... 10 Seating adjustments... 10 EXERCISE 2... 14 Manoeuvre training... 14 EXERCISE 3... 16
Changing gear and braking gently... 16
EXERCISE 4... 20
Starting on hilly roads... 20
EXERCISE 5... 21
Reversing ... 21
EXERCISE 6... 25
Co-ordination... 25
EXERCISE 7... 26
Accelerations and hard braking ... 26
EXERCISE 8... 29
Driving on roads with less traffic... 29
EXERCISE 9... 34
Care and maintenance of the car ... 34
EXERCISE 10... 36
Driving on roads in rural areas ... 36
EXERCISE 15... 62
Driving on highways and main roads... 62
EXERCISE 16... 71
Driving on motorways... 71
EXERCISE 17... 74
Driving on roads with complex and varying traffic in rural areas (Summary of 15-16) ... 74
EXERCISE 18... 75
Dark driving ... 75
For students with special needs, see Exercise 18, Appendix 1 ... 75
EXERCISE 1, Appendix 1, for students with special needs ... 79
EXERCISE 2, Appendix 1, for students with special needs ... 80
EXERCISE 3, Appendix 1, for students with special needs ... 82
EXERCISE 4, Appendix 1, for students with special needs ... 83
EXERCISE 5, Appendix 1, for students with special needs ... 84
EXERCISE 7, Appendix 1, for students with special needs ... 85
EXERCISE 8, Appendix 1, for students with special needs ... 86
EXERCISE 9, Appendix 1, for students with special needs ... 87
EXERCISE 10, Appendix 1, for students with special needs ... 88
EXERCISE 13, Appendix 1, for students with special needs ... 89
EXERCISE 16, Appendix 1, for students with special needs ... 90
EXERCISE 18, Appendix 1, for students with special needs ... 91
Introduction to Appendix 1 ... 92
Common and general aspects: attitudes to and treatment of the learner driver with physical disabilities ... 92
Method in driving education ... 97
Human machine interaction (HMI) problems – adaptation ... 98
Health and disabilities ... 99
Termination of the programme ... 101
Disabilities and Vehicle adaptation. ... 103
Logbook introduction page... 121
Logbook sheet example... 122
Disability description chart ... 123
Vehicle adaptation classification ... 124
01 Adapted Clutch... 124
02 Adapted Braking Mechanism ... 124
03 Adapted Acceleration Mechanism ... 124
04 Adapted Steering... 124
Preface
The present manual is one of the outcomes of an EU-project with the title ODIGO. It was carried out within the Horizon initiative. As part of the ODIGO/HORIZON project Körkort Handikapp, Lernia in Kävlinge (formerly AmuGruppen, Kävlinge) in Sweden were requested to produce an operation manual for driving instructors, to be used in driver education for persons with special needs (PSN).
The ODIGO/HORIZON project was carried out in collaboration between Lernia, INIOHOS-NIRH and TRD in Athens, Greece and VTI in Linköping, Sweden. The pre-sent manual was produced in collaboration between Benny Nielsen (Lernia), Torbjörn Falkmer & Björn Peters, Gunilla Sjöberg (VTI), Lars Gustavsson (STR1), and Sue Vernon, Mary Hill (Banstead Mobility Centre, UK) and Anna Stina Ponsford, (who formerly worked at Banstead Mobility Centre, now working for Traffic Medicine Center at Karolinska Institutet in Stockholm).
The present manual is aiming at providing knowledge about PSN and to support driving instructors that educate PSN. In the introduction of the manual, the require-ments demanded of a driving school facility and some general aspects of teaching are considered. In the following driver education exercises are presented. In those, references to Appendix 1 are inserted, in which specific aspects of the driver educa-tion with respect to PSN are discussed. This appendix also includes an introduceduca-tion to the area of education and PSN. In addition, a section called “Disabilities and vehicle adaptation” is enclosed, in order to provide an orientation within the field of PSN and vehicle adaptation. In the last section a suggestion for a lay out of logbook sheets for driver education is enclosed.
The authors hope that the manual will be a useful tool, both for acquiring knowledge about PSN and as a practical educational tool in the actual driver education.
number of students (5-10) should each have a seat in the classroom and space for taking notes, filling in test sheets etc.
! For students with special needs, make sure tables and furniture are not in the way of wheelchairs. Adjustable height tables and chairs can be very useful. The toilet should of course be accessible for wheelchairs. Make sure that persons with special needs, (PSN), can open entrance doors (possibly with automatic opera-tion). Doorframes should be sized to fit wheelchairs and high thresholds should be removed.
Office
An office should be connected to the classroom for administrative purposes. The syllabus and training programme should be posted in the office and the driving instructor should hold a student progress card for each candidate being trained. ! For students with special needs, make sure tables and furniture are not in the way
of wheelchairs.
Training car
The training car should be of a model commonly used on the roads. It should permit good all-round vision, have left and right hand mirrors, and interior mirrors for both the driver and instructor. It should also have a dual control system for the clutch and brake (if using an ordinary gearbox) or brake and ignition switch (if using automatic gearbox) to enable the instructor to intervene if necessary. The training car must be inspected regularly for faults and be maintained in roadworthy condition at all times. ! For students with special needs, make sure that the student has full access to the
vehicle and the vehicle controls. The vehicle should be adapted in collaboration with a medically trained person having adequate knowledge of the student’s special needs. Following individual adaptation of the vehicle, the driving instructor must supervise the appropriateness of the adaptation continuously. The driving instructor is responsible for the vehicle being adequately equipped for the student before starting each lesson.
! Entering and leaving the training car, using a wheelchair for transport and the ordinary seat for driving, implies a transfer process that should be practised mainly in the rehabilitation phase. However, the training car should be able to accommodate the wheelchair or other technical aid for mobility.
vehicle, the instructor may assist the entry/exit operation and also draw the student’s attention to any grab handles provided. In some cases, extra grab handles will be needed in the training car.
! If a choice has to be made between different activities, the emphasis in driving education should be put on vehicle manoeuvring and traffic behaviour, not entry and exit of the vehicle. The latter may be practised outside the driving school.
How to avoid occupational diseases and injuries as a
driving instructor.
The seat
Be very careful how you adjust your seat. If you do not have a specially designed seat, use a hard support for the back or a seat cushion. The most common type of accident involving driving school cars is a rear-end impact. Therefore, it is important to adjust your headrest correctly.
The mirrors
Your rear and side mirrors should be adjusted to give an optimal view of other traffic and also to reduce the risk of long term muscular injuries in your neck and back.
Exercise
Take regular exercise. You will feel fresher during the day if you take a short walk between lessons.
Exhausts
When standing in a traffic queue, the fan will draw exhaust fumes into your car. To avoid this, open the sunroof or the car window instead.
Filling up
A driving instructor uses approximately 3,000 - 5,000 litres of fuel a year. Petrol contains about 2,000 more or less toxic compounds. To minimise the effects of these, do not stand too close to the fuel pump when filling up.
Environment
Turn off the engine when stopping for longer periods.
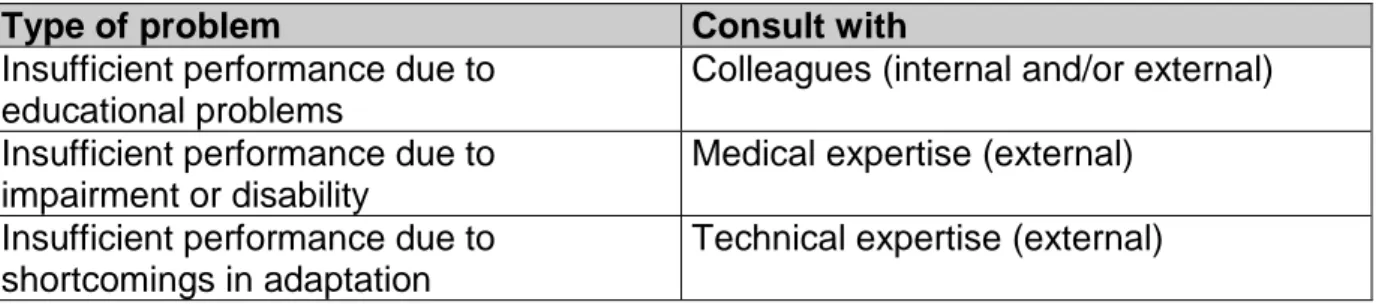
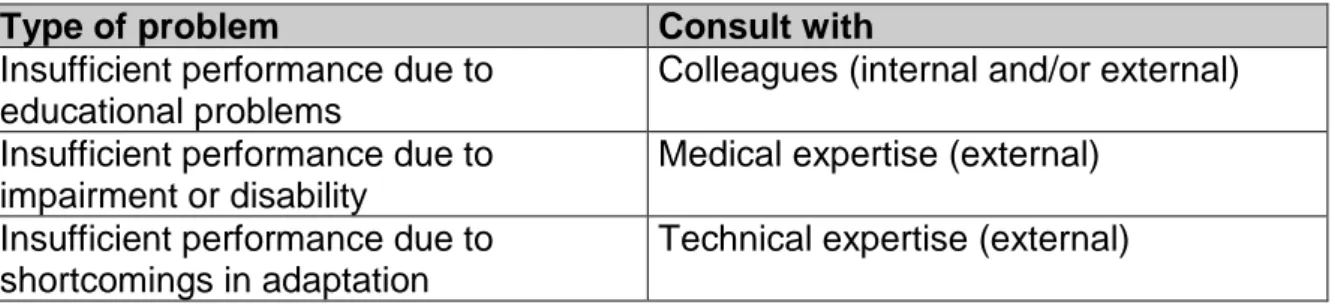
Testing and evaluation
For students with special needs (PSN), it is important that driving schools perform a test and/or an evaluation before training begins. This is to ensure that the driving school has the necessary equipment for performing training or adapting the training car. The evaluation form can later be used when the PSN requests a company to adapt a car.
are saying.
This is called motivation.
Three basic conditions for learning are: 1. Students must be motivated
2. Students must consider the programme useful 3. Students must be attentive
The way in which the training is organized and carried out will therefore influence the motivation of the student.
Is the theoretical information too theoretical? Is the course going too fast? Is the classroom unsatisfactory? And so on.
If the student forms such impressions, or if he does not feel he is making any progress, he will most certainly not be motivated and the training will not be successful.
Motivation is important in all training
Teaching involves transmitting your message to another person by means of words, text, drawings etc.
The keyword in all communication is clarity – both of the message and the means used to put it across.
This means that sentences must be short, precise and clearly delivered. Drawings must be simple and readable, and difficult words must be avoided.
To sum up:
Check continuously that your message has been understood.
For students with special needs, see Introduction to Appendix 1
Teaching aids
Do not overfill the blackboard with information. Use large letters and clean the blackboard frequently after checking that everything has been understood by all the students.
Blackboard/whiteboard
When using the blackboard, use a pointer to indicate the relevant information more precisely. Face the students – never face the blackboard/whiteboard while you are talking.
Posters, illustrations or text are very useful and may either be produced by you in advance or obtained from others. Make sure illustrations or text are large and legible, even from the back of the classroom.
Magnetic boards or so-called Flannelographs, on which texts or figures can be stuck, are also very useful teaching aids.
Overhead projectors are very popular in modern classroom teaching. One advan-tage of the overhead projector is that the teacher himself can use speed markers to produce his own illustrations or copy them from other sources. As with other technical aids, do not overfill the overhead with information.
Slide projectors are popular for showing photographic slides. However, series of training slides are often not produced by the teacher himself but obtained from else-where. The risk is that the contents are not completely in agreement with the teaching programme, showing unfamiliar situations etc. Slide projectors also call for a completely dark room so that all the details on the slides can be seen.
Videos and video recorders are more advantageous. TV is also popular for class-room teaching due to its small size and flexibility, and also to increasing access to teaching materials. Such materials can be produced by the teacher himself or obtained from elsewhere.
The teacher
What makes a good teacher? How should he teach and behave in order to be successful? There is no simple answer to this question, but let us take a brief look at different types of teacher.
The authoritative teacher:
• Takes the initiative and tells his students what to do • Controls the lessons without consulting the students • Make decisions on his own
• Criticises and praises without explaining why • Demands silence in class
The reluctant teacher • Is rather passive
• Answers questions only when asked • Lets the students work on their own The democratic teacher
• Adapts his teaching to the learning speed of the students • Makes use of constructive student initiatives
• Plans some of the lessons together with the students • Assists the students in solving problems
From this simplified description, it is easy to identify the democratic approach to teaching as the alternative to be recommended.
To sum up:
The teacher must help the student to feel responsible, motivated, co-operative and critical about his learning and progress.
For students with special needs, see Introduction to Appendix 1
Objectives of the lesson
going to teach. If this is not clear to the teacher, it will not be clear to the student either. This criterion is best met by following the overall program for training drivers, supplemented by an individually adapted plan for each student
To sum up:
For the training programme to be successful the driving instructor must have a plan and the student must be familiar with it.
For students with special needs, see Introduction to Appendix 1
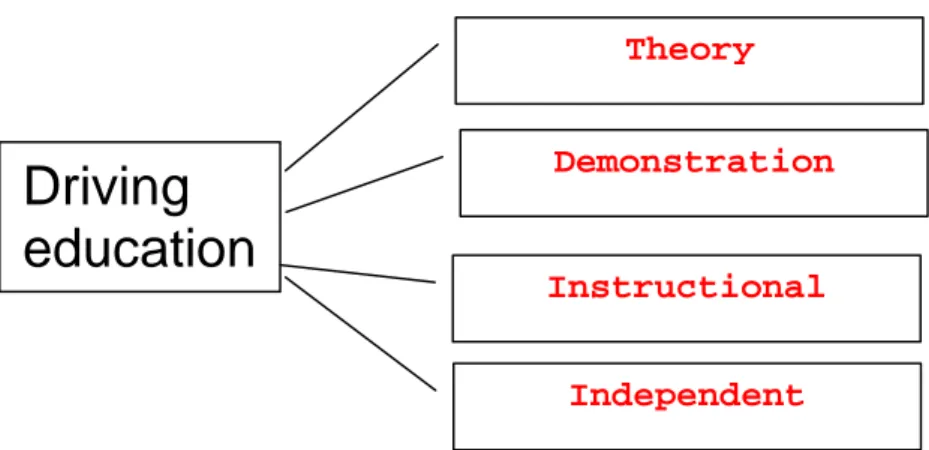
Teaching methods
Demonstrations
The fastest way of explaining the object of the exercise is to demonstrate the exercise in practise. By doing so, you will avoid any misunderstandings. The student does not always understand a verbal instruction in the way that the driving instructor intends. A common cause of misunderstanding instructions is that the driving instructor has not made the object of the exercise clear to the student.
Instruction practice
Instruction practice entails supporting the student with comments before he or she acts incorrectly. By providing hints in advance, the student will achieve success in practical work. The student will benefit from this method later on during training.
Independent driving
In this phase, the driving instructor should act as a “silent passenger” and confirm that the student has reached the obligatory goals. Do not interfere with or disturb the student. At the end of the practice session, the driving instructor should let the student analyse his driving performance and together with the driving instructor decide whether the goal has been achieved or not. The driving instructor should thereafter give his opinion on the student’s driving performance. Do not forget to give positive criticism first. Fill in the progress card together with the student. Inform the student about the objective of the next practice session and assign homework if any.
Exercise 3 Changing gears and soft braking
Exercise 4 Starting on hilly roads
Exercise 5 Reversing
Exercise 6 Co-ordination
Exercise 7 Acceleration and hard braking
Exercise 8 Driving on roads with little traffic
Exercise 9 Care, maintenance and control of the car
Exercise 10 Driving on roads in rural areas
Exercise 11 Driving on roads in urban areas
Exercise 12 Driving on roads with several lanes
Exercise 13 Turning and parking in traffic
Exercise 14 Driving on complex roads with varying traffic in
built-up areas
Exercise 15 Driving on highways and main roads
Exercise 16 Driving on motorways and freeways
Exercise 17 Driving on roads with complex and varying
traffic in rural areas
EXERCISE 0
The student should learn:
•
to use the steering wheel correctly. Place both hands on the steering wheel in the”quarter to three” position.
•
to use clutch correctly.Objective: The student should be able to...
Training area: Parking area It is very important
for both the driver intructor and the student to fully understand the objectives of the exercise. By choosing the correct training area, the student will progress faster in his training.
This phrase is used for each exercise. Basically, you should not continue to the next exercise if the student fails, unless you have a special reason
The different elements in each exercise do not necessarily have to be followed in a particular sequence. However, there is a logical design of the sequence in the exercises. Try to follow the exercises step by step, unless you have a special reason. Each exercise should start with a demonstration followed by exercises. Finally, the student should be able to manage the exercise on his own, i.e. independent driving. Study the chapter ” teaching methods”. Text written like this
For students with special needs, see Exercise 1, Appendix 1
The student should learn:
• about hazards when opening the door. Check rear view mirrors before opening
the door. PIC 1.1
• how to find the correct sitting position in the seat and carry out simple routine checks before starting from the kerb. PIC 1.2
• the correct usage and position of control switches. The student should be able to
find the control switches without looking at them.
• how to use the safety belt correctly. Explain to the student why he should use the
safety belt. The safety belt should not be twisted or damaged.
Make sure that the passengers are also using safety belts. Explain why loose objects can be a hazard when braking. PIC 1.3
• how to adjust the rear view mirrors correctly to obtain an optimum view to the rear. PIC 1.4
• that even with the rear view mirrors correctly adjusted, there are blind spots that should be checked before starting from the kerb or changing lanes, etc. PIC 1.5 reach the pedals and switches without difficulty. After practise, the student should know the adjustment possibilities of the seat and the correct usage of control switches in the car.
PIC 1.5
Door mirror
Door mirror
For students with special needs, see Exercise 2, Appendix 1
The student should learn:
• how to get ready before starting from the kerb. The correct sequence before
starting from the kerb.
• how to place his hands on the steering wheel and how to steer correctly. • how to observe traffic before starting from the kerb. Stress the blind spots. • how to start smoothly.
• how to drive very slowly straight on. Edging along.
• how to drive very slowly and steer at the same time. Edging along and steering. • how to bring the car to a completely stop correctly. The correct sequence before
stopping. Explain precautions before leaving the car (parking brake).
Note: Edging is a term that describes when the driver controls the speed with the clutch, i.e. driving very slowly. This part is very important when the student later practises parking and reversing. For students driving a car with an auto-matic gearbox, it is also important to control the car at very low speeds. PIC 2.1
! For students with special needs, see Exercise 2, Appendix 1
After practise, the student should be able to start from the kerb and stop the car smoothly. The student should also know how to steer and control the car at low speeds (Edging along).
For students with special needs, see Exercise 3, Appendix 1
3 a) Changing up and braking gently The student should learn:
• how to find the position of the different gears, first while standing still and later when the car is moving without looking at the gear lever.
• changing up at the correct speed. Exercise distinct acceleration before changing
gear. Make sure that the student is looking at the road when changing gear. Increase pace gradually in order to go through all the gears. PIC 3.1
• the correct sequence when stopping. Check the rear view mirrors before braking,
at first stopping smoothly and later giving the student a stopping, for example a road sign. The student should be able to stop exactly at the stopping smoothly. Exercise from different speeds. PIC 3.2
Note: For students driving a car with an automatic gearbox, some of the training with shifting gears is of course unnecessary.
3 b) Changing down The student should learn:
• to change down. Practise changing down to different years, until the student can
do this smoothly.
• to choose the correct gear. Let the student decide the suitable gear according to
speed and when to change to a lower gear. The student should first decide what speed to use and after that the correct gear.
Objective: The student should be able to understand the relation between speed and correct gear in order to drive safely, economically and smoothly. The student should know the position of the different gears and when to change gear. The student should also be able to use the braking pedal, gear lever, clutch and accelerator while looking at the road.
3 c) Changing down and turning The student should learn:
• to adjust speed when approaching a junction, choose correct gear before crossing, accelerate and change gear up after crossing. Start practising
right-hand turns. After a while, the student can practise turning left and going straight ahead. A common error is that the student approaches the junction to fast. PIC
3.3
• to scan correctly when approaching crossings. Give the student hints on where
and how to look when approaching the junction, within the junction and when leaving the junction.
PIC 3.3
Release the clutch
Release brake
and accelerate
Depress the clutch
Listen to the speed
of the engine
PIC 3.2
For students with special needs, see Exercise 4, Appendix 1
4 a) Starting from the kerb using the parking brake
The student should learn:
• how to keep the car still when releasing the parking brake. • to observe other traffic before starting from the kerb. • where this technique can be useful.
4 b) Starting from the kerb using the foot brake
The student should learn:
• how to start on roads with a slight gradient.
• how to quickly reduce the brake pedal pressure and adjust the accelerator and clutch in order to keep the car still.
• to observe other traffic before starting from the kerb. • where this technique can be useful.
Note: Students driving a car with an automatic gearbox should also practise this exercise as the car can roll backwards depending on the gradient.
roads. The student should be able to start on an uphill road using the parking brake and also using the brake pedal. The student should be able hold the car still for a few seconds and observe traffic before starting.
EXERCISE 5
Reversing
For students with special needs, see Exercise 5, Appendix 1
5 a) Reversing The student should learn:
• to sit correctly while reversing. Avoid reversing using mirrors only.
• how to reverse in a straight line. Explain problems in detecting small objects
behind the car. PIC 5.1
• how to control steering and reversing at the same time. Explain turning point. PIC 5.2
• reversing in a straight line after turning.
5 b) Precision driving The student should learn:
• to estimate the length of the car. PIC 5.3 • to estimate the width of the car. PIC 5.4
• that the front wheels and rear wheels move differently. PIC 5.5 • to predict the path that the wheels will take.
5 c) 3-point turns and parallel transfers The student should learn:
• how to make a U-turn. Start practising on a wide road. The turning radius of the
training car + 1 meter.
• how to make a 3-point turn. Practise on narrow roads. PIC 5.6
• how to make parallel transfers. If the student learns how to control parallel
transfers, he will never have any problems when parking.
Objective: The student should be able to “feel” the car in terms of turning radius, length and width. The student should be able to sit correctly while reversing in order to obtain the best possible view to the rear. The student should also be able to estimate length, width and turning-centre of the car. The student should be able to control the car in narrow places with varying obstacles.
Training area: Closed area, parking lot or road with kerbs but no traffic. Use cones to create obstacles.
PIC 5.2
Movement of
the front
Turning point
Movement of
the front
Turning point
PIC 5.4
PIC 5.3
PIC 5.5
Enough
space?
Rear wheels do not
follow the front wheels
EXERCISE 6
Co-ordination
The student should learn:
• to control switches and indicators while driving. • to understand where to look.
• to use the mirrors while driving.
Objective: Check that the student has handled the previous exercises without difficulty. The student should be able to control the car and observe other traffic and road users without the car wandering off course. The student should also be able to control switches and indicators without the car wandering off course
For students with special needs, see Exercise 7, Appendix 1
The student should learn:
• how to use the power of the engine when accelerating
• how to brake hard from different speeds: 50km/h, 70km/h, 90km/h. Simulate a
situation where the student has to brake very hard. Practise on different road surfaces and if the car is equipped with ABS, remove the fuse to disconnect the ABS system. Measure the stopping distance with “foot on brake” and without “foot on brake”. PIC 7.1
driving and understand the importance of adapting to the correct speed in different traffic situations. The student should also be aware that having his foot on the brake can influence the course of events.
The student should be able to accelerate rapidly to higher speeds and stop the car in the shortest distance possible.
EXERCISE 8
Driving on roads with less traffic
For students with special needs, see Exercise 8, Appendix 1
The student should learn:
• how to practise different basic rules at junctions. Start the exercise by explaining
rules for driving straight ahead and also making, right hand turns and left hand turns at junctions. PIC 8.1
• how to scan and look for essential features in traffic. Stress the importance of
scanning active. Also stress the advantage of first looking to the left when entering a junction.
• to apply basic positioning at junctions when driving straight ahead and also when turning left and right. PIC 8.2
• to practise systematic sequences such as: mirrors, signal position when turning. • to detect critical situations. Emphasise keeping a safe distance to unprotected
road users. PIC 8.3
• to seek eye contact with other road users. PIC 8.4
Note: This exercise contains several important elements. Practise these step by step. Do not continue with any further exercise if the student fails Exercise 8 Objective: Exercise 8 is a summary of Exercises 1-7. The student should have de-veloped a defensive, safe, economical and smooth way of driving. The student should be able to co-ordinate all exercises from 1-7 in a more complicated traffic environment. The student should be able to detect junctions, road signs and road users. The student should also be able to adjust to the correct speed in different traffic environments, without driving too slowly. The student should at this pace practise the different rules at junctions.
PIC 8.4
For students with special needs, see Exercise 9, Appendix 1
9 a) Knowledge about the vehicle The student should learn:
• how to use the instruction manual for the car.
• to understand and use switches and indicators both inside the car and in the engine compartment.
• how to change bulbs, fuses and wiper blades
• how to check and when necessary, re-fill motor oil, brake fluid, battery fluid, cooling water, washer fluid and servo steering fluid
• how to fill up petrol
• to understand and check: braking system
steering system wheels and tires
lighting and electrical system exhaust system
Note: The oil should be checked regularly in cars equipped with automatic gearboxes
the car is not kept in a roadworthy condition.
Goal: After this exercise, the student should be aware of the technical principles and equipment of the car. The student should also be able to detect faults and take steps in order to correct the faults.
Training area: Garage or gasoline station etc. Make sure to have the necessary tools and equipment for carrying out this exercise. Try to gather a group of 6-8 students and after instruction, let them work in small groups.
9 b) Routine control before take off
The student should learn:
• how to perform a simple routine check. • to understand the risks of lending cars.
• to perform an extra careful check before driving longer distances.
• that frequent checks pay off; for example, that correct air pressure in tires reduces fuel consumption.
Objective: The student should be able to check that the vehicle is in a roadworthy condition before starting.
Goal: The student should be able to make a simple, systematic routine check before starting.
For students with special needs, see Exercise 10, Appendix 1
The student should learn:
• how to brake hard on different surfaces. • to scan correctly.
• how to place the vehicle correctly on a curve. PIC 10.1
• how to use the correct driving technique, i.e. choose correct speed and gear before entering a curve.
• how to be prepared for unexpected events. PIC 10.2 • how to meet other vehicles on narrow roads. PIC 10.3
• how to pass a railroad crossing safely. Adjust speed to visibility and road surface. Choose correct gear.
Objective: In this exercise, the student feels what it is actually like to drive a car. At the same time, the driving instructor gets the oppor-tunity to stress that it is important to look far ahead of the car, place the car correctly on the road and adjust speed to the circumstances. The student should be able to detect environmental hazards such as blocked exits, blocked junctions, slow vehicles etc. The student should also know how to drive safely over a railroad crossing.
11 a) Going straight in crossings The student should learn:
• how to approach the junction. Emphasise how to scan, how to determine the
influence of road condition on braking, traffic signals, road signs, road markings, pedestrian crossings, pedestrians, cyclists and crossing vehicles.
• how to choose position and how to choose the correct lane. By scanning the
junction in advance, the student will be able to choose position and lane much more easily. Study the student’s behaviour when changing lanes. PIC 11.1
• how to adjust speed when approaching junctions.
• how to apply rules at junctions. As a driving instructor, you may sometimes think
that the student drives very well. But once the driving instructor starts to ask questions about rules etc, he may notice that the student has insufficient knowledge guessing. By asking the student questions is e.g. what rule should be applied at a certain junction, the driving instructor will gain a better idea of the student’s knowledge.
11 b) Turning right at junctions The student should learn:
• how to position the car correctly when turning right. PIC 11.1-11.2 • to scan correctly. Wide turns are often the result of incorrect scanning.
• which car has right of way. The student is often uncertain about when he should
yield to when turning.
inside and after junctions and at the same time detect and be aware of other road users. The student should also practise existing rules at junctions correctly.
Training area: Suburban area with junctions of different shapes and sizes. Traffic flow should be more intensive than in earlier exercises in order to apply the rules at junctions.
• to prepare for turning right, i.e. mirrors, signals and position or choosing the correct lane.
11 c Turning left at junctions The student should learn:
• how to position the car correctly when turning left. PIC 11.1-11.2-11.3
• to prepare for turning left, i.e. mirrors, signals and position or choosing the correct lane. Turning left is much more complicated than turning right. The driver has to
observe not only crossing vehicles but also oncoming traffic. PIC 11.4
• to scan correctly. The student often concentrates on crossing vehicles and
sometimes forgets the oncoming traffic. Stress why it is necessary to look twice, three times or more before deciding that the road is clear. Explain that the student sometimes has to turn his head in order to see pedestrians and cyclists.
• which rules should be applied when turning left.
• to avoid risks when turning left. Oncoming vehicles may obstruct other vehicles.
Observe the student’s attention to the vehicles behind. A common cause of accidents involving vehicles turning left is that the driver of the vehicle left turning has not observed that he or she is just being overtaken by another vehicle. In most cases, it is the driver of the vehicle turning left who is responsible for the accident. PIC 11.5
• about the problem of estimating speed and distance of the oncoming vehicle. It is
much more difficult to estimate the speed and distance of an oncoming vehicle compared to crossing traffic. For an inexperienced driver, it may also be difficult to judge the difference between a moped and a motorbike. Teach the students to be suspicious and alert in these situations.
11 d) One way streets The student should learn:
• to cross may one-way streets safely. Stress the risk of being hit from the right as
the vehicles in a one-way street the may drive on the left side of the street.
• how to position the car when driving straight ahead and turning right and left in a one-way street. PIC 11.6
• anticipate risks in a one-way street.
11 e) Junctions with traffic signals The student should learn:
• what to do if the traffic signal is out of operation or if a policeman is controlling the traffic at a junction with working traffic signals. PIC 11.7
• to determine which other vehicles have a green light. Most students are uncertain
about which other vehicles or road users have a green light at the same time.
• how to position the car and signal the intention to drive straight ahead and turn right and left. PIC 11.9
PIC 11.2 PIC 11.3
PIC 11.3
Do not forget to check
the
PIC 11.3
Do not forget to check the
traffic before you turn
PIC 11.8
Risks at junctions
EXERCISE 12
Driving on roads with several lanes
The student should learn:
• to choose the correct lane for the intended direction. When driving on roads with
more than one lane, the right lane is mostly used for right turns and driving straight ahead. The left lane is used for left turns and overtaking.
• to keep a correct distance to vehicles in front. Students often drive too close to
the vehicle in front. Try to explain the importance of keeping a safe distance to the vehicle in the front. PIC 12.1
• the 3-second rule. A good method to keep a correct distance to the vehicle in
front.
• how to change lanes. Stress the importance of correct observation around the
car, including blind spots, signalling and speed adjustment. PIC 12.2
• to be aware of the risks when passing other vehicles to the right.
Objective: The student should learn how to pass other vehicles and how to change lanes in a safe way. The student should also be able to keep a correct distance to vehicles in front and at the side.
Training area: Roads with frequent traffic. The roads should have at least two lanes in each direction.
PIC 12.1
PIC 12.2
EXERCISE 13
Turning and parking in traffic
For students with special needs, see Exercise 10, Appendix 1
13 a) Turning The student should learn:
• to turn at a 3-way junction. PIC 13.1 • to turn at a 4-way junction. PIC 13.2
• to be aware of the risks when reversing and turning in traffic. PIC 13.3-13.4 13 b) Parking
The student should learn:
• to park the car front first in the parking bay/space. PIC 13.5 • to reverse into the parking bay/space. PIC 13.6
• to move the car to a parallel parking bay/space. PIC 13.7-13.8 • to use the side mirrors.
• to park the car along the road between two cars, both driving in front first and reversing into the parking bay/space. PIC 13.9
• to use the parking brake correctly.
• to apply the correct rules and road signs when parking.
• the risks when parking too close to junctions and pedestrian crossings. PIC 13.10 Objective: The student should be aware of the risks when turning and parking in traffic. The student should be able to park, turn and reverse in traffic.
Training area: Different types of junctions for reversing and turning. Parking lots for parking.
PIC 13.3
PIC 13.2
PIC 13.4
U-turn in junction
Risk 3
Turning car forgets to
check oncoming traffic and
traffic coming from behind
PIC 13.6
PIC 13.6
EXERCISE 14
Driving on complex roads with varying traffic in built-up
areas
(Summary of Exercises 11-13)
The student should learn:
• to practise previous exercises independently. Give the student assignments to be
carried out independently. The driving instructor should offer constructive criticism after the assignment has been carried out.
• to follow road signs to towns and villages. Until now, the driving instructor has told
the student where to drive and when to turn etc. Following road signs towards a destination is a new task for the student. Give the student instructions to follow road signs to towns, villages, schools, shopping centres, hospitals etc.
Objective: The student should independently be able to practise all previous exercises in frequent and intense traffic. The student should also be able to follow road signs to towns, villages and central districts in towns. The student should be able to solve any problem that arises while driving without assistance from the driving instructor.
15 a) Estimating speed and distances
The student should learn:
• to understand problems of estimating speed of other vehicles. Stress the
problems of estimating speed, especially of oncoming vehicles. A large truck appears to be closer than an ordinary car.
• to estimate distance other vehicles.
• to look several times for crossing traffic or oncoming traffic before entering a junction.
15 b) Entering junctions on highways and main roads The student should learn:
• to approach a junction correctly. The student should approach the junction in such
a way that other road users feel confident of his intention. The student should consider the condition of the road surface when braking from high speeds.
• to estimate the distance to stop signs correctly. Teach the student hard braking
first and gradual braking later.
• to enter highways and main roads in a safe way. PIC 15.1 • to accelerate rapidly.
• to use the hard shoulder when necessary.
highways and main roads. The student should be able to enter and exit highways and main roads in a safe way. The student should be able to overtake in a safe way.
15 c) Exit to the right from highways and main roads The student should learn:
• to signal correctly. Explain the risks of signalling too early or too late. PIC 15.2 • to adjust to correct speed before exit. Stress the usage of the speedometer in
order to reduce the risk of speed blindness. PIC 15.3
• how to position correctly when turning right. PIC 15.4 • observe other traffic.
• accelerate after the turning.
• to understand the risks when turning right.
15 d) Exit to the left from highways and main roads The student should learn:
• to turn left from a highway or main road. Turning left from a highway or main road
is one of the most risky traffic situations. Therefore, exercise this phase very carefully. PIC 15.5
• to signal correctly.
• to choose the correct position or lane. The risk of being hit from behind will be
reduced through correct positioning. PIC 15.6
• to adjust to the correct speed before turning left.
• to use the hard shoulder when necessary. Try not to have any cars right behind
you just before turning left on a highway or main road. In order to reduce the risk of being hit from behind, use the hard shoulder in advance so that vehicles immediately behind you can pass. PIC 15.7
• to accelerate after the turning.
15 e) Overtaking The student should learn:
• to estimate the necessary distance for overtaking. • to overtake in three steps. PIC 15.8
• to be prepared to abandon overtaking.
• to return to the right lane correctly. Often, the student returns to the right lane
much too early. Do not return to the right lane until you can see the car that has been overtaken in the mirror. Use the steering wheel gently.
• to understand road signs and road markings prohibiting overtaking.
to make it easy for other drivers who want to overtake. The student should use
the hard shoulder when necessary, but should be aware of the risks when driving on the hard shoulder, e.g. pedestrians, soft surface, etc.
PIC 15.3
PIC 15.5
Risk 2
Heavy traffic
Risk 3
PIC 15.6
The red car is positioned to
the right in order to make the
blue car visible as it turns
PIC 15.5 PIC 15.5
PIC 15.5
PIC 15.7
Special design to reduce risks
when turning left
Do not turn left here because
of the blocked view
When you can see the
vehicle in your
mirror, return to
the right lane
Overtake. Always
be prepared to
abandon
EXERCISE 16
Driving on motorways
For students with special needs, see Exercise 16, Appendix 1
The student should learn:
• how to enter the motorway. Explain to the student that other vehicles already on
the motorway will more easily detect the vehicle entering the motorway when it signals. Stress speed adjustment, observation of vehicles and blind spots before entering a motorway. PIC 16.1
• to understand risks when driving on a motorway. Tiredness due to a relatively
inactive way of driving and also the risk of aquaplaning. PIC 16.2
• to keep the correct distance to the vehicle in front. Multiple collisions are often
related to high speeds and incorrect distance to the vehicle in front. The 3-second rule is useful also on motorways. PIC 16.3
• to overtake on motorways. Correct observation before changing lanes and also
attention to blind spots. PIC 16.4
• how to exit motorways. Explain the exit signs and the risk of speed blindness. In
many cases, an off ramp ends in a sharp curve. PIC 16.5
• how to turn on a motorway. Use the on and off ramps for safe turning.
• how to follow route signs. Instruct the student to follow signs to a destination. • the highway code, i.e. prohibition of stopping, parking, etc.
Objective: The student should be able to enter, exit and drive safely on motorways. The student should also be aware of special rules applying on motorways.
PIC 16.2
PIC 16.3
PIC 16.4
PIC 16.5
Watch out for aquaplaning
The student should learn:
• to drive independently. The driving instructor should not interfere in the event of
minor errors. Offer constructive criticism or comment when the car is parked or when instruction is finished.
• to drive towards destinations. Use a road map to show the student the
desti-nation.
• to follow route signs. Explain the different route signs or road number signs for
finding the way to the correct destination.
• to drive with the correct speed in different situations. Emphasise how visibility,
state of the road and traffic flow influence the judgement of speed.
types of road in rural areas. The student should independently be able to follow route signs to destinations.
EXERCISE 18
Dark driving
For students with special needs, see Exercise 18, Appendix 1
The student should learn:
• to estimate distances, including stopping distances. PIC 18.1
• the correct use of the headlights when approaching a vehicle in front or when, meeting and overtaking other vehicles. PIC 18.2
• the correct step in an emergency, engine breakdown etc. PIC 18.3 • all about the lighting on the car.
Note: A demonstration is a good method for giving the student an under-standing of the distance at which a driver can expect to see a pedestrian with dark clothing, reflectors, etc.
The demonstration should also include:
- the difference between using full beam and dipped beam when meeting other vehicles and when overtaking or being overtaken.
- when to use warning signals.
After the demonstration, practise the above in traffic.
Objective: The student should be aware of the special risks involved when driving in the dark. The student should be able to use the head-lights correctly in different situations. The student should also be able to park and stop the car safely on a road without street lighting.
Training area: For the demonstration, a long and dark road. Ordinary roads for traffic exercise.
PIC 18.1
Visibility with
main beam
EXERCISE 1, Appendix 1, for students with special needs
• The student should learn:• Seating adjustments:
• about hazards when opening the door. The student with special needs may require a wider entrance door than normal. This implies making a special check in the rear view mirror before opening the door. PIC 1.1
• how to find the correct sitting position in the seat and carry out simple routine checks before starting from the kerb. The student who requires a special sitting position should preferably use an electrically powered and widely adjustable seat. The reason for this is to avoid non-crashworthy solutions using extra cushions or other seat modifications with loosely attached devices. However, if medically trained personnel find the use of cushions and other modifications necessary, cushions and other modifications should be firmly attached to the seat. The sitting position should allow comfortable and safe use of the accelerator and brake pedals. In the case of manual gear shifting, this also applies to use of the clutch. The sitting position should also allow comfortable and secure use of the steering wheel. Further details of adapted steering devices are given in Exercise 2, Appendix 1. PIC 1.2
• the position and correct use of control switches. For the student with special needs, the control switches may have to be relocated in order to be accessible. The use of an IR link system may also fulfil this requirement. The controls should be adapted in collaboration with a medically trained person having adequate knowledge of the student’s special needs. The student should be able to find the
control switches without looking at them.
• how to use the safety belt correctly. For the student with special needs, the use of the safety belt is crucial. Thus, exemptions from using a safety belt on medical grounds should be avoided. Furthermore, it is necessary to adapt the training car in order to fulfil this requirement, i.e. the student should find the safety belt comfortable when seated. Explain to the student why the safety belt must be
used. The safety belt should not be twisted or damaged. Explain why loose objects can be a hazard when braking. PIC 1.3
• how to adjust the rear view mirrors correctly for an optimum view. The student with special needs should preferably be able to adjust the mirrors, either manually or with electrically powered mirrors. If this is not possible, the driving instructor should assist the student. PIC 1.4 Sometimes, the student will need a panorama rear view mirror due to restricted head movements.
• that even with the rear view mirrors correctly adjusted, there will be blind spots that must be checked before starting from the kerb or changing lanes, etc. Sometimes, the student will need wide angle door mirrors, due to restricted head movements, in order to eliminate blind spots. PIC 1.5
assistance to set the gear lever in the right position. However, it is important for the student to be able to handle this procedure independently. One solution could be an extended lever connected to the security pushbutton in order to facilitate its use. If this is not possible, due to a lack of motor abilities, an electrically powered gearshift might be used. The correct sequence before starting from the kerb. • how to place the hands on the steering wheel and how to steer correctly. The
basic requirement for steering is the same for the student with special needs as for any other student. Methods of fulfilling this requirement may vary considerably. For the student who is able to use a steering knob or a specially designed grip, it is important to make sure that this provides control equivalent to full 360-degree movement of the steering wheel. The position of the knob or special grip should be set to minimise the static load on the student’s muscular system. This may be done in collaboration with a medically trained person having knowledge of the student’s situation. Special attention should be paid to the student’s ability to handle the steering wheel when the steering knob or special grip is at its lowest position (i.e. close to the lap). Power assisted steering should be adapted to the student’s ability to turn the steering wheel. For a student who is unable to use the described systems, there are more advanced technical solutions for steering (e.g. high power miniature steering wheels, foot steering systems, full hydraulic steering systems and joystick steering systems). Almost any person with a lack of muscular strength can handle steering if the right equipment is available.
• how to observe traffic before starting from the kerb. The student with special needs should preferably be able to adjust the rear view mirrors, either manually or with electrically powered mirrors. If this is not possible, the driving instructor should assist the student. PIC 1.4 Sometimes, the student is in need of a panoramic rear view mirror, due to restricted head movements. PIC 1.5 Stress the
blind spots.
• how to start smoothly. For the student with special needs, correct adjustment of the seating position is essential. The reason is that when starting from the kerb, the student’s body will be pushed backwards, which may interfere with his ability to handle the accelerator, brake, steering or other controls (e.g. indicators). Special attention should be paid to this if the student is using hand controls for these functions and/or foot controls for steering.
• how to drive very slowly and steer at the same time. For the student with special needs, see above Edging along and steering.
• how to bring the car to a complete stop correctly. The correct sequence before
stopping. Explain precautions to be taken before leaving the car (parking brake).
For the student with special needs who uses an automatic gearbox, use of the parking brake is not necessary since the parking mode of the gearshift has the same function. The student should be able to brake smoothly and apply maximum braking. Furthermore, the instructor should focus on the student’s ability to use the braking system throughout the lesson. The instructor should pay attention to the student’s ability to use the rear view mirrors and to check blind spots PIC 1.5. Note: “Edging” describes a driving technique in which the driver controls the speed with the clutch, i.e. drives very slowly. This is very important when the student later practises parking and reversing. For a student driving a car with an automatic gearbox, it is also important to control the car at very slow speeds. PIC 2.1
• The student should learn:
• the correct sequence when stopping. Checking the rear view mirrors before
braking. Initially, the student should be taught to stop smoothly and later to stop at a given point, such as a road sign. The student should be able to stop smoothly and exactly at the point. This should be practised starting at different speeds. PIC
3.2. For the student with special needs who uses an automatic gearbox, this picture applies with the exception of use of the clutch. The general instruction in PIC 3.2 is applicable to all types of adapted vehicle manoeuvring system.
• to adjust speed when approaching a junction and accelerate after the junction.
Start practising right-hand turns. After a while, the student can practise turning left and driving straight ahead. A common error is that the student approaches the junction too fast. PIC 3.3. For students with special needs, PIC 3.3 is applicable
with the exception of the text in the yellow boxes.
• To scan correctly when approaching junctions. Give the student hints where and
how to look when approaching the junction, driving through the junction and leaving the junction. For students with special needs who experience problems
with head movements, it is essential for the instructor to be aware of these problems. They can be compensated for in many ways, for example by adding extra mirrors. However, the basic scanning procedure must be clearly defined and practised in this exercise.
EXERCISE 4, Appendix 1, for students with special needs
Starting from the kerb using the brake pedal. For students with special needs who use an automatic gearshift, the technique is described below.The student should learn:
• to shift gear mode from park to drive while keeping the car in a fixed position. • how to quickly reduce brake pedal pressure and adjust the accelerator in order to
keep the car still.
•
sate for limitations of head and abdomen movement are available. Extra rear view mirrors and panorama mirrors can help in obtaining the best possible rear view. • how to reverse in a straight line. Explain the problems in detecting small objects
behind the car. PIC 5.1 For students with special needs, reversing aids such as
warning signals and TV monitors are useful.
• how to control steering and reversing at the same time. Explain turning point. PIC 5.2 For students with special needs, the steering device should be easy to handle and comfortable to use even when driving for long periods. The steering device should allow the user to remain seated in an optimal position even during this exercise.
• reversing in a straight line after turning.
This exercise may set extreme demands on the skeletal/muscular system of the student with special needs. Thus, it should not be carried out if the student feels uncomfortable. It may be beneficial to practise this exercise in several relatively short sessions.
EXERCISE 7, Appendix 1, for students with special needs
For students with special needs, accelerating and braking should be performed independently of the sitting position. Subsequently, the sitting position should not be affected by accelerating and braking.The student should learn:
• how to use the power of the engine when accelerating
• how to brake hard from different speeds e.g. 50 km/h, 70 km/h, 90 km/h. Simulate
a situation in which the student has to brake very hard. Practise on different road surfaces and, if the car is equipped with ABS, remove the fuse to disconnect the ABS system. Measure the stopping distance with “foot/hand on brake” and without “foot/hand on brake”. PIC 7.1.
For the student with special needs, it is essential that the force required for hard braking (e.g. with the brake pedal or a manual braking system) does not exceed the maximum physical strength of the student.
• The “thinking distance” (shown in PIC 7.1) may be prolonged due to sub- optimal solutions for the student in changing from acceleration to braking. If the student finds it difficult to transfer his foot from the accelerator to the brake pedal or to change the hand control from the accelerating position to the braking position due to inadequate technical solutions, this may be revealed within the “thinking distance” of this exercise. The driving instructor should be aware of this type of problem in the case of students with special needs.
• The braking system should not be designed so that the student has to use his maximum reach to perform hard braking. If the student experiences problems due to poor design of the braking system, this may be revealed within the “braking distance” (PIC 7.1). The driving instructor should be aware of this type of problem in the case of students with special needs.
Both problems will be indicated by difficulties in keeping the vehicle within the lane.
• If the student cannot maintain his sitting position during this exercise, the instructor should be observant and suggest use of a postural support or supple-mentary seat belt system. However, such a solution should be tested and used in collaboration with medically trained personnel having knowledge of the particular student’s situation.
EXERCISE 9, Appendix 1, for students with special needs
Students with special needs who are unable to perform the simple routine checks mentioned in this exercise should have adequate knowledge of these activities on a theoretical level. Once the student becomes a licensed driver, he will be responsible for making such checks. The instructor should make this clear for the student with special needs.The student with special needs should be able to handle the control functions and switches required for safe driving without help from the driving instructor.
•
to handle the vehicle in more demanding traffic situations. If problems are experienced in driving straight ahead or turning at junctions, this may be due to a non-optimal solution of the steering system for the particular student. The restraint within the powered assisted steering system could be either too hard or too soft. Both problems will be exposed by difficulties in keeping the vehicle within the lane.
• If the student cannot maintain his sitting position during this exercise, the instructor should be observant and suggest the use of a postural support or supplementary seat belt system. However, such a solution should be tested and used in collaboration with medically trained personnel having knowledge of the particular student’s situation.
EXERCISE 13, Appendix 1, for students with special needs
For students with special needs, turning and parking in traffic may be further compli-cated if head and upper torso movements are restricted. Sometimes, the driving instructor will need to recommend a student with special needs to use rear view mirrors, although direct viewing is preferable. The driving instructor must make the student aware that there should be no blind spots before performing turning and parking manoeuvres.Certain students with special needs require extra large parking bays, which are indicated by special signs that the student should learn to recognise. Special permits are required in order to use these bays. The driving instructor should inform the student about the procedure for obtaining a permit.
EXERCISE 18, Appendix 1, for students with special needs
Students with special needs must be able to operate headlight and dipped beam switches simple, comfortably and with no effect on driving.will be working with the specified target group. This introduction deals with common and general aspects of training and education of learner drivers with disabilities. The following list of recommendations is general in the sense that it applies to all exercises and at all times during the driving education process. It does not specifically apply to any special type of adaptation of the car. Rather, it is an attempt
to visualise the tacit knowledge created through long experience of learner drivers with various disabilities, or in other words to render implicit knowledge explicit. Thus,
most of the text in this section of the manual is formulated in more general terms using generic concepts. The reader is expected to use this material as a framework for all driving education with disabled learner drivers. Expert knowledge is often associated with tacit or silent knowledge. Tacit knowledge is by nature imprecise. Consequently, it is often very difficult to give exact answers to potential problems. One method of developing expertise is to solve a large number of problems, although this may take a very long time. Theory learning does not really offer an acceptable alternative to “hands on” experience. Two alternative methods of obtaining expertise can be applied; one consists of providing numerous examples and the other of providing effective tools that facilitate the process of building up expertise. Here, the latter approach has been chosen. Such tools should support the driving instructor not only in gaining expertise but also in providing a platform for developing a specific education profile taking into account the national context, available educational resources (staff, vehicles and training premises), personal knowledge, and pre-ferences. It should also conform with the specific educational situation of the individual learner driver. This means that there are numerous additional aspects that have to be considered apart from those mentioned here. Specific medical, ergo-nomic, technical, legal and financial conditions should also be considered.
Skill/Insight. A useful pedagogical approach might be to make a distinction between
skill and insight. Skill is achieved by the driver while learning how to handle and
control the vehicle in every situation specified by the exercises. The aim is to make the learner driver confident with the vehicle, its possibilities and limitations. Insight means that the learner driver can intellectually understand and apply the knowledge that he/she is part of a social interaction requiring compliance with certain rules and regulations, in other words, knowledge of how to interact with other road users. Skill achievements should contribute to insight and vice versa. Skill and insight interact in a loop (see ). Normally, the process starts with utilising insight before a skill training segment is executed. After an exercise, the learner driver should have gained insight into what has been achieved. The interaction between skill and insight should be considered for all driver education, especially in the case of learner drivers with