Postadress: Besöksadress: Telefon:
Digital Compositing for Photorealism and
Lighting in Chroma key film studio
Andrijasevic Neda
Johansson Mirjam
EXAM WORK 2012
Application of Technology with Specialisation in
Lighting Design and Digital Compositing
Postadress: Besöksadress: Telefon: This exam work has been carried out at the School of Engineering in Jonkoping in the subject area lighting design and digital compositing. The work is a part of the Bachelor of Science continuation programme. The authors take full responsibility for opinions, conclusions and
findings presented.
Examiner: Annika Kronqvist Supervisor: Cecilia Häggström Scope: 15 credits
Abstract
Abstract
Photorealism is what visual effects are all about most of the time. This report entails digital compositing and studio lighting, in relation to Chroma key film material, aimed to give a photorealistic impression.
One of the identified problems in this report is that compositors may get Chroma key footage where the lighting is done poorly, which means a lot of extra work for the compositors and it might even make it impossible to create the desired end result.
Another problem recognized is that the knowledge that these professions possess is often tacit, not available in texts or even functionally defined.
Considering these problems, the purpose of this report is to articulate and try the tacit knowledge found in respect to these research questions:
Which factors can alter the photorealistic impression of filmed Chroma key material?
To what extent can different factors be altered in the compositing process, for a photorealistic result?
How can a photorealistic result from composited Chroma key material be enabled and facilitated, with focus on studio lighting?
Methods used to answer these questions are interviews with compositors, a case study of a small video production, and the production of video clips, including studio lighting and compositing.
While professionals often write about the importance of consistency in image characteristics between different element that are composited together, this report defines which specific features that ought to be consistent, for a photorealistic result.
Further findings are focused on the limitations of the compositor; i.e. the features that are possible to manipulate and the features that have to be set correctly when filming in the studio, to enable a photorealistic outcome.
Nonetheless, the main focus will be on the features of lighting set in the Chroma key film studio.
In fact, there are many features that are crucial for enabling and facilitating the compositing of a photorealistic end product. While some of the findings are new, others confirm what has already been presented.
Keywords
Chroma key Blue screen Green screen Studio light Digital compositing KeyingThe Foundry Nuke Photorealism Tacit knowledge
Contents
Contents
1
Introduction ... 5
1.1 BACKGROUND ... 5
1.2 PURPOSE AND RESEARCH QUESTIONS ... 5
1.3 DELIMITATIONS ... 6
1.4 OUTLINE ... 6
1.5 GLOSSARY ... 6
2
Theoretical background... 10
2.1 DIGITAL COMPOSITING ... 10
2.1.1 Keying and Compositing in Nuke ... 10
2.1.2 Colour Correction in Nuke ... 12
2.1.3 Colour Correction in Nuke - HueCorrect Node ... 13
2.1.4 Colour Correction in Nuke - Grade Node ... 14
2.1.5 Transformation in Nuke - Tracking Node ... 14
2.1.6 Transformation in Nuke - Transform Node ... 15
2.1.7 Transformation in Nuke - Reformat Node ... 15
2.1.8 3D Workspace in Nuke ... 15
2.2 PHOTOREALISM ... 15
2.3 CAMERA MOVEMENT ... 16
2.4 LIGHTING FOR CHROMA KEY ... 16
2.5 LIGHTING INVERSE SQUARE LAW ... 18
2.6 LIGHTING CONTROLS ... 18
3
Methodology ... 19
3.1 INTERVIEWS ... 20
3.1.1 Interview with compositor at Filmgate, Gothenburg ... 20
3.1.2 Interview with compositor at FIDO, Stockholm ... 20
3.2 CASE STUDY –ADAY COMMERCIAL ... 20
3.3 PRODUCTION OF VIDEO CLIPS ... 21
3.3.1 Studio recording at the University of Jonkoping ... 22
3.3.2 Lighting for video clip A - soft background & soft foreground ... 24
3.3.3 Lighting for video clip B & C - soft background & hard foreground ... 24
3.3.4 Lighting for video clip D & E - soft background & warm foreground ... 24
3.3.5 Lighting for video clip F & G - soft background & light from different directions ... 24
3.3.6 Lighting for video clip A - hard background & hard foreground ... 26
3.3.7 Lighting for video clip B & C - hard background & soft foreground ... 27
3.3.8 Lighting for video clip D & E - hard background & warm foreground ... 27
3.3.9 Lighting for video clip F & G - hard background & light from different directions ... 27
3.3.10 Compositing the video clips, Jonkoping ... 29
3.3.11 Compositing of video clip A - soft background & soft foreground ... 31
3.3.12 Compositing of video clip C - soft background & hard foreground ... 31
3.3.13 Compositing of video clip E - soft background & warm foreground... 31
3.3.14 Compositing of video clip G - soft background & light from different directions... 31
3.3.15 Compositing of video clip A - hard background & hard foreground ... 32
3.3.16 Compositing of video clip C - hard background & soft foreground ... 32
3.3.17 Compositing of video clip E - hard background & warm foreground ... 32
3.3.18 Compositing of video clip G - hard background & light from different directions ... 32
4.2 WAYS TO COMPOSITE FOR A PHOTOREALISTIC RESULT ... 33
4.2.1 Work process ... 33
4.2.2 Keying... 34
4.2.3 Compositing ... 35
4.2.4 Composited example from Filmgate ... 36
4.2.5 Composited example from FIDO ... 36
4.2.6 Composited example from Chimney Pot - ADAY commercial ... 37
4.3 WAYS TO FACILITATE AND ENABLE COMPOSITING ... 39
4.3.1 Professional advice ... 39
4.3.2 Case study – ADAY commercial - Work process for electrician ... 40
4.3.3 Case study – ADAY commercial – Lighting Green screen ... 41
4.3.4 Case study – ADAY commercial – Lighting Central scene ... 41
4.3.5 Case study – ADAY commercial – Lighting Desert scene... 42
4.3.6 Case study – ADAY commercial – Lighting Tokyo scene ... 42
4.3.7 Case study – ADAY commercial - Compositing ... 43
4.3.8 Production of video clip A - soft background & soft foreground ... 43
4.3.9 Production of video clip C - soft background & hard foreground ... 44
4.3.10 Production of video clip E - soft background & warm foreground ... 45
4.3.11 Production of video clip G - soft background & light from different directions ... 45
4.3.12 Production of video clip A - hard background & hard foreground ... 46
4.3.13 Production of video clip C - hard background & soft foreground ... 46
4.3.14 Production of video clip E - hard background & warm foreground ... 47
4.3.15 Production of video clip G - hard background & light from different directions ... 47
5
Discussion and conclusions ... 49
5.1 DISCUSSION OF FINDINGS ... 49
5.1.1 Factors affecting the photorealistic impression ... 49
5.1.2 Ways to composite for a photorealistic result ... 49
5.1.3 Ways to facilitate and enable compositing ... 50
5.2 DISCUSSION OF METHOD ... 51
5.2.1 Interviews with compositors ... 51
5.2.2 Case study – ADAY commercial ... 51
5.2.3 Production of video clips ... 52
5.3 CONCLUSIONS ... 52
5.3.1 Suggestions for further investigation ... 54
6
References ... 55
7
Search terms ... 56
Introduction
1 Introduction
The school of engineering at Jonkoping University give opportunities to students that have completed their two years diploma to proceed for their third year bachelor degree. When students with different specialties come together, the possibilities of topic choices for reports are vast. The authors of this report are schooled in different subjects; lighting design and digital compositing, but have one common field of interest connecting their mixture of skills, which is film making. This partnership provides a unique opportunity for two different specialties to learn from each other.
1.1 Background
The film industry constitutes a great deal of professional diversity, and in the making of a film it takes different professions to work for a common goal. Coming together to write this report is a lighting designer and a digital
compositor, representing two professions that would be working separately in a film project. The setting of light is done during the recording of the film while the digital compositor works with the filmed material afterwards. A typical situation where our work would coincide is when something is recorded in a Chroma key studio and later cut out during the postproduction to be composited with another background. In reality, the cooperation between these two professions is often limited. The lack of communication and understanding of the work and terms of the other profession can lead to difficulties emerging during the postproduction of the filmed material. Problems taken into account in this report are that digital compositors receive filmed material that can be difficult or even impossible to work with to create the desired result, and that people on set can have a hard time understanding how to make adjustments to facilitate the compositing work
process. Furthermore, it is a problem that a lot of the knowledge in this field is tacit, which is neither articulated nor available for scrutiny.
1.2 Purpose and research questions
The audiences of this report are students and professionals interested in the
setting of Chroma Key studios, digital compositing and how to get a photorealistic result. The purpose is to articulate and try the tacit knowledge about the factors that affect the photorealistic impression of filmed Chroma key material, and see to what extent these factors can be altered in the compositing process, and how the photorealistic impression can be enabled and facilitated in the film studio
beforehand. Questions that will be answered are:
Which factors can alter the photorealistic impression of filmed Chroma key material?
To what extent can different factors be altered in the compositing process, for a photorealistic result?
How can a photorealistic result from composited Chroma key material be enabled and facilitated, with focus on studio lighting?
1.3 Delimitations
The purpose of articulating tacit knowledge is fulfilled in relation to all research questions. However, the testing of the tacit knowledge is only done in relation to the extent to which, three different factors of lighting in Chroma key studios can be altered in the compositing process, for a photorealistic result.
The investigation is limited to a focus on lighting in film studios provided with a Chroma key background, keying and compositing work which is done by a digital compositor with the help of Nuke software (short for The Foundry Nuke), in order to treat filmed Chroma key material from film studios together with background footage.
The filmed material which is dealt with here is only such where the foreground plate is supposed to melt into the background plate creating a whole, which leaves out such material as new casting backgrounds.
The quality of a camera is an important factor in relation to Chroma key filming, however this will not be investigated.
In reality, the final result released from a compositor is most often not the finished product, since the postproduction continues afterwards with other adjustments made to the footage and the sound. However, these aspects of the postproduction will not be considered in this report.
1.4 Outline
From this point forward the paper is structured as follows. First there is a glossary with words that probably are familiar to either a lighting designer or a digital compositor but not to both at the same time.
Further onwards, an account is given of theoretical background, which depicts the current knowledge, as it is found with reference to the experience of
professionals and instructions from a software company. Later on, the methods and implementations are described under headlines for each part of the methods used. Then the findings answering the research questions are given account for as well as an analysis of those findings. After that, comes the discussion of the results found. This is followed by a discussion of the different methods used. Then come the conclusions and some suggestions as to what could be investigated further. Last of all, there are the chapters with references, search terms and appendices.
1.5 Glossary
Additive colour mixing - mixing light with different colours from at least two sources (Keller, 2010).
Introduction
Alpha Channel - is a special type of channel used in graphics and 3D software to show an area that is supposed to be transparent. The darkest area of the alpha channel is most transparent, white areas is opaque and shades of grey represent varying levels of transparency (Hanke & Yamazaki 2009).
Background plate - the background footage that will be composited with Chroma key footage (Hanke & Yamazaki 2009).
Bright - in this report referring to a high intensity on the scale of brightness. Card - a plane object in the 3D workspace of Nuke, onto which footage can be projected.
Chroma key (keying) - is the technique for removing a block of coloured pixels (often green or blue) in film or video footage, making them transparent and creating a mask for another colour or image to appear (Oxford Dictionaries, 2012).
Chroma key background - green screen or blue screen, which could be a cloth backdrop, a portable flex screen, a painted wall or flat surface.
Clean plate - plate is another word for image, and clean plate means an image without the foreground object (Okun & Zwerman, 2010).
Colour temperature – a characteristic of light measured in kelvin (K). A cool colour temperature gives a blue tone while a warm temperature gives a red and yellow tone.
Complementary colour - pairs of colours, which give black or white when mixed (Keller, 2010).
CTB gel - “a blue gel that corrects a tungsten source to daylight” (Box, 2010). CTO gel - “an orange gel that corrects a daylight source to tungsten” (Box, 2010). Depth of field - “the depth of the scene that will be in focus on the screen.
Depth of field varies with the camera’s aperture, focal length, and distance from the subject and the film format” (Box, 2010).
Diffusion - “material used in front of lighting fixtures to soften the light” (Box, 2010).
Dimmer - “the device controlling power to a circuit and lighting fixtures. Two lights on one dimmer circuit cannot be separately controlled” (Box, 2010). Directional light - light originating from a dominant direction casting shadows (Hanke & Yamazaki 2009).
Electrician - “common name for a lighting technician” (Box, 2010).
Fill light - “soft light used to reduce the darkness of the shadow areas” (Box, 2010).
Flag - “black duvetyn cloth stretched over a metal frame and used to shape and cut light” (Box, 2010).
Focal length - “the distance from a lens at which an image comes into focus (the focal point). For camera lenses, it is usually expressed in millimetres. A long lens has a very narrow angle of view and a short depth of field. A short lens has a wide angle of view and greater depth of field” (Box, 2010).
Foreground Plate - footage taken in front of a Chroma key background (Hanke & Yamazaki 2009).
Frame - a single image that is usually part of a group, designed to be viewed as a moving sequence (Okun & Zwerman, 2010).
Frame Blend - the Frame Blend node interpolates frames by generating an additive composite of the frames that precede and follow it, rather than creating mere copies between the existing frames (The Foundry Nuke, 2010).
Fresnel - a spotlight casting a soft and even light beam which can be a adjusted on a knob to be more or less diffused (Hanke & Yamazaki 2009).
f-stop - “a scale used to set the aperture of the camera” (Box, 2010).
Garbage matte - a matte that defines unwanted areas, can be created by a keyer or by the Rotoscope node (Ganbar, 2011).
Grain - the individual particles of silver halide in a piece of film that capture an image when exposed to light (Okun & Zwerman, 2010).
Gel - “polyester-based coloured gelatine used to colour a beam of light” (Box, 2010).
Keying - see definition of Chroma key
Key light - “the main source lighting the subject” (Box, 2010).
Light Meter - a device measuring the light hitting a surface (Hanke & Yamazaki 2009).
Lightwrap – a node that spreads some of the light from the background plate onto the edges of the key from the foreground plate (Compositor at Filmgate, interview, March 2, 2012).
Matte - The matte is created by identifying the colour of the Chroma key
background. This colour forms a black matte as a form of mask, representing the transparent part, while the white represent the opacity (Hanke & Yamazaki 2009). Node - “the image processing operation represented by an icon within the
compositing software” (Wright, 2010).
Noise - the equivalent of grain for digital video material
PAR can - “a rugged fixture used often in rock-and-roll concerts. A PAR can is simply a PAR globe mounted in a cylindrical can that provides a slot for coloured gel” (Box, 2010).
Plate - is another word for image, a clean plate means an image without the foreground object (Ganbar, 2011).
Rendering - the final process of creating the actual image (Hanke & Yamazaki 2009).
Introduction
Rotoscope (roto) - by using the Roto-paint node we create a shape that defines white or black area, depending on wanted result (Ganbar, 2011).
Set Extension - use of computer generated elements to extend the set beyond of scope, which is physically built (Okun & Zwerman, 2010).
Space light - “a large silk cylinder that hangs above the set to create soft ambient illumination” (Box, 2010).
Spill - coloured light reflected from the background (Hanke & Yamazaki 2009). Tacit knowledge - stands for the practical knowledge traditions that are not based on verbal expression but on the activity of performing tasks. The “tacit knowledge” is primarily generated from role models, practice and personal experience (Molander, 1996).
VFX Supervisor - The individual responsible for the creative and technical side of visual effects production (Okun & Zwerman, 2010).
White Balance - a camera setting giving reference to what in the shot that is white (Hanke & Yamazaki 2009).
Zebra – a camera setting adjusting the degree to which one see parts of overexposure in the shot (Hanke & Yamazaki 2009).
2 Theoretical background
2.1 Digital Compositing
According to Steve Wright, it takes three different levels of knowledge to be a good digital artist: the art, the tool and the technique. The artistic knowledge allows us to know what it should look like in the first place in order to achieve photorealism. The knowledge of the tools is to know how to operate the compositing software. While the third level of knowledge, which is technique, comes with experience (Wright, 2008).
Digital Compositing is a necessary part within the business of film making today, as there are almost always elements in a moving picture that are required to be added or removed. Elements that are added can be of different kinds e.g. an object or a person, filmed in a Chroma key studio and later digitally cut out and added in the picture using compositing software. Other examples of what can be added in a picture are computer generated images (CGI); objects that are
completely made in a 3D software. The 3D elements can be whole environments or other components such as a character, furniture, car and many more. Other elements to be added might be matte paintings; which are digitally produced images such as a landscape. The digital compositor’s mission is to take these elements, no matter how they were created, and blend them together into a seamless whole (Wright, 2010).
The term visual effect is used to describe elements that are added during the postproduction, after primary image capture is completed. There are three reasons for using visual effects in a moving picture; the first is when there are no practical ways to film the scenes required by the script or the director. The second is for safety reasons; the scene could be done practically, but may risk personal injuries. The third reason is cost efficiency, when it is more economical or practical to use visual effects than to film a scene for real (Okun & Zwerman, 2010).
2.1.1 Keying and Compositing in Nuke
Nuke is developed by The Foundry, which is fast becoming the leading company in compositing software for film and TV. The software has been developed by artists to meet the needs of top-level productions. Today the world leading visual effects studios use Nuke as their main compositing tool (Ganbar, 2011).
When filming in a studio, the plate contains a green or blue background and the foreground subject (actor). Using different keying nodes in Nuke, the compositing software will be asked to remove the picked colour, which is the colour of the Chroma key background (Okun & Zwerman, 2010).
Theoretical background
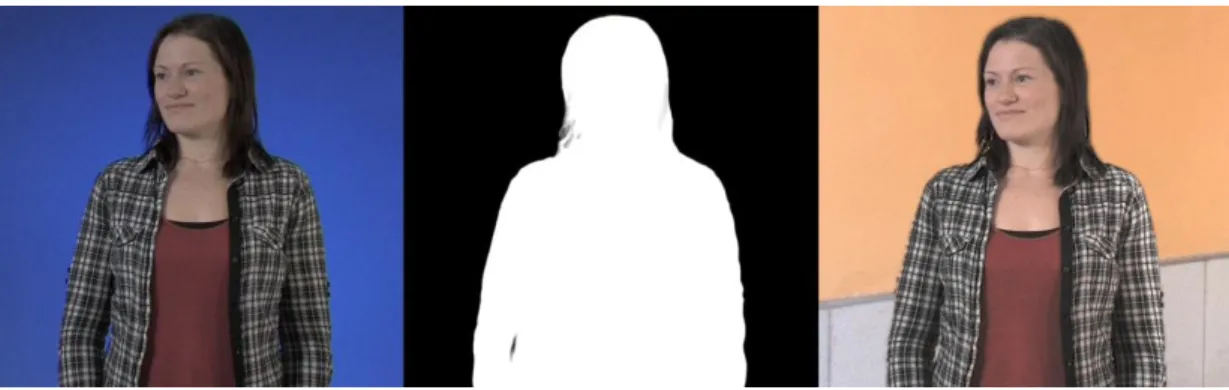
Keying is a process of creating a matte; an image that defines a foreground area by creating an alpha channel where the white pixels define the foreground and the black pixels define the transparency (see figure 1). To remove the Chroma key colour digitally, it is important that the screen is lit as evenly as possible. This is hard to do and usually mattes have to be created from an uneven screen, a screen that has many different shades of the Chroma key colour. Extracting a key is not an easy process; there are many problems with holes in the matte, fine edges like hairs and spill from the screen. Today most applications are set to create a tool that creates a matte with a couple of clicks but this hardly ever works (Ganbar, 2011).
Figure 1. To the left: blue screen footage. In the middle: a matte or an alpha channel. To the right: a composition.
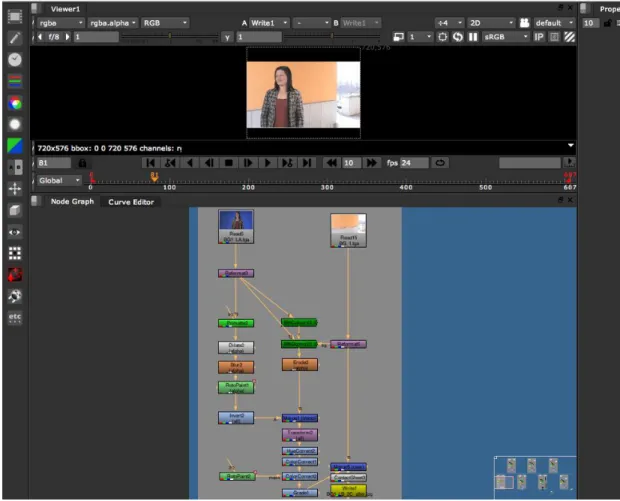
The node-based workflow in Nuke (see figure 2) makes it easy to manipulate the image by combining keys, mattes and colour correction and controlling the
adjustments. A Nuke project starts with importing the source plates, which then get connected to a series of nodes where each node represents a different
operation.This workflow is usually called a process tree or flow. A node can have several inputs to which it can be connected, while the output is the result from using the node. At last, the series of nodes is rendered to a final outcome (Ganbar, 2011).
Nuke has several keying nodes; the ones mentioned in this report are the IBK (Image Based Keyer), Primatte and the Keylight. The IBK is designed to remove the foreground object and make the Chroma key background a clean plate. This method is useful when the Chroma key background is uneven. The Primatte node can key any colour and reaches very high levels of detail and control. Keylight is made to key only bluescreens and greenscreens, this node offers additional controls to adjust the matte (Ganbar, 2011).
Figure 2. A view of a node-based workflow in The Foundry Nuke, which is an image connected together to a series of nodes, and also called a process tree.
2.1.2 Colour Correction in Nuke
Colour correction refers to any changes to the colours of the image and is one of the most fundamental changes performed in Nuke and can be done with various nodes (see figure 3). The colour correction operations are used when combining two images to make them seem like part of the same scene. With these operations an image can be made brighter, more saturated, and changed in terms of contrast or colour tone (Ganbar, 2011).
The ColorCorrect node is a tool to use when one desires to generate a specific “look”. This procedure refers to the artistic practice of giving the image a different feeling compared to how it was in the first place. Depending on the desired feeling the image can be made to look brighter, warmer or colder (Ganbar, 2011). The ColorCorrect node lets the compositor control the different parts of the dynamic range, which means all the colours existing in the image, from the darkest to the brightest. The parts of dynamic range is split according to their value of brightness as follows:
The shadows or lowlights, meaning the darkest colours in the image
The midtones, the colours in the image that are neither dark nor bright
The highlights, meaning the brightest colours (Ganbar, 2011).
Theoretical background
Figure 3. Different colour correction nodes in The Foundry Nuke.
2.1.3 Colour Correction in Nuke - HueCorrect Node
The HueCorrect node is a colour-correcting tool in Nuke. It is a useful tool for removing spill as well as allowing changes to the hue of a pixel. The HueCorrect node has several functions and all of them have to do with selecting a hue and moving a point on the graph (see figure 4). In the graph, saturation, luminance and colour are manipulated and controlled by increasing or suppressing the degree of red, green or blue colour. For instance, toreduce the amount of green in the hair colour or in the skin tones, first of all one needs to find where the colour is on the graph by using a colour picker to pick a pixel from the colour wished to manipulate (Ganbar, 2011).
Figure 4. The HueCorrect node in The Foundry Nuke. A spill suppression graph.
2.1.4 Colour Correction in Nuke - Grade Node
To define the darkest and brightest pixels compositors often use their eyes, which is a valid method but the computer has much better ways to define this. The Grade node is especially built to make some colour correction operations easier. One of these is matching colour from one image to another. The normal
operation when matching colours is to match the black and white points, the levels of midtones and last of all the hues and saturations (Ganbar, 2011). 2.1.5 Transformation in Nuke - Tracking Node
Within Digital Compositing, tracking refers to following a group of pixels over time and gathering their location on each frame. Tracking makes it possible to measure how much movement is taking place from frame to frame. This
information can be used to either cancel that movement out by negating it, called stabilizing, or transfer that movement to another element, called match moving (Ganbar, 2010).
When placing tracking points a well-defined pattern should be chosen, with points that have different coloured pixels and that do not coincide with other things close to it in the frame. Tracking data is simply positional data, which can be used in many creative ways (Ganbar, 2011).
Theoretical background 2.1.6 Transformation in Nuke - Transform Node
The Transform and TransformMasked nodes can rotate, scale, and skew elements. The TransformMasked node is identical to the Transform node except that it is used when there is a need to process a transformation through a mask (The Foundry Nuke, 2010).
2.1.7 Transformation in Nuke - Reformat Node
The Reformat node can be used for three different purposes:
To generate image sequences that match a desired image format in terms of both resolution and pixel aspect ratio (the width to height ratio of the individual pixels).
To create postage stamps (low resolution frames which you might post to the web in order to storyboard a sequence). The node scales the frame until it fits inside a rectangle with specified dimensions.
To scale images. The scale factor will be rounded slightly so that the final image has the number of pixels in the direction chosen in the controls of the Reformat node (The Foundry Nuke, 2010).
2.1.8 3D Workspace in Nuke
The 3D workspace in Nuke creates a powerful compositing environment within the project. This workspace combines the advantages of cameras, lighting, and a three- axis (x, y, and z) environment, with the node-based compositing. With a Card the 2D images are put into the 3D space. The next steps are to setup a camera, animate the scene, and then render the results back to the 2D composite environment (The Foundry Nuke, 2010).
The 3D workspace is defined by a group of nodes in the workflow. The most basic setup includes a Camera node, a Render node, a Scene or Geometry node, and Card nodes that provide the 2D images (The Foundry Nuke, 2010).
2.2 Photorealism
The origin of the word photorealism comes from a genre of art characterized by creations with meticulous details, resembling photography (Oxford Dictionaries, 2012). Today the word is commonly used within the context of computer graphics and visual effects such as compositing. For instance, Stuart Robertson says
“photorealistic visual effects require all elements within an image to share common image and lighting characteristics and, most importantly, a common perspective” (Okun & Zwerman, 2010). Ultimately, the task of a digital compositor is to composite different parts to a photorealistic whole, so that it seems that everything has been recorded at the same time, in the same light and with the same camera (Wright, 2008).
2.3 Camera movement
When filming in a Chroma key studio and the shots require a moving camera, tracking points have to be put up with regular intervals on the Chroma key background, to enable the camera movement to be tracked over time and apply that movement to the background plate for instance. Tracking marks are small dots or X-shapes made of tape. These are necessary for any of the moving camera shots and have to be removed from the plate after the tracking is done (Hanke & Yamazaki, 2009).
2.4 Lighting for Chroma key
According to John Jackman in his book Lighting for Digital Video and Television, a typical misconception is that Chroma key pictures must be lit evenly. Although the background has to be evenly lit, the foreground should be lit in a way that applies to the setting it is meant for. Jackman (2010) argued that it is the details that determine the credibility and for a picture to look real one ought to notice how the background plate looks like and how the light falls in it, in order to match that in the studio. To be able to match camera angels and lighting exactly, the
background plate should be ready before the filming of the foreground plate. When using a photo or a video as a background, one ought to consider the angle, the image size, and to position the frame preferably without any foreground objects since these could be difficult to remove in the postproduction. As for the lighting some actions are to prefer; to take note of all the lighting conditions when shooting the background plate, or to use a balloon in a test plate for the measuring of the strength, direction and colour of the light. In order to match the colour in the postproduction, a trick is to put a swatch coloured with black, grey and white, on both plates for a few seconds when filming (Hanke & Yamazaki, 2009). Ideally the Chroma key background is illuminated evenly to eliminate the differences in colour, which facilitates the keying work. To control that the background is evenly lit a light meter can be used. The zebra function of the camera can also be used to test the consistency of the light; the setting of it should then be 50 IRE or 60 IRE to check for inconsistencies. What can also be used are software packages such as Adobe’s OnLocation or Divergent Media’s ScopeBox (Hanke & Yamazaki, 2009).
Theoretical background
The more even the background is lit the less adjustments are needed when removing the colour in the software, and the less likely there will appear problems such as glorias around heads and missing ears. A problem with lighting the
background is spill, which is when the colour of the background is reflected and appears on the skin of a person or the surface of an object, especially if the surface is shiny. To avoid this problem the foreground can be placed further away from the background, and the intensity of light for the background can be decreased (Jackman, 2010). The distance between the actor and the Chroma key background as well as between the actor and the camera ought to be one and a half meters in order to prevent spill and shadows hitting the background (Hanke & Yamazaki, 2009). Spill can also be reduced or eliminated through having the backlight gelled with the complementary colour of the Chroma key colour, which would be, for example magenta for a green background and straw for a blue background
(Jackman, 2010). This can be explained with the additive colour mixing law, which determines that complementary colours, such as magenta and green, can be used additively to produce white light (Keller, 2010). In addition, fresh make-up is vital in order to avoid spill on the actor (Hanke & Yamazaki, 2009).
The choice of whether to use a green screen or blue screen depends foremost on the colour of the actor’s eyes and clothing. For example, it is advisable to use a blue screen when shooting blond haired people since the green colour has a tendency to cling to the hair. The choice of background colour may also depend on the camera that is used. The blue colour is preferably used when recording film, while green is better for digital recordings, since those cameras discard information from the colours red and blue. In case there would be some spill colour from the screen, blue is less noticeable for the eye. If using a cloth backdrop it should be stretched and curved when meeting the floor to avoid creations of shades that would make the keying difficult. Furthermore, there is something called the Chromatte system, which includes a grey fabric that reflects green or blue light when lit with the LiteRing placed on the camera. The problem that might occur, with this option as with other options of lighting, is reflections that could appear on shiny surfaces (Hanke & Yamazaki, 2009).
To get the colour of the Chroma key background to appear blue or green and not be washed out, one ought to use a fabric or paint in a dark shade of green or blue. It is also suitable to use coloured light in the same colour as the screen. Options can be to use colour gels or coloured LED lights (Hanke & Yamazaki, 2009).
2.5 Lighting inverse square law
Light does not decrease or increase in a constant rate as the distance between the light and the lit surface is altered. The inverse square law applies here and means that if the light is placed one meter away from the surface and is moved to the doubled distance, which is two meters, then the light is reduced to a quarter of what it was originally. The increase or decrease in light equals the square of the distance travelled (Jackman, 2010). Usually the distance between the lights and the Chroma key background ought to be between one and a half and two meters, and placed in an angle from both sides, which allows the edges of the light to cancel each other out, to create an even wash of light across the screen (Hanke & Yamazaki, 2009).
2.6 Lighting controls
The most common lighting control is the set of barn doors. These are placed in front of a light to cut the light beam keeping it off certain areas. There are various sorts of lighting control; among them are diffusion material, flags, and gels. The diffusion materials soften the light. The flag is used to cut off the light where needed. Gels are thin sheets of transparent plastic, placed in front of light to change the colour or colour temperature of the light beam. The way this works is that the gel is made to filter out the opposite colour of the transmitted colour. The colour conversion gels, are made to change the colour temperature of a light, for instance from daylight, which is roughly 5600K, to incandescent, which is about 3200K (Jackman, 2010).
Worthy of note is that the stronger the coloration of the gel the more the intensity of light decreases (Hanke & Yamazaki, 2009). Actually, the intensity of the light is reduced by any diffusion or gel put in front of the light. (Box, 2010)
Methodology
3 Methodology
A pilot study was made in order for the authors to get a more correct view of the professional work and if the described problem really was a problem. The pre study was carried out through interviewing a couple of compositors. These interviews consisted of questions sent out by e-mail to compositors who had graduated from the same education as one of the authors. The answers were sent back via e-mail some weeks later. Their answers made it possible for the authors to describe a well-founded problem, purpose and research questions, and also to have a good foundation for further investigations.
Methods used to find and articulate the tacit knowledge of compositors and lighting electricians were case studies including interviews and observation. The interviews were also made in order to reach understanding of which factors that affect the photorealistic impression of filmed Chroma key material. To find out to what extent these factors can be altered in the compositing process, compositors were also interviewed, while showing examples. In order to reach understanding of how the photorealistic impression can be enabled and facilitated in the film studio, compositors were interviewed and a case study was made including observations of how the lighting was set for a studio filming with Chroma key background. In addition, an interview was done with the VFX supervisor working on that project. Further methods used to test the knowledge found related to this question, were production and evaluation of video clips.
The choice of interviewees was made through contact with several compositing companies and personal contacts of one of the authors. The ones chosen were those showing interest and having time to spare for interviews.
The choice of case study was made through inquiring different production companies of Chroma key projects within an estimated time frame and it depended on if they had time to take us on for interviews and observations of a Chroma key studio recording and postproduction.
3.1 Interviews
3.1.1 Interview with compositor at Filmgate, Gothenburg
March 2, 2012
The first person interviewed in person was a compositor who had been studying in the same class as one of the authors. He had answered questions in the pre-study phase via e-mail and agreed to meet for an additional interview at his workplace. At the company, he gave a tour of the premises and introduced his colleagues before starting to answer any of the prepared questions. The interview was held sitting down in front of his work computer in a room where other compositors kept on working at their own stations at the same time. When asked for an example relevant for the questions asked, he showed a short clip on his screen. While he answered the questions, the authors took notes and recorded the sound with a smart phone application.
3.1.2 Interview with compositor at FIDO, Stockholm
March 23, 2012
This time the manager of the company chose one compositor he saw fit for the interview due to his previous experience as VFX supervisor in Chroma key studios. During the interview he sat at his workstation in a room together with three other compositors working at their own workstations. He started to introduce himself by showing what he currently was working on and then he continued by answering our questions, which he allowed to be recorded with a smart phone. When asked for relevant examples he was hesitant whether he had any but another compositor in the room overheard the questions and gave an example, and told what difficulty there had been and how he had solved it.
3.2 Case study – ADAY commercial
March 24, 2012
The venue, in which the Chroma key studio was set up, is situated in the suburbs of Stockholm in an industrial area. The studio is provided with a high ceiling permanent rig, which is appropriate for attaching the temporary rig. There is also an adjacent recreational room, kitchen and canteen.
During the day of the rigging, the director, producer, photographer, two stage decorators and two electricians were present. The producer presented the
electricians to the authors and said that those were the people to talk to. While the authors presented themselves, the electricians were about to finish their meals and start working again.
Methodology
The photographer came into the studio and all the others gathered in a cluster. They talked about the lighting, among other things. For the first time the
photographer showed the background plates to the electricians, followed by an explanation of what he wished for in relation to the lighting.
The authors observed while the electricians were rigging the lights. Since they were both running around working, it was rare to find opportunities to ask them questions. In spite of that, a few questions were asked and answered in between workloads. However, they were hesitant at answering and sometimes they answered with a question or answered by explaining something non-relevant to the question.
March 25, 2012
The following day was the day of filming, and the rigging work continued for the electricians. The authors observed and found moments to ask a few questions to the electricians.
The VFX supervisor from Chimney Pot arrived to the studio as agreed with the production leader. He put up his laptop to be able to test the keying of the
material. Next to him there was an editor sitting at his workstation and was prepared for his work as well.
The VFX supervisor was asked for a brief interview, which was carried out sitting by a table in a corner of the canteen. Furthermore, one of the authors sat behind him, to observe procedures, throughout the rest of the day.
He was also contacted through e-mail some days afterwards to give information on when the material was going to be processed. He was solicited again via e-mail a week later for further information on how the compositing process had gone.
3.3 Production of video clips
Further investigation was made to test the knowledge found related to studio lighting. Sample video clips were produced for the authors’ evaluation of whether inappropriate lighting could be processed in the compositing phase to render a photorealistic result. The sample video clips were recorded in a temporary set up Chroma key studio and then processed in the software Nuke, by the author who is also a compositor. The investigation was limited to two background plates with 14 foreground plates each with different lighting conditions.
3.3.1 Studio recording at the University of Jonkoping
March 29, 2012
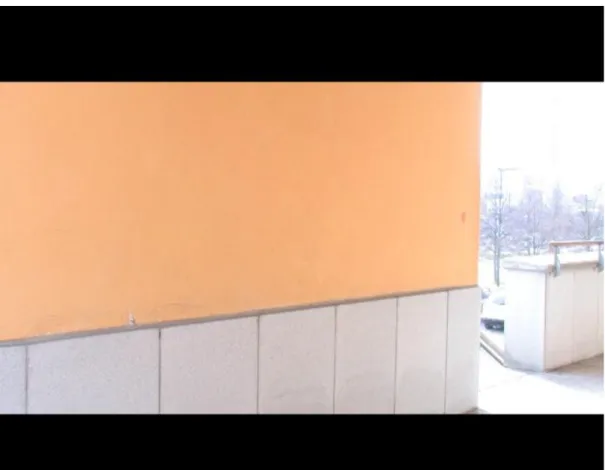
As previously recommended by professionals in the theoretical background, the background plates were shot first. These included one soft light background with light, which casts very few shadows (see figure 5), and one hard light background with sunlight from one angle casting distinct shadows (see figure 6). According to these backgrounds the studio lighting was planned. What was found relevant to experiment with were the values related to lighting, which were mentioned as factors that affect the photorealism. These were intensity of light, direction of light and colour temperature. Filming the foreground plates for these
backgrounds, the three factors were altered in two levels, one subtle and one strong. This meaning that the light in the studio was set with a subtle and strongly altered lighting in respect to the factors intensity, direction and colour
temperature, one at a time.
The Chroma key studio was set up in the lighting laboratory room at the University of Jonkoping. The lights and other equipment came from the storage of the lighting department of the University and the blue cloth backdrop came from the TV-studio at the same University. The setting up of equipment was done the day before the recording. The camera used for recording all material was a Canon XHA1s, HDV 1080i, and it was set on SD 16:9 and 25F.
The lighting of the set was done systematically, starting off by lighting the stretched blue screen evenly and blue enough for the camera to interpret it as blue. The blue screen was lit with a Selecon Acclaim Axial 600W and two Luci Dela Ribalta 1000W, all with added blue coloured gels and dimmed to 40%, (figure 7). The placement, direction, intensity and colour were decided after several attempts using the camera as a measuring instrument. The blue gels were added for the blue colour of the fabric to come forth and not be washed out. To make sure the light was even on the blue screen the zebra function of the camera was used, set to 70. The height of the camera and the focal length were adjusted to match the background plate. For all the shots taken the distance between the actor and the blue screen was 1,8 meters and the distance between the actor and the camera was 2 meters.
Methodology
3.3.2 Lighting for video clip A - soft background & soft foreground To continue, the lighting was set for the first scene representing an appropriately lit foreground plate for the soft light background, which is seen in figure 8:A. The key light was set from the left (always referring to the perspective of the camera angle), and the fill light from the right, as seen on figure 7:A. The key light was angled in 45 degrees from the actor’s point of view. This light came from a Fresnel light called Arri300 with a full CTB and a full diffusion gel attached. The fill light constituted of two Arri 650 lights with a half CTB, both directed onto the white wall on either the left or the right side of the room. The intensities and the direction were set to match the background plate with even lighting and soft shadows. This was the lighting in which the white balance was set, to serve as a reference for the other inappropriate lighting sets.
Continuing with the inappropriate light sets for the same background, one of the factors intensity, direction and colour temperature was altered one at a time. The specifics of the alterations was controlled and written down on paper. 3.3.3 Lighting for video clip B & C - soft background & hard foreground
For the soft light image with an inappropriate intensity of light, the subtle alteration (seen in figure 8:B) was made with a brighter and less diffuse key light by changing the full diffusion gel to a half. The stronger change came through removing the half diffusion gel, making the light even more intensified. 3.3.4 Lighting for video clip D & E - soft background & warm foreground
For the soft light image with an inappropriate colour temperature, the subtle alteration came when the CTB gels were removed and the stronger alteration when a full CTO gel was added to all of the lights.
3.3.5 Lighting for video clip F & G - soft background & light from different directions
For the same image with an inappropriate direction of light, the subtle change was from moving the key light to come from a higher upward angle, roughly 25
degrees, and closer to the camera angle, as seen in figure 7:F. The stronger change in direction came from moving the key light to the other side of the camera angle, the right side. The fill light remained constant.
Methodology
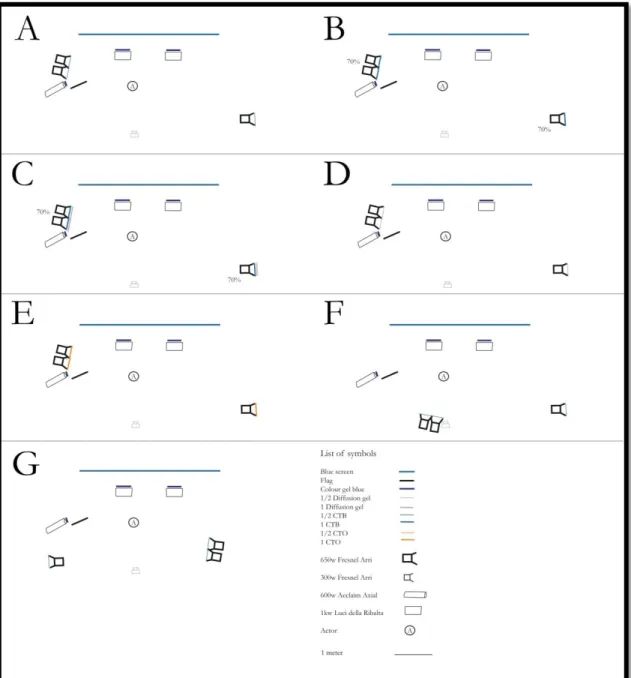
Figure 7. Sketched lighting plans for the blue screen studio with lighting alternatives for the soft light background plate. A: soft and cold light from left, B: hard light, C: very hard light, D: warm light, E: very warm light, F: light from front left, G: light from extreme right.
Figure 8. The blue screen shots, with alternatives of lighting for the soft light background plate. A: soft and cold light from left, B: hard light, C: very hard light, D: warm light, E: very warm light, F: light from front left, G: light from extreme right.
3.3.6 Lighting for video clip A - hard background & hard foreground Continuing with the hard light background the lighting was first set in the studio to match the background lighting conditions. Furthermore, the distance between the actor and the camera was increased to 2,8 meters for it to be the same as for the background plate. In order to get the chair in front of the blue screen it had to stand on a platform and thus the camera had to be raised as well.
Methodology
For the first well lit video clip (see figure 10:A) the actor sitting in the chair was lit from behind with two Arri 650 lights, both with half CTB gels, coming from a 30 degree angle. The fill light came from a Arri 650, containing half a CTB gel, directed towards the white wall on the right side as seen on figure 9:A. This is the set to which the rest of the alterations are referred to.
3.3.7 Lighting for video clip B & C - hard background & soft foreground
The hard light image was then modified with a deficient intensity of light. The subtle change was a decrease of intensity to 70% and to avoid the change of colour temperature the half CTB was exchanged for a full CTB. The stronger change was accomplished with an added diffusion gel in addition to the changes made earlier.
3.3.8 Lighting for video clip D & E - hard background & warm foreground
For the alteration of colour temperature of the same image, similar changes were made as to the soft light image. Namely, the CTB gel was removed and a half diffusion gel was added for the subtle change and a full CTO was attached and the diffusion gel removed for the stronger change.
3.3.9 Lighting for video clip F & G - hard background & light from different directions
When the change in direction of light was set for this image it was made
principally through the same method as for the previous image. That is, through altering the angle of the key light. The subtle alteration was that the key light was directed in an angle closer to the camera. For the stronger alteration the key light was put on the opposite side of the camera and the fill light was switched to the opposite side as well, as seen on figure 9:G.
Figure 9. Sketched lighting plans for the blue screen studio with lighting alternatives for the hard light background plate. A: hard and cold light from left, B: soft light, C: very soft light, D: warm light, E: very warm light, F: light from front left, G: light from extreme right.
Methodology
Figure 10. The blue screen shots, with alternatives of lighting for the hard light background plate. A: hard and cold light from left, B: soft light, C: very soft light, D: warm light, E: very warm light, F: light from front left, G: light from extreme right.
3.3.10 Compositing the video clips, Jonkoping
April, 2012
The digital compositor keyed fourteen different blue screen shots, seven for each background plate. These were composited with the two different backgrounds.
The compositing process started with opening Nuke and importing the different plates, background plate and the foreground plate for each composite. The project settings were adjusted such as; frame rate, format and other adjustments related to the imported video clips. When importing filmed material in Nuke, it is important to render the frames and observe the material before starting with compositing or any other image modification. Since the background plates were filmed with a higher resolution than the foreground plates, the compositor converted the soft light background and the hard light background to the same format as the foreground, using the Reformat node in Nuke. A still image was rendered from the background plates since it was easier to handle digitally and saved time when previewing.
For both background plates, the compositor started the keying process with combining two different keying nodes in Nuke. The first one was the Primatte node, which was used to create a garbage matte - to define the unwanted area, since the blue screen was very uneven, with darker blue colour at the edges and some irregular fabric. The matte was created in the Primatte by choosing the background colour with a colour picker, for some shots the AutoCompute was used. To be able to use this created matte, as garbage matte it had to be expanded for the fine details to remain. For that operation the Dilate node was used. Since a matte defines the area that needs to remain in the foreground, it is the white pixels that define a shape; by inverting the matte, the white pixels turn black and
opposite. For inverting the matte the Invert node was attached in the compositing tree. To use this matte as garbage matte it was necessary to combine it with a main matte, which was created with the IBK keyer.
When dealing with different clips of the same material Nuke makes the workflow easy, as one can copy the whole or a part of the compositing tree and reuse it where needed. Working with this project, the compositor built a basic compositing tree, which was reused and modified to match the needs of the different foreground plates.
When compositing the video clips, the time and difficulty was estimated separately, to either the soft light background or the hard light background. The different clips of each background were compared in relation to each other depending on time spent and effort made to get a final photorealistic result. The values of time and difficulty are assessed on a scale between 1 and 5, where 1 is easy and 5 difficult. The values are interdependent which can mean for instance that if the time is assessed to 5 and the difficulty to 1 it means that a photorealistic result was possible but it took a long time. While, if the time is set to 1 and the difficulty to 5, it means that a photorealistic result was very hard or impossible to get.
Methodology
3.3.11 Compositing of video clip A - soft background & soft foreground After combining the foreground and background, a Transform node was added to reposition the foreground object at the right place. With a HueCorrect node the blue and green background spill was removed. A ColorCorrect node was added to decrease the saturation and brighten the foreground plate since the background was a lot brighter. With another ColorCorrect node, the right side was brightened to match the highlights coming form the right side on the background plate. In order to modify that specific area of the foreground object a RotoPaint node was used, and connected to the ColorCorrect node. With this operation the
compositor commanded Nuke to correct only this specific area. Finally, a Grade node was added to define the white and black point; the white point was tinted with a yellowish tone to match the background plate (see figure 17 and 18).
3.3.12 Compositing of video clip C - soft background & hard foreground The same procedure was done with this plate as with the previous one. In
addition, yet another ColorCorrect node with a RotoPaint mask was added to decrease the highlights coming from the left part of the foreground object, to match the background plate (see figure 19 and 20).
3.3.13 Compositing of video clip E - soft background & warm foreground
As with the previous shots the foreground object was repositioned to match the background. Furthermore, some of the hard red/yellow light was removed with a HueCorrect node. A ColorCorrect node was added to brighten the foreground plate, and remove the spill. As done with others shots, another ColorCorrect node was used to brighten the right side of the foreground object to match the
highlights coming form the right side of the background plate. Also here, a Grade node was connected to define the white and black points and also to give a blue tone to the white areas (see figure 21 and 22).
3.3.14 Compositing of video clip G - soft background & light from different directions
Also here, the foreground object was repositioned. For the removal of a small amount of green spill a HueCorrect node was used. The white point was also adjusted with a Grade node. However, only minor adjustments were made to make this foreground plate appear photorealistic. The compositor did not find it necessary to make any further image modification (see figure 23 and 24).
3.3.15 Compositing of video clip A - hard background & hard foreground
When the foreground and background plate were combined, the compositing continued with repositioning the foreground object to match the background, using a Transform node. Then a RotoPaint node was used to define one background object (the coffee table) and place it over the foreground object (actor). Since the foreground shot was suited for the background only small adjustment were necessary. A HueCorrect node was added to remove a very small amount of background spill, which difference could only be seen in the skin tones. A Grade node was added to give a small amount of blue tone (see figure 25 and 26).
3.3.16 Compositing of video clip C - hard background & soft foreground Similarly to the previous plate, the compositing started with the repositioning of the foreground and background objects. Spill was removed with a HueCorrect node. A ColorCorrect node was connected to the compositing tree; here the compositor changed the values of saturation and contrast in the different parts of the image; shadows, midtones and highlights, in attempt to match the background plate. Then a Grade node was used to set the white point to remove the warm look and changed the hue to a bluer tone (see figure 27 and 28).
3.3.17 Compositing of video clip E - hard background & warm foreground
As with previous shots the background and foreground plates were matched in terms of position and placement. Then a HueCorrect node was added to suppress the red tone, as far it was possible. Some attempts were made with a Grade node to improve the matching of colours and light, but with poor result since the picture started to loose colour information (see figure 29 and 30).
3.3.18 Compositing of video clip G - hard background & light from different directions
As before, after combining the two plates, a Transform node was added to reposition the foreground object at the right place, and a RotoPaint node was again used to place the coffee table over the actor. Then a HueCorrect node was added to remove the hard spill. Moreover, a Grade node was used to try to
suppress the hard lighting and match the background lighting but without success (see figure 31 and 32).
Findings and analysis
4 Findings and analysis
4.1 Factors affecting the photorealistic impression
The compositor at Filmgate says that what matters most for a clip to be
photorealistic is the angle of things, perspective, scale and colour. Other factors contributing to a photorealistic result are consistency of camera movement,
direction and intensity of light, colour temperature, black point, and also the detail of keyed edges without spill.
People have different abilities to see different phenomena. For instance, people are not very sensitive to faults related to direction of light, as long as it is not coming from the opposite direction. “Many composites are not completely photorealistic but enough so that people are fooled”, says the compositor at Filmgate.
In addition, filmmakers often want things to be exaggerated, and look a little bit bigger or a little bit cooler than it is in reality.
The compositor at FIDO means that it looks bad if the edges of the key have noise. Other things, which are important for the footage to look photorealistic is the consistency of the light, depth of field, perspective, camera angle, distance and lens. He also states that it is more likely to get a photorealistic result if the
compositor thinks that it should be in accordance with the laws of physics, such as gravitation. If something is filmed in real time, then the frame rate should be consistent for it to look real and not slow motion. Nonetheless, this cannot always be accomplished.
Another compositor working as a freelancer thinks that there are many more things that should coincide but to figure it all out one can evaluate every image critically and try to imagine what it would have looked like if it had been filmed for real; how the different parts would have affected each other, such as casting shadows, reflecting light, etc.
4.2 Ways to composite for a photorealistic result
4.2.1 Work process
The freelancing compositor suggests starting the work process by analysing the footage, making sure to know what is expected and how much time there is to work with it. He also recommends making a list dividing the different elements. Then the compositor continues by preparing the plates, for instance making a “denoised” version to render, which can be used for keying and tracking. Then the work proceeds in this order: keying, despilling, compositing foreground over background and evaluating what needs to be done, making detailed edges, motion blur, putting dark or bright edges around the foreground key, colour correction, matching of white balance, black point, colour tone, contrast and grain or noise.
4.2.2 Keying
According to the compositors interviewed in this study, there is not one blue screen shot that can be keyed with one method, instead several have to be used including making masks manually. The compositor at FIDO says the same thing and adds that if the Chroma key background is even, one can probably get a good key by using the Keylight node but most often a combination of different nodes has to be used, such as Primatte, Keylight and IBK.
The compositor from Filmgate believes that a good result is most of the time reached from using a combination of different keyers for different parts of the plate. If it is a person for example then Keylight usually functions well for hair and motion blur, while Primatte might be better for the rest of the body. To use the keys for specific parts of the foreground, one has to animate masks for each part respectively. Often it can be quicker to rotoscope certain parts which has a similar colour to that of the background. This means that the mask one ends up with can consist of Keylight on one part, Primatte on another and rotoscoping on yet another part.
The freelancing compositor says that most problems in keying can be solved by dividing the keys for different parts of the plate. A clean plate can be of great help when keying something from an unevenly lit Chroma key background. If nothing else helps one can use rotoscoping although it can be difficult with frizzy hair. If there is much movement in the footage, one might not notice that there is noise at the edges of the key. However, when keying something that is rather still, a clean mask can be created by frame blending 20 or 40 frames to eliminate the noise and key on those frames to create a mask to use on the material, which are not frame blended.
When the Chroma key background is unevenly lit or has flaws, it can be corrected to an extent through increasing or decreasing the intensity of light and the colour tone, with the help of masks before keying. If the light is moving on the Chroma key background it is more difficult to solve. Then the masks can be animated if the light is not too complex. As a last resort one can use a painting instrument to fix the edges on the foreground. If there is a seam in the Chroma key background it can be removed by painting over where the seam is showing. As told by the compositor at Filmgate the workflow begins with the keying and creation of a mask. In this phase the important thing to ensure a photorealistic result is making sure details of hair for example are included and that the edges are not too sharp to match the definition from the background. In that case, the edges on the foreground should be made a little blurry.
Something called spill suppression, which removes spill, is often made to
remove every trace from the Chroma key colour. Many keyers have a built in spill suppression, but when combining several keyer one gets to make one’s own spill suppression by using for example the node HueCorrect.
Findings and analysis 4.2.3 Compositing
The work continues with compositing. It is crucial to adapt the foreground plate to the background plate or the other way around, making the colour temperature and the lighting factors consistent. For the purpose of making the foreground and background plate to resemble each other in terms of lighting and colour
temperature, nodes such as Grade and Lightwrap are used to make the two layers melt together better.
To change the lighting from being hard to soft or the other way around is not possible to do in compositing with a photorealistic result. The direction of light can be altered in compositing but it takes a lot of effort and time. Therefore it is important that the direction and the characteristics of the light are consistent from the beginning. If there is a main direction of light in the image, then the light has to be set from that direction in the studio otherwise the end result will not be good. The direction of light can be manipulated but it is a daunting task to be facing, says the compositor at FIDO.
When it comes to shadows, they ought to be correct when filming since it is difficult to get a good result by manipulation in Nuke.
If the general tone is off, it can be adjusted without much trouble with a colour correction in Nuke.
The contrast can be altered to an extent but the result will be better if the contrast is satisfactory in the original film material.
There are different possibilities to match the camera movement in the
compositing phase. To an extent it can copied, for instance when there is a small camera movement like a tilt or a pan, it is usually possible to match but if the two clips have different movements, it can be difficult to adjust. Therefore it is wise to have planned for similar camera movements when the material is filmed. During the filming a device called motion control can be used to make the camera move in the same movement infinite times over again.
For movements in 2D, such as pan or tilt, one can use the Tracker Node to choose a dot to be followed over time. Then the angle can be adjusted to stand still or it can be matched with another clip to resemble the camera movement from one clip to the other.
It becomes more difficult to work with material where the camera has not been standing on the same place. The same procedure then has to be done in a 3D virtual environment. By placing tracking points, the programme can calculate where the camera was and how it moved. The difficulty lies in that one cannot look behind things that have been filmed. Building objects and projecting images on them within the software can partially solve this problem. However, if the clip is filmed against a flat coloured background without any tracking points, it gets impossible to match the movement in a way that is good enough.
If the perspective is off, people notice immediately. When the material is not filmed from the same perspective, it is hard to do anything about it. However, it can be helped by faking the perspective and scale in the virtual 3D environment in Nuke, through putting the footage on a Card. The interviewed compositor at FIDO also says that it is difficult to use material with the wrong scale, but through projecting the clip on a Card, the right perspective can be accomplished.
What is usually the finishing detail work is the part of adjusting effects caused by the camera, such as grain or noise. There is not a problem if the foreground and the background are filmed with the same camera, but if it is not, the footage has to be matched. This is done by using a manual node, where comparing what is seen, or with a more automatic node, which takes a sample from one clip and transfers it to the other clip.
4.2.4 Composited example from Filmgate
This example is a composition of a background plate that represents an outdoor scene with the sun breaking through the clouds, shining towards the camera. The foreground plate shot in the Chroma key studio is an actor wearing a costume. The keying was done with the Keylight node and some other manually made masks, which gave much detail in the hair. This was decided after many different trials.
In this example, the lighting comes from behind which means that the actor would have appeared darker if it was to be photorealistic, but then he would not have been visible for the audience, thus he had to compromise.
The lighting from the foreground plate was not compatible with the background plate. It was white and even lighting, which would have been realistic for a cloudy day. The compositor altered this by using the Grade node to resemble a warmer, more yellow sunlight.
4.2.5 Composited example from FIDO
Often the Chroma key background is not in focus, which can cause problems as the tracking points are often placed on that background. In this case, the tracking points were small LED lights and appeared as huge orbs of light when they were out of focus (see figure 11). This posed a problem, since the light orbs in the background went in and out of the actors’ hair. To solve this problem the
compositor covered pieces of hair and cut frames from when the orbs were out of their hair and tracked these images onto the inappropriate frames. In this shot the compositor used mainly the IBK keyer in Nuke, but needed to combine some parts of the matte with the Primatte keyer as well, to get an improved result (see figure 12).