V¨
aster˚
as, Sweden
Thesis for the Degree of Master of Science in Engineering - Robotics
30.0 credits
AUTOMATIC BRAKING DISC
ANALYSIS SYSTEM
Joakim Gustafsson
jgn10006@student.mdh.se
Examiner: Giacomo Spampinato
M¨
alardalen University, V¨
aster˚
as, Sweden
Supervisors: Mikael Ekstr¨
om
M¨
alardalen University, V¨
aster˚
as, Sweden
Company supervisor: Ingemar Reyier,
Robotdalen, V¨
aster˚
as
Abstract
Volvo Group Truck Technology has the ambition to automate parts of their routine service. There-fore a project was launched to investigate which parts of the routine that could be automated. The idea of this project is to lower the time spent on the service and also improve the working envi-ronment for the personnel.
The purpose of this thesis is to develop and build a conceptional prototype for a low-cost crack detecting sensor. This thesis is a part of a larger proof of concept project which Volvo GTT runs in cooperation with Robotdalen and Robot Application Center (RAC).
The work done in this thesis has been based on literature studies, interviews and company visits. The gathered knowledge and observations was translated into what would be required to fit the needs. This thesis covers different techniques that could be used to detect flaws in braking discs. However, this thesis is mostly focused on one non-destructive method technique based on induced eddy currents.
Several non-destructive techniques and conceptual designs has been tested and evaluated with varying results during this project.
The result of this thesis was a design that reacts to discontinuities in conductive materials, such as the grey cast iron material used in the Volvo trucks braking discs. The results are represented as a voltage drop change and can be visualized by an oscilloscope. This study shows that the method of choice has the potential to be used as a crack detecting system and that the system can be built reliable with rather cheap components.
Further development should aim towards making the design even cheaper and the components should be assembled on a PCB instead of a breadboard in order to make the system less sensitive to noise and easier to assemble alongside the trucks braking discs.
Abbrevations
NDT Non destructive testing
ECT Eddy current testing
LDC Inductance to digital converter GUI Graphical user interface
AC Alternating current
PCB Printed circuit board
IACS Electrical conductivity unit for metals relative to a standard copper conductor ADC Analog to digital converter
BBB Beaglebone black
MCU Microcontroller unit
GPIO General-purpose input/output SPI Serial peripheral interface
Table of Contents
1 Introduction 4 1.1 Problem Formulation . . . 4 2 Background 5 2.1 State-of-the-art . . . 5 2.1.1 Eddy-Current Testing . . . 5 2.1.2 Ultrasonic Testing . . . 6 3 Method 7 3.1 Methodology . . . 7 3.2 Data gathering . . . 7 3.2.1 Literature studies . . . 7 3.2.2 Company visits . . . 7 3.3 Interviews . . . 83.4 Eddy current probe designs . . . 8
3.4.1 Absolute probes . . . 8
3.4.2 Differential probes . . . 8
3.4.3 Reflection probes . . . 9
3.5 Tested coil types . . . 9
3.6 Depth of penetration . . . 11
3.7 Circuitry . . . 11
3.8 Test system design . . . 12
3.8.1 Analog-to-digital converter . . . 13 3.8.2 Multiplexer . . . 13 3.8.3 Transistors . . . 14 3.8.4 Probe design . . . 14 3.8.5 Software . . . 15 4 Results 21 4.1 Test system design . . . 21
4.2 Coils with potential . . . 21
4.3 Calibration data . . . 23
5 Discussion 25 6 Conclusions & Future work 26 6.1 Future work . . . 26
7 Time Plan 27
1
Introduction
This master thesis is a part of a bigger project at Robotdalen in cooperation with Volvo Group Truck Technology (Volvo GTT). Volvo GTT wants to investigate how they could automate some parts of their aftermarket strategy.
1.1
Problem Formulation
The goal of this thesis is to investigate and evaluate how an automatic analysis of a trucks braking discs could be done with the use of suitable sensors mounted on a robotic arm. The sensor system should be developed and used to detect both surface and sub-surface cracks in the metallic structure of a braking disc. The goal of this system is to automate some parts of the today manually work done by a trained technician during service routine. The following points below should be considered to solve the problem.
• A sensor should be developed and evaluated that is able to detect both surface and sub-surface discontinuities in a braking disc.
• Possibility to mount the sensor to a robotic arm which can move the sensor in a desired three dimensional trajectory, in order to scan a desired area of a braking disc.
• Possibility to place the sensor alongside the braking disc at all time.
The state-of-the-art study in this thesis should focus on non destructive testing for cracks in metallic structures. Research about signal processing should also be done to get a good overall understanding of how the different parts should cooperate with each other in order to solve this problem.
2
Background
A braking disc has to be robust and be able to withstand the force and heat changes created by braking in a harsh environment. Occasionally the structure of the braking disc will break and a potential hazard is a fact. Although trucks goes through a service routine a couple of times a year a broken braking disc can be hard to detect.
In a truck service routine today a specialized technician does a number of services on each truck. Upon suspicion of a bad braking disc a number of analysis methods is used to locate the problem. One of the error-indicating systems is based on a pressure sensor that is connected to the braking pads. This system will warn the driver if the braking pads are not forcing the braking disc enough. Another more manual method of finding problems with a braking disc is by sensing the feedback in the steering wheel generated while braking. One of the most common problem found with this method is wobbling braking discs, although cracks will most likely go undetected.
As of today there is no system implemented to analyse the braking discs for surface or sub-surface cracks. By developing a tool that can be used in an automated fashion that does both surface and sub-surface crack detection analyses one could possibly make the process of detecting bad braking discs both faster and more secure.
2.1
State-of-the-art
This section presents the state-of-the-art research that has been done to get an understanding of what has been done before and which methods that could be used in this thesis.
2.1.1 Eddy-Current Testing
One of the most commonly used non-destructive testing (NDT) methods is Eddy-Current Testing (ECT), which can be used to detect both surface and sub-surface cracks in conductive materials. For example, this method is widely used in the aeroplane industry to detect cracks in wings [1].
In ECT a magnetic field is generated by inducing an alternating current into a coil. When the magnetic field is generated in an ECT-probe and then placed close to a conductive material, eddy currents are produced inside the conductor. Pure conductive materials allows the eddy currents to flow without much disturbances to the generated magnetic field. However, if the conductive material contains cracks the flow of eddy currents is disturbed and the magnetic field is therefore disturbed. The disturbances in the magnetic field can be measured by measuring the voltage-variations of either a separate detection coil or by the excitation coil, depending of which coil type that is being used [2].
By varying the frequency of the alternating current and matching this to the resonance fre-quency of the circuit one can get different penetration depths of the magnetic field. This allows for detection of discontinuities at a desired depth [3]. The circuitry choice is explained further in the section3.5.
Advantages
• Probes can be built portable since the electronic components that is needed can be small and still be sensible to small discontinuities.
• The results are immediate so the sensor could be used while in motion. • Can detect both surface and sub-surface discontinuities.
• Probes does not need to have physical contact with the target of interest. • Inexpensive components.
Disadvantages
• Rough surfaces might interfere with the testing. • Can only detect flaws in conductive materials.
2.1.2 Ultrasonic Testing
Ultrasonic Testing (UT) is another NDT-method that is widely used to detect flaws in different types of material. The technique can detect surface and sub-surface flaws that produce reflective interfaces such as: cracks, shrinkage cavities, bursts and porosity [7]. In UT, the probe needs to have physical contact with the surface of the target to get proper readings.
In UT, an ultrasonic probe sends a sound wave pulse into the target material, and listens for the echo which indicates the traveling time of the pulsed signal. By determining the time of flight for the signal to echo back, an estimation of the depth can be done. If there is a crack on the surface or sub-surface, there will be more than one echo that makes it possible to estimate the depth of the crack.
Advantages
• Probes can be built very portable.
• The results are immediate so the sensor could be used while in motion. • Can detect both surface and sub-surface discontinuities.
• Can be used in a wide range of materials and thicknesses, not limited to conductive materials. Disadvantages
• Needs physical contact with the target.
3
Method
In this 20 weeks master thesis work there is a need to gather wide knowledge regarding the service routine and the design of the trucks braking system so that the tool can be developed in a suitable way. This knowledge will be gathered by doing literature studies, company visits, interviews and prototype manufacturing.
Both UT and ECT was researched and both methods could potentially be used in this master thesis. Compared to UT the ECT-method does not need physical contact with the target material and was therefore chosen as the method to use in this thesis. An ECT-sensor can be built very portable and also be shielded from external interferences such as dust and magnetic fields. The ability of sensing both surface and sub-surface discontinuities is also something that is highly desired for this thesis.
Interviews and state-of-the-art research regarding Eddy Current techniques will lay the foun-dation for the development of the crack detection sensor. Different types of Eddy Current probes will be developed and tested in different configurations. One of the most important thing that will be evaluated is what frequencies to use when generating the magnetic field in order to get desired penetration depth. This will be done by tuning the oscillation part of the Eddy Current probe until a desired penetration depth is achieved. Different windings of the excitation coils will be tested and evaluated to get a desired magnetic field.
The ECT-sensor will be developed in such way that it could easily be mounted to a robotic arm so that a braking disc analysis can be done during the service routine. It should also be possible to mount the sensor beside the braking disc so that analyses can be done while the truck is in motion.
3.1
Methodology
The research methodology will follow the principles of exploratory engineering science. The objec-tives will be achieved through the following steps:
• Identification of technical challenges or technical problems that could occur. • Identifying existing research, technology, and components that can be used. • Develop new or adapt existing components.
• Build proof-of-concept implementation using the existing, adapted, and/or new components. • Evaluate, qualitatively, these implementations with respect to the challenges or problems.
3.2
Data gathering
For this thesis, there was a need to gather information about both the process within the service routine and about non-destructive testing methods. Both qualitative and quantitative data were very important for the evaluation of different approaches to the problem.
3.2.1 Literature studies
Different forms of literature has been studied for this thesis, for example technical reports, books and articles. This literature study has worked as a theoretical framework for the practical parts of the project. A good understanding of electromagnetic fields, resonant circuitry and programming has been critical to be able to develop a conceptional sensor.
3.2.2 Company visits
By interviewing people and inspecting the routines at companies that are performing the service routine, a better overall understanding of the service routine and the problem was gathered. One important company visit was done at Volvo Truck Center in Enk¨oping which included interviewing workers at site and inspection of the Volvo trucks at site. An important observation was done during this visit, the braking discs was shielded and could not be inspected without removing the wheels.
It could thereby be hard to inspect the braking discs with a robotic arm during the service routine. However, the project was reformulated to develop a low-cost sensor that could be placed beside the braking disc at all time which also could be used to scan the braking disc with the help of a robotic arm.
3.3
Interviews
Interviews with workers, teachers and researchers has been important to the project. By gathering knowledge from a broad range of experienced people, important decisions have been possible to take.
The people that has been interviewed are: Per Schlund
Per Schlund is a lecturer in the Division of Intelligent Future Technologies at M¨alardalen University who has great experiences in non-destructive testing methods in the aerospace industry. The conclusion of the meeting with Per is that Per thought that Eddy Current held the highest potential for this application.
Nikola Petrovic
Nikola Petrovic, Post Doc at M¨alardalen University with great experience in signal processing and visualizations. Nikola described his work about detecting breast cancer with the use of micro waves and also his studies about detecting cracks in bolts and nuts. Nikola recommended that for metallic structures Eddy Currents has good potential since it e.g. is used by the aeroplane industry for similar crack-detection applications. [8]
Brian Cox
Brian Cox has experience in different NDT-methods for both metallic and biological structures. Brian explained another technique he had used to measure salinity in water. The system depended on resonating circuits. The principle of resonating circuits was explained by Brian and he envisioned that it could be used in this thesis work. Brian recommended an LDC1000 Evaluation Module with an on-board LC tank which comes with a GUI to plot the variances in the impedance of the coil.
3.4
Eddy current probe designs
Eddy current probes comes in different designs based on which type of application they will be used in.
3.4.1 Absolute probes
Absolute probes are based on the principle of using a single coil for both generating the magnetic field and to sense the changes of the magnetic field. The magnetic field is generated by passing an alternating current (AC) through the coil. When the probe and its magnetic field is placed near a conductive material, eddy currents are generated inside the material which interfere with the magnetic field of the probe. By sensing the variations of the magnetic field one could detect flaws in the material, conductivity changes and thickness estimations. [9]
3.4.2 Differential probes
Differential probes uses at least two active coils where the difference in the magnetic field is measured to find discontinuities. For example, if one of the two coils are placed over a flaw and the other is not, a difference in the magnetic field will occur between the two coils which indicates a discontinuity. [9]
3.4.3 Reflection probes
Reflection probes uses multiple (2 or more) coils where the principle is based on using sending coils and receiving coils. Reflecting probes are for example used in metal detectors where a larger coil creates a magnetic field that a smaller coil can pick up, variations in this magnetic field represents interference with a conductive material. The receiving and sensing coils can be scaled and optimized for their indented purpose.[9]
3.5
Tested coil types
Different types of coils were tested and evaluated during the project. Air coils both with and without a ferromagnetic core to focus the magnetic field were tested in absolute, differential and reflective mode.
One of the first designs that showed potential was a combination between reflection mode and differential mode. Where one sender coil is placed in between two receiving coils, see figure1. The idea of this configuration is that the sending coil generates an electromagnetic field which when placed over a conductive material generates eddy currents in the conductive material. Ideally, when the receiving coils gets induced by the generated electromagnetic field, the impedance between the two receiving coils should be close to equal. When a discontinuity disturbs the eddy current inside the conductive material, an impedance change in one of the receiving coils will occur. By measuring this change one can estimate the size of the discontinuity (e.g. crack). However, this design should not be practical and probably to expensive since three coils is needed for each point that is to be measured.
Figure 1: A printed circuit board with three coils with ferromagnetic cores
Another similar design to the one shown in figure 1 was tested, see figure 2. The design was meant to be simple in the sense that the coils are winded by hand with the possibility to add a ferromagnetic core inside the coils for testing purpose. This coil configuration uses the principle of reflection and differential configuration with a sender coil in the middle and two receiving beside. An insulated copper wire with a diameter of 0.10mm was winded in 40 turns to build up each coil. This design did work in some sense but it was very sensitive to noise, making the changes of interest hard to filter out. A good shielding of the magnetic field was thereby very desirable.
Influenced and inspired by a study about differential planar eddy current probes made by a couple of students in Portugal, the idea of a planar coil design printed on a PCB was born. Their design consists of two D-shaped sensing coils with a driving trace in between them. [10] The results of that probe is quite remarkable. It generates an easy to decode output since the differential method outputs a voltage equilibrium of 0 when the two sensing coils are in a symmetric condition.
Figure 2: 3D printed rake shaped probe with three air coils
When a defect or other discontinuities interferes with the magnetic field, the voltage equilibrium is changed and the output is no longer 0.
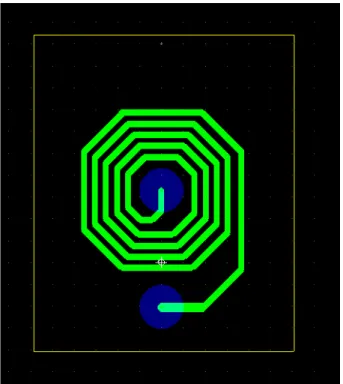
Based on the gathered information about a flat PCB coil design, a coil prototype was designed in Ultiboard, see figure3. This type of coil generates a wide magnetic field when a current is run through it. The inductance is proportional to the amount of loops that builds up the coil and can be calculated by the equation1, where L is the inductance in µH, r is the mean radius of the coil in centimeter, N is the number of turns and d is the depth of coil in centimeters.
L = r
2N2
20r + 28d (1)
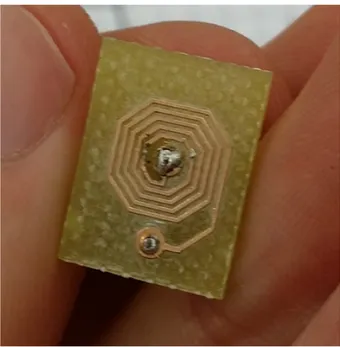
This coil was later printed on a copper PCB, see figure 4. The inductance of the coil was measured to be about 8 µH. The testing and evaluation of the coil was done by connecting it to an AC powered LC-circuit where a conductor of 220 nF and the PCB coil was connected in parallel followed by a resistor. An oscilloscope was connected to measure the voltage drop across the coil and the conductor. The maximum voltage drop indicates that the impedance of the coil and conductor configuration is the highest at that specific frequency. The frequency of the AC power source was therefore increased until a peak of voltage drop was reached over the coil and conductor. This peak-voltage drop frequency indicates the resonance frequency of the LC circuit where it is desirable to be for a couple of reasons, read more about the circuitry choice in section
3.7. However, this coil seemed to pick up quite a lot of noise, which most likely is due to its edgy design. The noise was high and could potentially be hard to filter out. Another design was considered instead with a less edgy design.
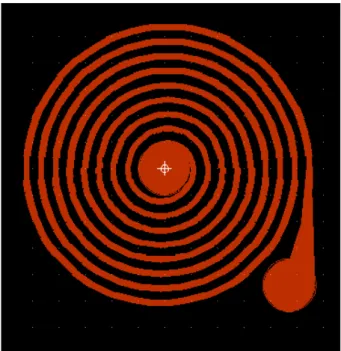
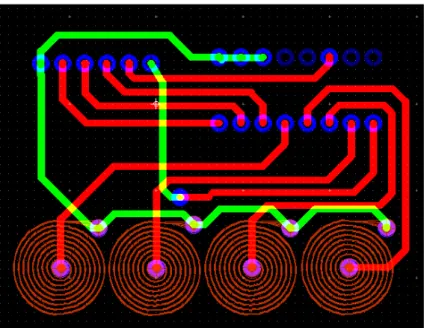
The flat coil that showed the most desirable results with low noise sensitivity and calculable inductance can be seen in figure5. This coil consists of 9 turns that is printed on a PCB with an inductance of about 8 µH. This coil design can easily be calculated upon and thereby adjustable to fit the need of inductance to achieve right resonance frequency. This coil design was tested in absolute mode where it was evaluated before it was printed aligned with 3 more identical coils. The 4 coil design can be seen in figure10.
Figure 3: A single flat coil designed in Ultiboard
3.6
Depth of penetration
Based on a paper from Volvo Trucks, cracks deeper than 1.5 mm into the braking discs could potentially disrupt the disk further and the disc should be replaced if a crack deeper than 1.5 mm is observed. Based on this fact, the sensors’ depth of penetration had to be taken into account when designing the circuit. The depth of penetration is basically how deep the eddy currents are induced into the target material.
To calibrate the depth of penetration one need to understand that the depth of penetration is based on different properties of the target material. More specifically, the depth of penetration is determined by the electrical conductivity, magnetic permeability of the target material and also by the frequency of the generated magnetic field by the probe. [11]
The depth of penetration can be calculated by formula2. Where δ is the depth of penetration in millimeters, f is the frequency in Hz, µ is the magnetic permeability in H/mm and σ is the electrical conductivity in IACS.
δ ≈ √ 1
πf µσ (2)
Lower frequencies penetrates deeper into the material but lower frequency also makes the changes in the magnetic field due to discontinuities less noticeable. So the relationship between depth of penetration and inductive sensitivity are two very important aspects to take into account when designing an NDT system based on induced eddy currents.
3.7
Circuitry
Generating a magnetic field and sensing it can be done in multiple ways. Where in this master thesis the choice of design was based on researched designs with the restrictions that was set for the project. Since the system could potentially be used in all of Volvo trucks at all time, the restrictions for the system to be low-cost is crucial. However, the system should still be very durable and sensitive.
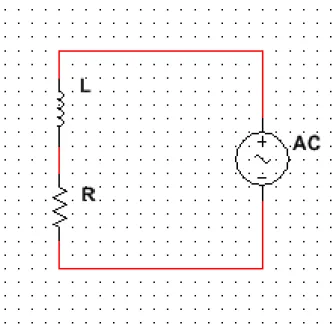
The system designs tested in this project has been based on different coil and capacitor config-urations where the first system that was tested was based on a single coil and resistor connected in series, see figure6.
Figure 4: A single flat coil printed on a PCB
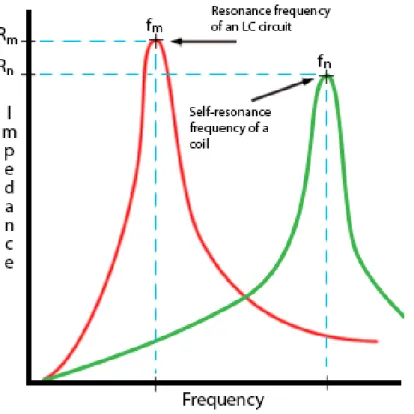
By sweeping the frequency of the AC power source it is possible to determine the self-resonance frequency of a coil. By configuring the AC power source to the self-resonance frequency of the coil the voltage drop over the coil is varying a lot depending on the changes in the magnetic field. The voltage drop is changing because of the high impedance change near the specific frequency. Figure
7 shows the impedance change relative to the frequency. This system has potential in the sense that small variances in the magnetic field will give a large voltage difference which occurs when a discontinuity disturbs the eddy currents. However, at self-resonance the coil starts to get more unpredictable and can be hard to control. Therefore, a more stable configuration is desirable.
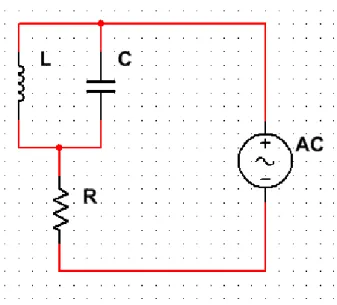
Another more stable configuration to sense variations in the magnetic field in a circuit instead of a single component is to connect a conductor and a coil in parallel to each other, see figure8. This configuration allows to adjust the resonant frequency just by changing the inductance and conductance components [12]. By choosing the values correctly, the resonance frequency can be chosen to match a certain penetration depth of a given material.
The circuitry choice of this project landed on the principle of absolute probes extended with a switching circuit that enables to switch between coils that are aligned on a board. For the conceptional design a PCB was made that contains 4 flat coils with an inductance of about 8 µH each. The reason for this design was based on the knowledge that the braking disc is spinning and that the sensor could be moved by a robotic arm in a circular trajectory while the measurement are supposed to take place.
3.8
Test system design
The entire system is based on the principle of resonance, where an LC circuit is tuned to the resonance frequency of that circuit. This resonance frequency can be adjusted by changing either the coil or the capacitor to achieve a certain depth of the eddy currents that are induced in the conductive material. The reason for the AC power source to be set to the resonance frequency of the LC circuit is that the system gets more sensitive to small variances that interferes with the coils magnetic field. This occurs because the impedance of the LC circuit is the highest at resonance frequency, this can be seen in the figure7.
To be able to detect the variations in the voltage drop, an ADC was used to sample the voltage drop across the coil and the conductor that is connected in parallel in the LC circuit. The phase-shift of the changes can also be taken into consideration to give a better estimation of the flaws size
Figure 5: A single flat coil with 9 turns
the flaws.
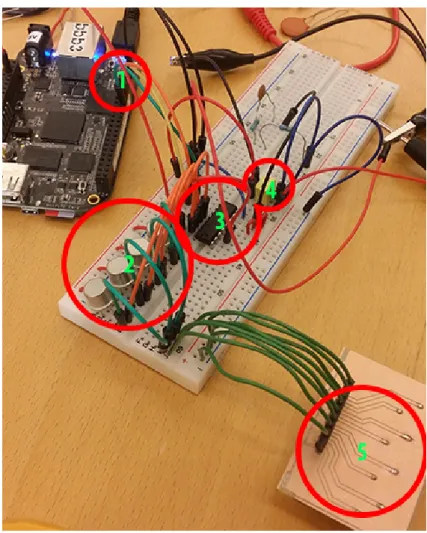
The conceptional system design that was connected onto a breadboard can be seen in figure9, where circle 1 shows the three control signals from the Beaglebone Black, circle 2 shows a transistor coupling with four transistors, circle 3 shows the multiplexer, circle 4 shows the 220 nF conductor and circle 5 shows the four flat PCB coils boards backside. When a conductive material is moved under the PCB coils, eddy currents are induced into the material which interferes with the coils magnetic fields which can be seen on the change of voltage drop across the coil.
3.8.1 Analog-to-digital converter
An LTC2380CMS 16-bit analog-to-digital converter (ADC) that has a sampling rate of 2 Ms/s was bought and could be used in this project to sample the change of voltage drop over the coils. The Linear Demo Circuit 1783A-A board that has an LTC2380CMS mounted could be used in test purpose to be able to sample the data and send it over USB to a computer. This could be done in order to evaluate if the signal analysis methods that was going to be used worked as intended before scaling the system to a smaller PCB with a smaller MCU. At 16-bit resolution and a sampling rate of 2 Ms/s the ADC samples 4 MB data per second. The need for storage is a crucial parameter to take into account since most MCUs only has a small flash storage integrated.
3.8.2 Multiplexer
To be able to switch between the flat coils on the PCB-probe a CD4051BC multiplexer was used. This multiplexer opens the gates of the transistors in a transistor coupling. This coupling deter-mines which out of 8 coil channels the current should be lead through. A Beaglebone Black was used to send the control signals to the multiplexer so that the right coil was activated at the right time. There is three control signals, A, B and C that can be used in a binary fashion to toggle between 8 channels, see table1. The multiplexer has a crosswalk between any two channels of 3 MHz which is way more than what is needed in this project. The switching frequency is considered to be around 8 kHz to be able to do one complete reading of the eight coils every millisecond, that has been considered to be needed when the wheel is spinning at high speeds. If the measurements are taking place at a speed of 90 km/h, each measurement will scan approximately 3 mm of the braking disc, which has been considered the upper scan length limit. At lower speeds a lower sampling rate could therefore be used to still get a good estimation.
Figure 6: Coil and resistor in series connected to an AC power source C B A Output Channel 0 0 0 1 0 0 1 2 0 1 0 3 0 1 1 4 1 0 0 5 1 0 1 6 1 1 0 7 1 1 1 8
Table 1: Multiplexer control signals and output channel
3.8.3 Transistors
In the transistor coupling that is controlled by the gate controlling multiplexer there is a need for transistors that tolerates signals with a peak-to-peak voltage of 5 volt at tops 500kHz that also has low internal resistance and low current leakage. The bipolar NPN transistor 2N3053A were the first transistor that was used, tolerates signals up to 7 GHz. However, this type of transistor drains the gate-current and since the multiplexer only can deliver a smaller than needed amount of current this transistor could not be used. Another way of doing this since the multiplexer only can deliver a small amount of current was to use MOSFET transistors instead. MOSFET transistors can be controlled by a small amount of current and are mostly dependent on the voltage because of its insulated design. The MOSFET transistor type used for this system was a BSP171.
3.8.4 Probe design
A flat PCB coil design with 4 aligned coils was chosen to prove the concept of switching coils. The coils has 9 turns and an inductance of about 8µH each. Figure10 shows the coils printed on a PCB. The idea of this type of probe is to sample on each coil to detect changes in the voltage drop over each coil while the braking disc is spinning underneath the coils. For each measurement, one peak-to-peak average voltage is calculated and stored in memory. This process is repeated until the whole braking disc has been scanned. When the data has been calculated and stored, an analysis to find variances in the sampled signal will take place and indicate if there is any disturbances. A conceptional PCB designed in Ultiboard with a mounted multiplexer can be seen in figure11.
Figure 7: Illustration of how the impedance of a coil and an LC circuit is changing with the frequency. The self-resonance of a coil is in general higher than the resonance frequency of an LC circuit
3.8.5 Software
A Beaglebone Black Rev C (BBB) was used to generate the control signals to switch between the coils of the probe, a BBB can be seen in figure12. The BBB is running an AM335x 1 GHz ARM Cortex-A8 processor, 4 GB on-board flash storage, 512 MB RAM and 64 controllable GPIO pins. The BBB comes with an installed Linux Debian operating system.
To control the switching between the coils a separate code needed to be implemented. The system uses three GPIO pins of the BBB to generate a 3-bit value to control the multiplexer. Since the BBB is running an operating system, access to the GPIO pins are exposed by the kernel in the /sys/class/gpio directory. To enable the desired GPIO pins, echo the GPIO port numbers to the /sys/class/gpio/export file. When the ports are enabled one need to set them to either act as an input or an output, this is done by echoing in/out to /sys/class/gpio/gpioX/direction, where X is the GPIO pin number. When the GPIO is set to the desired mode the GPIO pin can either be set or read by reading or writing to the GPIO pins. To read from the GPIO pin, simply use the catenate (cat) command, like cat /sys/class/gpio/gpioX/value. The GPIO pin is set to a desired low (0 V) or high (5 V) value by echoing 0 or 1 to the /sys/class/gpio/gpioX/value file. A coil switching program written in C controls the switching between the GPIO pins in the right sequence to activate the desired coil. This sequence switching should preferably be done 8 times a millisecond to get one complete reading every millisecond. Figure13shows a state-machine illustration of the code running on the BBB.
Another important part of the switching program is to indicate which coil is activated. This is important because another program will be running in parallel in a separate thread that needs to know which coil it is sampling on. A state-machine representation of the sampling system can be seen in figure14. In the initial state of the sampling system an 8 by N integer array/matrix is created, where 8 is the number of coils that will be used and N refers to the number of complete scans (1 on each coil) that will be done. Another initialisation done in the beginning of the code is a temporary sampling buffer which holds all the samples that will be done on each coil. When the
Figure 8: Coil and conductor in parallel with a resistor in series connected to an AC power source
initialisation is done, the ADC starts to sample and store the samples into the temporary buffer created in the initial state. The sampling continues until the coil is switched. When the coil has been switched, the absolute mean value is calculated by adding together all the absolute values of the samples and dividing them with the number of samples. The absolute mean value is then stored in the 8 by N array. If the total scan of the entire disc is not completed, the system will start over again and do a new scan of all the coils, this is repeated until the entire disc has been scanned. When the disc has been scanned entirely further analysis of the sampled data will take place. Each row of the 8 by N array will be analysed separately, since each row represents one coils’ readings throughout the scan. Any deviations in the signal indicates discontinuities in the target material. The size of the deviations indicates the size of the flaw in the braking disc.
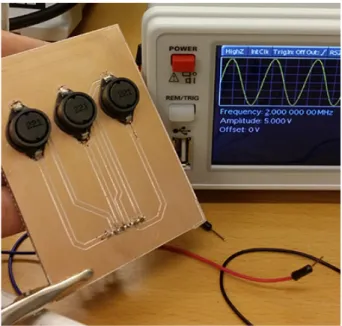
Figure 9: Conceptional breadboard connected circuit. 1, Control signals to control the multiplexer. 2, Transistor coupling. 3, Multiplexer. 4, 220 nF conductor. 5, PCB coil board.
Figure 11: Concept design of a 4 coiled PCB card with a mounted multiplexer on the backside
4
Results
This section presents the results of this thesis work. The results are presented with pictures and texts to explain what has been accomplished.
4.1
Test system design
The design of the test system consists of a BBB, multiplexer, conductor, coils, resistor, oscilloscope, function generator and a lot of wires. The multiplexer, conductor, coils and resistor are connected on a breadboard, which can be seen in figure9.
The function generator generates an AC current to drive the circuit while an oscilloscope is connected to measure the voltage drop over the active coil. A program is running on the BBB that controls 3 GPIO ports on the BBB. These 3 GPIO pins acts as an input to the multiplexer to choose between 8 different outputs, in this thesis only 4 ports were used to prove the concept of switching coils. The outputs of the multiplexer controls a MOSFET transistor coupling which did work, but with some current leakage which interfered with the signal.
A voltage drop indicating that a conductive material was interfering with the magnetic field generated by the active coil was seen. This variation was seen when an adjustable spanner made from cast iron was moved underneath the coil. The results from this test are explained further in section4.2.
4.2
Coils with potential
The flat PCB coils, seen in figure10, proved that the concept of switching between coils worked as intended with some varying features of the coils due to some limitations of the milling machine. However, these coils were not perfect in the sense that they had a very low inductance, which gave a very high resonance frequency when combined with a 220 nF conductor. A higher conductance should give a lower resonance frequency of the circuit, which would lead to an increased penetration depth. The conductor was changed to a conductor with higher conductance, without being able to achieve the desired resonance frequency.
The coil that showed the most impressive results were the type of coil seen in figure1. This coil is relatively expensive when compared to the printed flat PCB coils but are less sensitive to noise. The combination of this coil and a 220 nF capacitor results in a resonance frequency of 22.8kHz, which in the case of inspecting cast iron materials gives a desirable penetration depth. The figure
15shows a setup where a single coil is held up by a soldering stand. The back end of an adjustable spanner was used to prove the concept of detecting discontinuities in a cast iron specimen.
Figure 15: Single coil placed about 2 millimeters above an adjustable spanner made of cast iron The results from this configuration showed that a noticeable change in the voltage drop occurred
when the adjustable spanner was placed about 2 millimeters underneath the coil. The peak-to-peak voltage drop in this case dropped from 328.68 mV down to 300.96 mV. These measured values can be seen in figure16and17respectively.
Figure 16: No conductive material underneath the coil - Peak-to-peak voltage of 328.68 mV
Figure 17: Adjustable spanner directly underneath the coil - Peak-to-peak voltage of 300.96 mV The results from this test indicates that there is a gradual sweet spot between 300 mV and 330 mV which indicates variations of depth in the target material. This sweet spot was not calibrated for the depth during the project since the ADC was not implemented. The variations were only observed on an oscilloscope.
The same coil configuration was set up to be compared to a scanCONTROL 2600 laser scanner at Robotdalen in V¨aster˚as. The setup can be seen in figure18. The idea of this test was to prove that this sensor could indicate variations in a braking disc and also see how well a laser scanner would perform. The setup consisted of a rig for spinning a braking disc based on the same principle
rig allowed to spin the braking disc while at the same time doing measurements with any sensor. The spinning simulated the fact that the sensor will do its analyses while the wheel is spinning. No switching circuitry was used during this test since the task for this test was simply to prove that the concept worked. The AC power source was set to 5 Volts at 22.8 kHz which is the resonance frequency of the circuit. When letting the sensor hover above and pass by a visual crack, a clear variation in the voltage drop was observed on an oscilloscope. This proves that the sensor reacts to discontinuities in braking discs. The scanCONTROL 2600 laser scanner was configured to scan a diagonal line of the spinning braking disc so that the whole braking disc could be scanned. This laser scanner gave a pleasing crack depth estimation with a resolution down to 2 µm.
Figure 18: A scanCONTROL 2600 laser scanner to the left and the developed conceptional eddy current sensor to the right with one coil operating
These variations in the voltage drop across the coil shows that the system is sensitive to changes in conductive materials, which has been the task all along. Due to a limited amount of time the variations has not yet been calibrated to give an estimation of the size of the discontinuities.
4.3
Calibration data
Data regarding voltage drops at different crack depths was gathered, the result of this can be seen in the table 2. The immediate voltage drops when a crack passed by were observed on an oscilloscope.
Distance Depth Peak-to-peak Voltage Frequency
2 mm 0 mm 300 mV 31 kHz
2 mm 1 mm 304 mV 31 kHz
2 mm 2 mm 310 mV 31 kHz
2 mm 5 mm 326 mV 31 kHz
Infinite None 330 mV 31 kHz
The disc was rotated in a relatively slow speed compared to how fast it would rotate if it was mounted on a moving truck. However, the change of voltage drop over a coil is close to immediate because of the sensor’s analog design. The ability to sense the cracks that passes by the sensor in high speed is therefore mostly dependent on how fast the sampling can be made. Estimations on how wide the crack is can also be done if the truck’s moving speed is known and the time of the change of the voltage drop is measured. The truck’s moving speed could potentially be known if a connection with the trucks main computer is established.
5
Discussion
This thesis work has given a better technical understanding of generated magnetic fields, conductive materials, electronics in general, controlling an industrial robot, C programming as well as project management. To get the responsibility of developing a system from scratch with great access to components and materiel has been very pleasing. An important lesson that has been learnt from the project is that to always count with delays and redefinitions of the project. During the thesis work, some parts had been promised to be delivered at a certain time but had either been delayed or not been delivered at all. These are things that should be considered from the beginning of projects and alternative ways of doing things should always be kept in mind so that the work can continue.
During the first 3 weeks some redefining of the project definition had to be done after an observation at Volvo Truck Center in Enk¨oping. This redefinition meant that the sensor to be developed had to be a low-cost system, since it would potentially be used on every Volvo truck at all time. This observation showed the importance of communicating with the people on site and listening to their feedback. This is an important lesson that has been learnt during the project.
In general, ordered components have been delivered in time. Although, during the middle parts and the end of the project some late deliveries of components and materiel has delayed the development of some parts of the system. Thankfully, these late delivered components have not been crucial to prove the concept of the system.
Throughout the thesis work, different approaches to generate and sense changes in magnetic fields has been tested. Based on these tests and doing research in NDT-methods, a couple of concepts has been tested and evaluated with varying results. Because of time related reasons, some ideas has not yet been fully tested and could be considered to be tested if someone continues on with the project. These ideas are believed to be working and the components that is needed was delivered.
The sensor has not been fully developed which was the goal from the beginning. However, the system constructed to prove the concept of detecting cracks in metallic structures has been proven successful. How reliable and accurate the system is has not yet been tested, but changes in the metallic structures such as cracks has been observed on an oscilloscope. Since this sensor still is in a conceptional state, there is still things to work on before a working sensor with the right size and price can be developed.
Overall, this thesis work has been very interesting and given deeper knowledge in different research fields. The communication with teachers, professors, workers and supervisors have been greatly appreciated.
6
Conclusions & Future work
The idea of a sensor based on induced eddy currents that can sense discontinuities in braking discs has been proven successful. Since the sensor has shown great potential with relatively cheap components, it is confirmed that induced eddy currents could be the main technique to be used in a system for detecting cracks in braking discs.
The author of this report sees good potential in this solution, because it have displayed pleasing results at a low cost. Some further development and optimizations and the system could potentially be implemented on the Volvo Trucks.
Based on the shown results, the conceptional sensor developed during this thesis work could potentially be built into a reliable system. This system could warn the driver that the braking discs are disrupted, avoiding potential hazards.
The purpose of this thesis was to investigate how a crack detecting system could be designed, in order to detect cracks in braking discs. The author of this thesis is pleased with the results and thinks that with the knowledge gathered during the project, which has been captured in this report, a sensor could be built that fulfills the goals of the thesis.
6.1
Future work
Due to some time related reasons, everything that had been planned to test has not yet been tested. These theoretical ideas has been discussed with the supervisor of the project Mikael Ekstr¨om and also with Brian Cox.
First of all, since the conceptional system is connected on a breadboard using wires, a PCB layout for the entire system should be considered to reduce the amount of noise in the system. A proper shielding of the entire system should be considered as well.
The sensor is today depending on a function generator and an oscilloscope. The function generator should be switched to a compactly designed sinus generating circuit that can generate a sinusoidal signal at the resonance frequency of the circuit.
Instead of using the BBB, another cheaper PCB-mounted MCU could be considered that can store the sampled data from an ADC. Another option to the ADC is to consider using an LDC1051 that calculates and converts inductance into a digital signal which can be sent over SPI to the MCU. An overview of the desired conceptional complete system can be seen in the figure 19. An MCU should be scaled to fit the purpose of the system. The MCU controls the multiplexer which enables and controls the switching of coils. To sample the signal variations for further analysis, implementation of the inductance to digital converter LDC1051 or an ADC could be considered.
Figure 19: State-machine representation of the conceptional complete system
Since cracks in conductive materials also shifts the phase of an induced current, one improve-ment could be to also take the phase shift into consideration when doing the crack depth estima-tions. The phase shift is often taken into consideration in other EDT studies and applications [14]
7
Time Plan
Tasks Duration Start Finish
State-of-the-art research and interviews 3 weeks Mon 19/1-15 Tue 10/2-15 Status and planning seminar 1 day Wed 11/2-15 Wed 11/2-15 Concept development and writing report 13 weeks 5 days Thu 12/2-15 Tue 19/5-15
Report submission date 1 day Wed 20/5-15 Wed 20/5-15 Preparing the presentation 2 weeks Thu 21/5-15 Thu 4/6-15 Demonstration of the system
The state-of-the-art research and interviews were completed in the first 3 weeks as planned. A status and planning report was written and handed in to the examination committee, followed by a status and planning seminar. The concept development was ongoing in parallel with writing daily notes of the progress. These notes reflected my thoughts, progress and what people had said during the interviews. The main focus until the end of April was to develop a reliable and cost effective conceptional sensor system before starting to put the report together. The last three weeks before the report submission date were mostly focused on the report writing. The time plan was in general held quite well with some minor delays.
References
[1] “Non-destructive testing in the aerospace industry,” 2015. [Online]. Available: https://www. nde-ed.org/AboutNDT/SelectedApplications/AircraftInspection/Aircraft%20Inspection.htm
[2] P. J. H. Geirinhas Ramos, A. Lopes Ribeirol and J. Neskudla, Eddy Current Testing of Con-ductive Materials, 2008.
[3] P. Schlund, personal communication, 2015.
[4] Y.-M. Q. Xiao-Me Pei, Hong-Sheng Liang, A frequency spectrum analysis method for eddy current non-destructive testing, 2002.
[5] B. Petkovi´c, Assessment of Linear Inverse Problems in Magnetocardiography and Lorentz Force Eddy Current Testing, 2013.
[6] “Pulsed eddy current testing,” 2015. [Online]. Avail-able: http://www.tuv.com/en/corporate/business customers/materials testing and inspection/advanced ndt/pulsed eddy current/pulsed eddy current.html
[7] F. A. Administration, Acceptable Methods, Techniques and Practices - Aircraft Inspection Repair and Alterations, 1998.
[8] N. Petrovic, personal communication, 2015.
[9] “Probes - mode of operation,” 2015. [Online].
Avail-able: https://www.nde-ed.org/EducationResources/CommunityCollege/EddyCurrents/ ProbesCoilDesign/ProbesModeOp.htm
[10] P. M. R. P. V. M. P. Luis S. Rosadoa, Telmo G. Santos, A differential planar eddy currents probe: Fundamentals, modeling and experimental evaluation, 2012.
[11] “Probes - depth of penetration & current density,” 2015. [Online]. Avail-able: https://www.nde-ed.org/EducationResources/CommunityCollege/EddyCurrents/ Physics/depthcurrentdensity.htm
[12] B. Cox, personal communication, 2015. [13] [Online]. Available: http://regmedia.co.uk
[14] P. M. R. M. P. Diogo E. Aguiam, Luis S. Rosado, Portable Instrument for Eddy Currents Non-Destructive Testing based on Heterodyning Techniques, 2014.