Design of an
adjustable table
PAPER WITHIN Industrial Design AUTHOR: Marina Caballer TUTOR:Daniel Hegestrand JÖNKÖPING 09 16
Postadress: Besöksadress: Telefon:
Box 1026 Gjuterigatan 5 036-10 10 00 (vx)
551 11 Jönköping
This exam work has been carried out at the School of Engineering in
Jönköping in the subject area Industrial Design of the three-year Bachelor
of Science in Engineering programme. The authors take full responsibility
for opinions, conclusions and findings presented.
Examiner: Lars Eriksson
Supervisor: Daniel Hegestrand
Scope: 15 credits
Abstract
2
Abstract
The aim of the project is to redesign an adjustable table in collaboration with the company Form O Miljö from Stockholm, which develops, produces and markets
high-quality furniture and interior design for public environments . The table is part of a biomechanical project developed by the company. It´s focus is
school environments and designed for the students. The idea comes from the problems observed in children while using electronic devices or study in the current tables and a later ergonomic study about it.
The bachelor thesis consists of looking for a new design that fits in its market, catches the users interest and meets his or her needs in order to be successful. Therefore, it is a project that has been carried out from a human-centered design approach.
The result is a table adjustable in height thanks to the lifting system implemented, that has a drawer to store stuff and a tilting support for electronic devices. All its characteristics makes this new desk an innovative product in the market that fulfils the users’ requirements and solves the problems analyzed.
Sammanfattning
3
Sammanfattning
Målet med detta projekt är att omdesigna ett justerbart bord tillsammans med företaget Form och Miljö i Stockholm, som utvecklar, tillverkar och marknadsför kvalitetsmöbler och inredningsdesign för offentliga miljöer. Bordet är en del av ett biomekaniskt projekt som utvecklas av företaget. Projektet riktar sig till skolmiljöer och är designat för elever. Idén härstammar från de problem som observerats bland barn som använder elektronik som hjälpmedel eller studerar vid de
nuvarande borden och senare ergonomistudier om detta. . Examensrapporten består av att leta efter en ny design som passar in på den tänkta
marknaden och som väcker användarens intresse och mötes dennes behov. Därför är detta ett projekt som har blivit utfört utifrån en människocentrerad designstrategi. Resultatet är ett justerbart bord som kan höjas och sänkas tack vare att ett lyftanordningssystem, har plats inuti för att förvara saker i, och som har en vinklingsbart ställ som är anpassad för elektronisk utrustning. Alla dessa funktioner gör detta nya bord till en innovativ produkt på marknaden som uppfyller användarens krav och som löser de problemen som tidigare observerats.
Keywords
Ergonomics Function Sustainability Environment friendly Educational valueContents 4
Contents
1
Introduction ... 11
1.1 BACKGROUND ... 11 1.2 OBJECTIVES ... 111.3 PURPOSE AND RESEARCH QUESTIONS... 11
1.4 COMPANY ... 12
1.5 DELIMITATIONS ... 12
1.6 DISPOSITION ... 12
2
Theoretical background ... 13
2.1 DESIGN THINKING ... 13
2.2 EVOLUTION OF SCHOOL DESKS ... 14
2.3 HUMAN FACTORS ... 15
2.3.1 Posture-related injuries from electronic devices ...15
2.3.2 Desk design and injuries ...16
2.4 CLASSROOM DESIGN ... 16
2.5 PNEUMATIC ADJUSTABLE SYSTEM ... 17
3
Method ... 18
3.1 PROBLEM DEFINITION ... 18
3.1.1 CATWOE: ...18
3.1.2 Gantt Chart: ...18
3.2 PRODUCT DESIGN SPECIFICATIONS (PDS): ... 18
3.3 STAKEHOLDER ANALYSIS: ... 19
3.3.1 Mood boards: ...19
3.3.2 Ability analysis: ...19
3.3.3 Requirements: ...19
3.4 EVALUATION OF THE EXISTING ADJUSTABLE TABLE: ... 20
3.5 TASK ANALYSIS: ... 20
Contents 5 3.7 MARKET ANALYSIS: ... 20 3.7.1 Company: ...20 3.7.2 Competitors: ...20 3.8 ERGONOMIC ANALYSIS: ... 20 3.9 RELATED STANDARDS: ... 20 3.10 IDEA GENERATION: ... 21 3.10.1 Brainstorming: ...21 3.10.2 Sketching: ...21 3.10.3 3D modeling: ...21 3.10.4 Rendering: ...21 3.11 IDEA SELECTION: ... 22 3.11.1 Concept evaluation: ...22 3.12 IDEA IMPLEMENTATION: ... 22 3.12.1 Prototyping: ...22
4
Aproach and implementation ... 23
4.1 DEFINITION OF THE PROBLEM: ... 23
4.1.1 Goals: ...23
4.1.2 Requirements: ...23
4.1.3 CATWOE: ...23
4.2 COLLECT INFORMATION: ... 24
4.2.1 Product design specifications (PDS): ...24
4.2.2 Stakeholder analysis ...25
4.2.2.1 Mood boards: ...26
4.2.2.2 Children development: ...26
4.2.2.3 Learning theory: ...27
4.2.2.4 Cognitive- developmental theory: ...27
4.2.2.5 Growth: ...28
Contents
6
4.2.2.7 Conclusions: ...28
4.3 REQUIREMENTS: ... 29
4.3.1 Evaluation of the existing adjustable table: ...29
4.3.2 Task analysis: ...31 4.3.3 Environment analysis: ...31 4.4 MARKET ANALYSIS: ... 33 4.4.1 Company: ...33 4.4.2 Competitors: ...34 4.5 ERGONOMICS ANALYSIS: ... 35 4.5.1 Standards: ...35
4.5.2 Office furniture- work tables and desks- part 1: dimensions: ...36
4.5.3 Office furniture- work tables and desks- part 2: mechanical safety requirements: ...37
4.6 CONCEPTS GENERATION: ... 37
4.6.1 Main shape exploration: ...38
4.6.2 Quick sketching: ...38 4.6.3 First concepts: ...38 4.6.3.1 Concept 1: ...39 4.6.3.2 Concept 2: ...40 4.6.3.3 Concept 3: ...41 4.7 CONCEPTS EVALUATION: ... 41 4.8 SECOND CONCEPTS: ... 42 4.8.1 Variant 1: ...42 4.8.2 Variant 2: ...43
4.9 FINAL CONCEPT SELECTION: ... 44
4.10 DESIGN AND DEVELOPMENT: ... 46
4.10.1 Final concept: ...46
Contents
7
4.10.3 Technical specifications: ...46
4.10.3.1 Materials: ...46
4.10.3.2 Table top weight: ...48
4.10.4 Rendering: ...48 4.10.5 Ergonomics: ...48 4.11 RESULT: ... 48 4.11.1 Desk components: ...51 4.11.2 Form: ...52 4.11.3 Dimensions: ...53 4.11.4 Color: ...54 4.11.5 Use: ...54 4.11.6 Safety: ...56 4.12 MODEL BUILDING: ... 56
5
Discussion and conclusions ... 60
5.1 DISCUSSION OF METHOD ... 60
5.2 DISCUSSION OF FINDINGS ... 60
5.3 CONCLUSIONS ... 61
6
References ... 62
Table of figures
8
Table of figures
Figure 1. Desk evolution through time [6] ...15
Figure 2. Most common bad position while using computer [8] ...16
Figure 3. Children from 7 to 9 years ...26
Figure 4. Children from 9 to 11 years ...26
Figure 5. Children from 11 to 14 years ... 26
Figure 6. Children from 14 to 16 years ...26
Figure 7. Existing table movements ...29
Figure 8. Existing table groups work ...29
Figure 9. Structure ...30
Figure 10. Up/down button ...30
Figure 11. lifting mechanism ...30
Figure 12. Existing table ...30
Figure 13. Use sequence ...31
Figure 14. Form o Miljö products [2] ...33
Figure 15. Materials [2] ...34
Figure 16. Martela products [31] ...34
Figure 17. Kinnarps products [32] ...35
Figure 18. EFG products [33] ...35
Figure 19. Desk ergonomics [34] ...37
Figure 20. Tabletop shape exploration ...38
Figure 21. Concept 1 ...39
Figure 22. Concept 2 ...40
Figure 23. Concept 3 ...41
Figure 24. Variant 1 ...42
Figure 25. Variant 2 ...43
Figure 26. Concepts selection graph ...45
Figure 27. Birch plywood ...47
Figure 28. Steel ...47 Figure 29. Polypropylene ...47 Figure 30. Environment 1 ...49 Figure 31. Environment 2 ...50 Figure 32. Environment 3 ...50 Figure 33. Components ...52 Figure 34. Measurements ...54
Figure 35. Own work disposition ...55
Table of figures
9
Figure 37. Group work disposition 2 ...56
Figure 38. Milled pieces ...57
Figure 39. Separate pieces ...57
Figure 40. Glued pieces ...58
Figure 41. Pieces with filler ...58
Figure 42. Painted pieces ...58
Figure 43. Finished model ...59
Figure 44. Gantt schedule ...65
Figure 45. First sketches 1 ...66
Figure 46. First sketches 2 ...67
Figure 47. First sketches 3 ...68
Figure 48. Hand width ...69
Figure 49. Shoulder breadth ...69
Table of tables
10
Table of tables
Table 1. Learning theory [28] ...27
Table 2. Evaluation chart ...30
Table 3. Ergonomics [34] ...36
Table 4. Concept evaluation ...48
Table 5. Table top weight ...46
Table 6. Hand width [36] ...69
Table 7. Shoulder breadth [36] ...69
Introduction
11
1
Introduction
This report describes the redesign of an adjustable table for the company Form O Miljö in Stockholm as part of the final bachelor thesis on Industrial Design and Product Development Engineering at University of Zaragoza during an exchange in Jönköping University.
1.1 Background
It is a fact that children have health problems while using electronic devices [1]. Form O Miljö is a company dedicated to design furniture for schools concerned about costumer’s experience which aim is to avoid this kind of problems with a new set of products based on ergonomics.
The idea is to redesign a desk for school environment adapted to children that makes better their experience while using this kind of devices as well as the activities that they perform normally.
The company requires a new design of the existing table in order to be more adapted to the environment and the user and improve its design in general taking into account ergonomics, customer interaction, aesthetics, functionality and sustainability.
1.2 Objectives
The project, developed in co-operation with the company Form O miljö includes the redesign of an adjustable desk for schools. The desk is part of a biomechanical project developed by the company that also includes a chair and a support for electronic devices. The design has to be based on function, ergonomics, quality and sustainability and be suitable for the target user considering all their needs.
This new desk attempts to help the children (between ages 7-16) to have a good position while sitting on their desks and using their electronic devices or studying at school. The objective is to implement the knowledge acquired in the program regarding the key aspects in the product design and its environment paying particular attention to the ergonomic part and development of the product. The result of the project is to have a presentation of the final product, with all the process that has been followed and a physical model.
1.3 Purpose and research questions
The design framework of the project is defined by the following questions which must be answered in the final design in order to have a successful product:
• How does a desk have to be designed in order to be suitable for the school environment?
• What are the stakeholders’ requirements? • What are the stakeholders’ interests?
•
What are the environment requirements?Introduction
12
1.4 Company
Form o Miljö [2] is a Swedish company from Stockholm that produces and sells high-quality furniture and interior design for public environments.
Their design is mainly focused in furniture for schools, care centers, elderly care and offices. Their motivation is to get the best quality adapted to these areas.
Their own designs are done in cooperation with architects and users and it’s concerned in the user it’s going to be for and its functionality. That’s why, they are now carrying out a product series for schools based in ergonomics composed by a chair, an electronic devices support and a table.
This series is concerned in health problems derived from the use of electronic devices in schools.
1.5 Delimitations
The project is not going to focus on any manufacturing methods.
Since the company already have their own supplier of the mechanism to adjust the table, the project is not going to include a new design of the “adjustable” system or any other mechanical solutions.
1.6 Disposition
Section 2: theoretical background in order to introduce the problem and understand the framework of the project.
Section 3: methods used to develop the project.
Section 4: approach and implementation of the methods described before in order to develop a solution for the problem explained in section 2.
Section 5: conclusion and discussion of the results.
Section 6: references of the sources were the information has taken for the project. Section 7: attachments.
Theoretical background
13
2
Theoretical background
2.1 Design thinking
To understand a bit more about the process that is going to be followed in this project, it is important to understand what design is about. In this project, it has been used the design thinking theory in order to develop the idea.
Design thinking is a methodology of design used as an innovation tool that applies design processes in order to achieve the best results.
It is focused on finding the best solutions for problems and explores different ways to solve them.
It is made up from different activities. These activities are mainly divided in several stages: empathize, define, ideate, prototype and test. In all of this different stages, creativity is the essential element and it makes the whole idea to be in continue evolution.
This methodology is based on logic, imagination and intuition reasoning in order to explore the most suitable solutions for the stakeholder since it is a human centered innovation process. [3]
Empathize:
“To create meaningful innovations, you need to know your users and care about their lives.” [4, page 2]
This first step consists in understanding how people do things and why do they do it that way, their thoughts and needs. This is a very important stage since the problems that designers try to solve are basically other people’s problems. Designers put it in practice through observation and recognizing the different needs or manifestations of the users. A good empathize work helps to be more creative and see things from another point of view.
Define:
“Framing the right problem is the only way to create the right solution.” [4, page 3] The main goal of this step is to clarify and focus in the problem in order to start looking for possible solutions. It is a way of arranging all the information gathered in the first step. Designers craft a problem statement to work on. This statement guides the designer to focus in the different needs of the user based on the designer’s new understanding of it. It also narrows the problem just to make easier to find the solution.
Ideate:
“It’s not about coming up with the ‘right’ idea, it’s about generating the broadest range of possibilities.” [4, page 4]
Ideation is about generating different ideas in order to solve the problem that the statement contains. It provides the main information to create the final solution. The more ideas the designer has, the better. It is about finding the most ideas possible so the designer can select the best one afterwards and work on it.
Theoretical background
14
Prototype:
“Build to think and test to learn.” [4, page 5]
This stage is based on generating different artifacts that helps the designer to take some decisions while designing the final concept. It helps the designer to get closer to de solution. There are many ways of prototyping but all of them have in common that they are used to interact and communicate with the final user.
Test:
“Testing is an opportunity to learn about your solution and your user.” [4, page 6] With all the prototypes that designers make during the prototype stage, designers solicit feedback from the final user to work again on their empathy and understand them a little bit more and find new solutions or possible problems. To be clear, it makes a better design. It can be made by testing with a physical object or simulating a real context of the user’s life.
2.2 Evolution of school desks
Desks are an important part of the school environment. Students spend most of the time in the school behind this product. The different styles, materials and costumer needs through time have influenced the evolution of this furniture. [5]
Before the 1880s: it was not common to have school desks since the population was not used to go to school.
1881- John Loughlin invented the first popular desk. First desks were made by wood and cast iron. It had a simple design based on two pieces, one that joined seat and table legs and the second one was the wooden top.
1899- After, in 1899 designers change their mind into a more ergonomically friendly one, so they designed the new standing desks. They were thought to be more comfortable since the students could change their position.
1920- School desks were also made by wood but in this case they had a double compartment (before they were individual) on an iron structure.
1930- The new generation of school desks appeared, they could be adjustable in height with a simple mechanisms based on a screw situated on the chair and another one on the tabletop.
1946- The school desks begun to be more like the ones that are in the market nowadays, with clean surfaces and supporting structure. The materials used were also wood and metal.
1950- New materials like chromed steel and plywood allowed the desk to be lightweight. They also included hooks for school bags as designers realized of the importance of having the student belongings next to the table.
1970- Desks started to be made by plastic composites, also a new style of desks become very famous. It was based on a plastic chair with chrome legs and a tabletop very close to the student body. This new desks were not very ergonomic for left-handed people since the tabletop was situated on the right side.
Today…- There are many options of desks. It depends on the needs of the costumer. You can find any style in any color, shape and functions.
Theoretical background
15
Figure 1. Desk evolution through time [6].
2.3 Human factors
Human factors or comfort design is based on designing products taking into account the interaction of the product with the user. It studies the different users and their interactions in order to improve it and optimize the products.
The aim of this science is to design the best working place so the users don’t suffer any injuries.
2.3.1 Posture-related injuries from electronic devices
Many people unknowns the different kind of injuries that the misuse of this product, that is so common nowadays for many different activities, can cause in their bodies. This kind of risk can be significantly reduced choosing the correct furniture and having a proper posture.
The biggest problem is remaining in the same position for long periods of time. In case of schools, children spend an average of 6 hours every day. If the workstation is not designed properly, so that the students can have the most appropriated posture, their blood circulation can be reduced leading to pain in some parts of their body. The most common injuries are neck pain, headaches and shoulder and arm pain.
Hand or arm: it is called overuse injury. It is caused by doing the same movement all the time with the same muscle position for long periods. This produces localized pressure on tendons that damage the joints. In order to avoid this problems, it is important; to choose the correct surface finish. Hard or sharp surfaces can damage wrists and elbows. Take some breaks while using working. Try to adopt the most neutral joint position that allows more freely movement to reduce injuries.
Eyestrain: it can appear when the computer display settings or the screen are not appropriated. To avoid this kind of problems with the posture, the furniture has to be adapted to the user so that the screen has to be 50-60 cm from the users eyes and the center has to be 10 degrees below the eyes for a comfortable position for the user’s neck.
Shoulders: The use of use of laptops, makes the shoulders be forced to work too high, and keep this position for long periods. The joints that join tendons and muscles become damaged because of this it. To prevent this kind of injurie is important to select the best workspace for the task that are going to perform. An ergonomic furniture can help the student to keep the best position while sitting correctly. Feet on
Theoretical background
16
the floor, elbows close to the body and wrist and hands in line. Shoulders have to be also relaxed. It is important to take into account that a desk that is too high can cause shoulder injuries.
Back pain: Having a bad position while using these devices causes back pain. This action added to the backpacks that students use to carry to school aggravate student’s health. Choosing a good chair is the key for having the optimal position, it is important that the students sit all the way back on the chair and their hips are at the same height as the knees. [7]
Figure 2. Most common bad position while using computer [8].
2.3.2 Desk design and injuries
While designing this kind of furniture is very important to take into account all the different positions of the students in this case. To avoid the problems shown in 2.3.1:
• The desk should be adjustable in height so all the students can adjust it to their most comfortable position since not all of them are the same height.
• The computer monitor has to be situated at the eye level, a bit tilted to avoid glare for the user and at the right distance (not too close to the student’s face) • The keyboard has to be in a position so that the elbows rest comfortable at the
sides and the user arms have 90º respect the horizontal line.
• The chair has to allow the student adopt a natural posture with his column
straight.
2.4 Classroom design
The classroom is the space where the students spend most of their time. Its design presents some benefits that modifies the way they learn and build their essential skills. It is important to keep the student’s motivation high and keep them engaged in order to obtain the best results. To achieve this purpose, some studies have found that cooperative learning as the most effective way.
A study from the National Training Laboratories (2000) that analyses different kinds of lectures, from normal lectures to lectures in which the students work in groups with discussions and “practicing by doing” it was found that the percentage of the information that they retain varies in more than 60%. Being a 5% in normal lectures
Theoretical background
17
and 80% (the highest) in group work. This shows the noticeable benefits that this active learning provides to the group.
How can this kind of learning be applied to the classroom? The design of the classroom can help in this task. It is known that the more the teachers communicate with the students, the better they feel, and the more motivated and engaged, that’s why it is important that teachers can move freely around the room and interact with them and help them if necessary.
Is important to take into account also the level of comfortability of the classroom. The more comfortable it is; the best student behavior can be found on it. It is not possible to know if the classroom is comfortable or not because is not something that can be measured, but in this case it can be noticed depending on the distraction of the children. A comfortable classroom keeps the student minds focused and less distracted than one that is not comfortable. Light, temperature and furniture affect directly to this phenomenon. Ergonomics play an important role since all he areas and furniture should be designed taking it into account. School spaces should be the more flexible possible as not every student are the same and each of them have their specific needs. It needs to be able to adapt to all of them and improve the learning experience to all of the students. [9]
2.5 Pneumatic adjustable system
The adjustable system that is going to be attached to the tabletop in order to change its dimension in height is based on pneumatic.
It consists on a pneumatic cylinder that supports the tabletop. Inside the cylinder, there is air that applies a lifting force in order to keep the table stability.
Compared to the electric adjustable system, pneumatic lifting systems don’t need to be plugged, this is an advantage when talking about a classroom where there are going to be many students working at the same time.
In its advantages, it also stands out by its quiet guide system and precision.
The mechanism to activate this system is quite simple. The user has to activate the hand control valve in case he wants the table to be higher or lower. To activate it needs to be push up or down depending on the specifications of the valve.
Method and implementation
18
3
Method
The design process chosen for this project is a user-centered design. This kind of process is focus on the user needs and requirements. It is developed as follows:
3.1 Problem definition
3.1.1 CATWOE:
“CATWOE” is a mnemonic of a creativity method which aim is to define the goal of the problem. It was designed by Checkland and Scholes, Soft Systems Methodology in Action in 1990. CATWOE describes the human activity and its processes performed by customers and actors, controlled by owners and occurs within an environment. This method is applied to the system that contains the problem. It consists in defining the following terms:
C: customers of the system. Those people who benefit or suffer from the process of the system.
A: actors. Those people who are going to carry out the main activities for what the system was defined.
T: transformation process. What the system does to give something useful for the actor in the end.
W: world view. Context in which the system is going to be placed.
O: owners. Those people who control the system and can do whatever they want with it when they wish.
E: environmental constraints. Ethical limits, financial constraints, regulations, limitations… [10]
3.1.2 Gantt Chart:
A Gantt chart is a tool used to plan the schedule of the project. It includes the start and the end and all the dependencies between the tasks that are going to be done during the project. The duration of each task can be visualized in bars, their length depends on their duration.
It allows to easily see the different activities, when they begin or end, how long they last. [11]
3.2 Product design specifications (PDS):
The product specifications it’s a very important tool while developing the product. It is used to enumerate all the requirements that must be met in the product that has to be designed, in order to define it, and complete the first brief. [12]
There are different kinds of specifications:
• Technical specifications: characteristics of the product.
o Requirements of the product considering the customer needs o Ergonomic requirements (size, weight…)
o Functions
Method and implementation
19
o Material requirements o Aesthetics
o Environment of the product (interaction and conditions) o Safety of the product
o Life of the product*
o Standards and requirements o Maintenance of the product* o Recycling and expected disposal*
o Manufacturing process requirements and limitations* o Packaging requirements*
• Methodological specifications*: characteristics of the process. o Quantity of products
o Launching date of the product o Manufacturing time
o Time in stock
*This kind of specifications are not going to be considered because of the delimitations described at the beginning of the project.
3.3 Stakeholder analysis:
This analysis is used in order to identify who the different stakeholders of the product are, their interest and requirements in order to know what to focus on for our design. [13] The techniques used are:
3.3.1 Mood boards:
This technique is based in a collage consisting of images and text related to a defined theme. It helps to get an overall idea of the topic this product is going to be based on. [14]
3.3.2 Ability analysis:
In order to know what the children can or cannot do, it is necessary to analyze their abilities so that their limitations when using something can be taken into account.
3.3.3 Requirements:
This analysis is based on the requirements of the users regarding the product.
It is used to know more of our stakeholder’s needs, which are the most important features for them or how they use the product. [15]
Method and implementation
20
3.4 Evaluation of the existing adjustable table:
This analysis provides information of the usability of the table, how the users interact with it and how are they features. It can be used to improve the new table taking into account the problems that the user has with it or the things that can be changed in order to improve the product.
3.5 Task analysis:
This analysis helps to understand better the relation between the product, the task and the user. How the task is going to be developed by the user concerning the product and how to make it easier. [16]
3.6 Analysis of the product environment:
The analysis of the product environment helps to understand the space in which the product is going to be used and placed, so that the design can be adapted to it following its requirements. [17]
3.7 Market analysis:
3.7.1 Company:
It is important to know which products are part of the company’s catalogue in order to follow the same aesthetics and design a similar product.
3.7.2 Competitors:
Knowing the competitors in the field where the product is going to be launched is important to understand the market. This analysis helps to know what competitors have and what would be our competence when placing our product in the market and also trends and development of the rest of the companies in order to get an overview of it. [18]
Taking into account all this information the new product would be successful in this market.
3.8 Ergonomic analysis:
In order to have the best design for the product is important to take into account some characteristics of the user and the way he interacts with it. Ergonomics is based in the study of interactions between the product and the user. Ergonomics works together with anthropometrics in order to apply to the products measurements based on the study of the human body and its movements. [19]
The final design is based on anthropometric charts of children on the age range of 7-16 as it is the age range of the users of this new desk.
3.9 Related standards:
Standards are the different norms established that regulate the design of this kind of products and are necessary to take into account while designing. These standards stem from institutes that create them and stablish them in the place they belong to.
Method and implementation
21
Since the table is for a Swedish company, the standards come from the “Swedish standards institute” [20]
3.10 Idea generation:
3.10.1 Brainstorming:
It’s a creative method for generating ideas and solutions. This technique is performed by a group of people in which each of the members has to create their own spontaneous ideas based on a problem in order to find a solution for it. The aim of this technique is to come up with as many thoughts and ideas as possible. Some of this ideas are used after as a creative solution for the problem and others can be used in order to develop more ideas. Brainstorming sessions are very helpful since it they are hold by a group, avoiding criticizing which provides a free and open environment where lots of ideas grow. [21]
3.10.2 Sketching:
Making easy drawings in order to understand the ideas that have emerged before. It is an easy method to visualize ideas and give them a shape. [22]
3.10.3 3D modeling:
3D Modeling the process of emerging with representations of a three-dimensional surface of an object. Although they are in 3D, they can be shown as a 2D image through rendering (view in 3.10.4). This kind of representations usually follow the sketching process and they help to visualize the product with computer. It’s used to develop the concepts and represent ideas.
Models can be created manually or automatically with a 3D modeling software. [23] The software that is going to be used is called Inventor and it belongs to Autodesk. Inventor is a 3D CAD software that allows to create mechanical design, documentation, and product simulation tools in a professional-grade. It is similar to other CAD programs such as SolidWorks, ProENGINEER, CATIA and Solid EDGE. It provides tools to create different pieces and assemblies. The basics of this program are pieces, built by 2D sketches that can be drawn in a plane and extruded afterwards. This modeling system is very intuitive since it is quite easy to control all the dimensions and parameters of the piece. It provides modeling flexibility, each designer can decide the way he wants to design, with its parametric parameters. It can work with any kind of files from other 3D CAD programs maintaining the same settings. [24]
3.10.4 Rendering:
It’s the process of generating a digital image from a 2D or 3D model in a realistic way. In order to get this image, it is necessary to use computer programs based on 3D computer graphics. [25]
There are a lot of different rendering programs but the one that is going to be used is called VRED. This program belongs to Autodesk.
Method and implementation
22
3.11 Idea selection:
3.11.1 Concept evaluation:
Concept evaluation is a method that helps to choose the correct concept in order to develop it in the following steps. It provides the correct information to make the decision.
Each of the concepts are evaluated according to how much value they bring to users and providers. Each of the concepts are given different scores in their user-value and provider-value. This scores are plotted in a diagram, translated into coordinates. This provides a basis to compare them and gives an idea about which concept to develop and which could be combined.
1. The first step of this method is to create a criterion in order to evaluate the user and provider value.
2. Then, it is necessary to create a solution evaluation matrix with different columns in which user-value and provider-value are listed.
3. The third step is to choose a scale to score each solution and score each of them to finally record a total of scores for each criterion.
4. The forth step is to plot the solutions in a diagram.
5. The last step would be to analyze the solutions. This diagram is divided in two parts divided by a diagonal line. This line creates two different triangles. The higher triangle contains the concepts that better designed and would have better acceptance in the market. This is because the solutions in the high user-value and high provided user-value triangular are high-priority. [26]
3.12 Idea implementation:
3.12.1 Prototyping:
This method is based on producing a mockup of the product in order to have a physical model. It helps to receive feedback and evaluate it. Prototypes can be produced with many different kinds of materials and techniques.
The main purpose of this method is to have an idea and be able to receive feedback from the users and also to give the designer some clues about it and possible advantages and disadvantages of the product. With all this information, the user is able to optimize it and find new ideas. [27]
Approach and implementation
23
4
Aproach and implementation
4.1 Definition of the problem:
To find a solution, the first step is to define the problem, in order to do that it’s necessary to contact the company which is going to explain it in detail to have an overall idea of it.
So that the project started with a brief made in cooperation with “Form O Miljö” in Stockholm, and presentation of the actual product. In the brief there were all the specifications and requirements for designing the table.
4.1.1 Goals:
The aim of the project is to design a product that allows the stakeholders to adjust the surface to their height necessities so they don’t have any health problem derivate of the misuse of this product, and integrate it in the school environment.
Therefore, the principal goal is to evaluate the stakeholder’s requirements.
4.1.2 Requirements:
The requirements given during the briefing at the beginning of the project where: • The table should be intuitive (no manuals needed where possible)
• The table should facilitate the best position of the user while it is sitting down in order to avoid health problems.
• The way the user adjusts the table has to be as simple as possible so that it’s always in the right position and the user has its eyes at the correct height. • The product should be suitable for children between ages 7- 16 mainly.
• It needs a correct geometry that allows the children work in groups without problems while using the table.
• It has to use a specified system to adjust it defined for the company.
• The table has to implement small wheels to enable moving it all around the room.
• It is necessary to take into account the stakeholders belongings while going to the school (where to place them)
• Take into account the class room noise.
• Take care of the aesthetics according to the environment it’s going to be used in.
4.1.3 CATWOE:
This method is used in order to understand better the problem to solve and its objectives.
Situation: Apply a new adjustable table for children’s schools that provides a better use of electronic devices.
Approach and implementation
24
• Customer: Children in the school who are going to write or use electronic devices on it.
• Actor: Schools
• Transformation process: Adjust the height of the surface of the table while working
• World view: The children’s health isn’t affected by the using of electronic devices
• Owners: Schools
• Environmental constraints: Room space, materials used.
4.2 Collect information:
4.2.1 Product design specifications (PDS):
Technical specifications: characteristics of the product. Performance:• The product should be suitable for the stakeholder’s expectations (7-16 years’ children).
• The product should be intuitive an easy to operate.
• The product should meet the health requirements specified in ergonomics. • The product must be adjustable.
• The product must be suitable for children with wheelchairs or disabilities. • The product must allow children to work in groups using it.
Environment:
• Resistant to children’s aggressions. • Resistant to dust and dirt.
Life in service:
• Desirable a life in service between 5-10 years. Maintenance
• Easy maintenance of the adjustable mechanism in case it breaks. Aesthetics:
• The product should be attractive for children • The product should be suitable to be in a classroom
• The aesthetics must follow the simplicity and distinctive code of the company Materials:
• Certified environmental friendly materials Ergonomics:
• It must be easy to adjust to the correct height • Avoid sharp edges that can damage the user
Approach and implementation
25
• Follow the ergonomics normative for dimensions (provided by the company) Safety and security:
• Avoid any damage on the user because of the use of the product. • Round edges
• Avoid possible entrapments while using the adjustable mechanism • It has to be stable
Standards and requirements:
• Follow Svensk standard SS-EN 527-1:2011 for office furniture, tables and desks • Follow Svensk standard SS-EN 527-2 for office furniture, tables and desks • Follow Svensk standard SS-EN 527-3 for office furniture, tables and desks
4.2.2 Stakeholder analysis
The center of the project is the stakeholder, as it is an ergonomic product based in a specific stakeholder and designed for it. That’s why this analysis becomes the most important while doing the research.
In order to know more about the key stakeholders, the first step is to set some questions that are going to be solved later with the techniques used. The questions based on the needs for the design are the following:
Since the table is going to be designed for a specific environment and for this specific public that has to feel comfortable with it:
• What interest do these stakeholders have? • What are their motivations?
Regarding to the use itself, it has to be and adjustable table and it has to be for children, it is necessary to know what are they capable to do and what not:
• What motor skills characterizes them?
It is necessary to know their manners and how they behave so that the design is suitable for their habits within the school.
Approach and implementation
26
4.2.2.1
Mood boards:
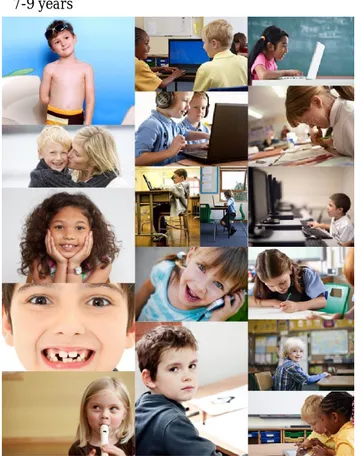
The following mood boards are divided depending on groups. Each group determinates some changes on the children meaningful behavior for this kind of product.
Children appearance:
Figure 3. Children from 7 to 9 years
Figure 5. Children from 11 to 14 years
4.2.2.2
Children development:
1. Culture, Age and social factors are the ones that make the children change in all the aspects of their life. This study is based on children development and their abilities.
7-9 years 9-11 years
Figure 4. Children from 9 to 11 years
11-14 years
14-16 years
Approach and implementation
27
4.2.2.3
Learning theory:
It is a fact that the experiences that a person has during his whole life influences that person’s behavior. Erik Erikson (1902-1994) proposed a psychosocial theory based on Sigmund Freuds (1856-1939) idea. Freud holds that people’s personality is made by all the conflicts that the person has had during his childhood. This conflicts come up every time there is a difference between what they want to do and what society wants them to do.
Erik Eriksson maintains are not those conflicts but the way that people resolve conflicts what directly affect their behavior at different ages. So is the interaction what makes the person change their behavior.
The learning theory explains how this behavior changes depending on the way that person has been treated while his learning process during his whole life.
Erikson suggested 8 stages of psychosocial development. [28]
Conflict Age Challenge
Basic trust vs. mistrust Birth to 1 year To develop a sense that the world is safe Autonomy vs. shame 1 to 3 years To realize that one is an independent person
Initiative vs. guilt 3 to 6 years To develop the ability to try new things Industry vs. inferiority adolescence 6 years to To learn basic skills and work with others
Identity vs. identity
confusion Adolescence To develop a lasting, integrated sense of self Intimacy vs. isolation Young adulthood To commit to another in a loving relationship
Generativity vs.
stagnation adulthood Middle To contribute to younger people through child rearing, child care or other work Integrity vs. despair Late life To view one’s life as satisfactory and worth living
Table 1. Learning theory
4.2.2.4
Cognitive- developmental theory:
Cognitive development is based on thoughts and how children build their own knowledge through time. Jean Piaget (1896-1890) proposed a theory based on children and their behavior. Piaget holds that children naturally try to make sense of their world, they work like scientists, creating their own theories. They try to understand how things work, that’s why infants want to know and ask about everything that they have around. When they find that those theories that they first create don’t work, they change them radically. This changes occur while their development.
Each of the changes mark the different stages of cognitive development. Piaget holds that there are 4 different stages divided on age groups.
Approach and implementation
28
• From 2 to 6 years’ children learn how to represent life’s aspects with symbols, numbers and words but they are egocentric, that means that they consider things from their own perspective and think that everyone around them think the same. It is called as “preoperational thought”.
• From 7 years to 12 years approximately, child applies more logic and understand better the situations. They are more focused on the tasks. However, they don’t know how to apply abstract thinking.
• From 12 years and beyond they are more adult, they can finally think abstractly, consider more solutions and solve them without problems. [28]
4.2.2.5
Growth:
From 5 to 10 years, children’s physical growth is constant, the same as it was from 1 to 1 years. A child gains around 3,6 kg and 5 cm per year and their height is increased because their legs grow faster than their trunk.
In these years, boys and girls tend to be the same size, but girls enter puberty before boys. When girls finish elementary school, they start to experience big changes. They become bigger than the boys, around 13 cm taller in average. [28]
4.2.2.6
Motor skills:
The changes explained in the last point contribute to improve children’s motor skills very fast. They become faster and stronger. They progress in some tasks like writing and drawing as they get better in their fine skills, thanks to the control over their fingers and hands that they have learnt.
As in growth, there are also gender differences. Girls become better at fine skills than boys and also in those gross motor skills that require flexibility and balance. However, boys are better in those gross motor skills that require strength.
The explanation for this differences is the change of the girl’s bodies before boys, they experience a change in proportion that makes them have more fat than boys bodies, that have more muscle.
Anyways physical fitness is crucial for children development since it is a way of practice and improve their motor skills for both boys and girls. [28]
4.2.2.7
Conclusions:
The conclusion obtained of this analysis are the following:
• As children grow up, their interests change, but this doesn’t affect our product because they don’t vary that much in the range of years selected, so the product can be designed for all of them.
• Is after adolescence when they start to have the most significate changes and when that can affect to our product, especially because of ergonomics.
• Children from this range of ages have the capacity enough to face any kind of problems and be able to solve it in a creative way. They want to discover. • They don’t depend on other people to do things so that they can solve the
Approach and implementation
29
4.3 Requirements:
4.3.1 Evaluation of the existing adjustable table:
The existing adjustable table is part of a project developed by the company Form O Miljö called Biomekanisk Ö. The idea of the table came from the idea of creating a modern workspace focused on better concentration of the children and posture while working mainly with electronic devices.
The innovation feature of the table is that it can be adjustable in height with a gas lift, and it doesn’t need to be plugged into electric current to be used. That allows the mobility of the table around the classroom, which is important if works in group are considered since they require a change in the disposition of the furniture.
Technical specifications:
Material: High pressure birch disk
Gas lift height, depending on the 3 models for each measurement:
• 551 – 781 mm above the edge of the table top. (Includes spacer 40 mm) • 720 – 1122 mm above the edge of the table top. (Includes spacer 40 mm) • 760 – 1162 mm above the edge of the table top. (Includes spacer 40 mm)
Figure 7. Existing table movements.
Approach and implementation
30
This is the real table that is already been produced. The pictures were taken while the visit to the company in Stockholm.
Evaluation chart:
In the following chart it has been evaluated from 1 to 5 (1 worst punctuation, 5 better punctuation) the most important characteristics of the existing table, another different one in the market (not adjustable) and the desirable ones for the new, in order to compare and know what to change to be successful.
Normal table Existing table Future table
Aesthetics 3 2 5
Mechanism - 3 5
Functionality 4 3 5
Ergonomics 3 4 5
Table 2. Evaluation chart
Problems:
• The aesthetics is not the most appropriated for this kind of environment and the user. It looks more technical and not very friendly.
Figure 9. Structure Figure 10. Up/Down button. Figure 11. Gas mechanism. Figure 12. Existing table.
Approach and implementation
31
• The shape of the table is not the most appropriated
• It’s difficult for children to know the correct position while using it because it doesn’t have any guides or anything to explain it.
• It is difficult for the user to find the button to adjust the table.
• It is difficult for the user to know how to use the button to adjust the table. • Compared to the normal table, the existing one is simpler but it doesn’t have
any facility for the user to leave their belongings or the books.
• They shouldn’t be any cable exposed to the children because that’s not safe for them.
4.3.2 Task analysis:
What the user is going to use it for is to work with electronic devices on it, but also perform other task in a normal working day at the school.
With this kind of table, the procedure in order to do the task is as follows:
Figure 13. Use sequence.
1. The user sits down on the chair he/she is going to use or he stands up in front of the table in case he/she is not going to sit down.
2. The user adjusts the table to the correct measurement 3. The user adjusts the inclination of the table if needed
4. The user uses the electronic support if needed or directly puts his/her things on the table and starts performing the task he/she wants to do.
Conclusions:
• It is important that the user can adjust the table easily independently of his height.
• The adjustment of the table has to be intuitive so that the user doesn’t have any problem.
• The adjustment button has to be clear and good situated so that the user knows how to use it.
4.3.3 Environment analysis:
The environment in which the product is going to be placed is the scholar space. In this place, the pupils develop their learning, so that, the environment is an important tool to help the children with this process. It has to be a good atmosphere so that the
Approach and implementation
32
children can feel motivated and stimulates them to discover and develop their creativity.
Some environmental features to take into account while designing the product for this kind of spaces are:
• Noise level: Since it will be a classroom with children, noise pollution is one of the most important issues when talking about the classroom environment. Noise produces interferences communication and cognitive problems, according to specialist from the national institute of work safety and hygiene (INSHT, Spain) [29]
One solution to avoid this problem is to cover the classroom and use products with noise absorbing coating. Also design products with materials that doesn’t make sound, try to avoid them or change them frequently if it is possible that they produce noise over time.
• Space arrangement: The teaching style changes depending on the physical layout of the classroom. The desks configuration changes depending on the task they are going to realize in the classroom, that’s why for example if they are going to work in group, its better if they organize them in O or U shape. Nevertheless, if they are going to work individually, they need separated desks so that each student has their own space. [30]
Specialists think it is important to change the disposition to contribute to the class motivation.
"Move the students' desks on a regular basis so all children learn to cooperate with all children." Laurie Borger
• Aesthetics: Each classroom has their own touches that makes it different from the others and gives it personality. The classroom should look like home, a good site to be.
• Order: The classroom is a place where many children are going to stay for a long period of time. Order is an important feature when talking about concentration, because a disorder class can incite children to distractions. Things have to be perfect ordinated and there should be places to facilitate this task so that the classroom becomes a better environment. [30]
• Space for all: It is necessary to consider that there are too many different kinds of children in this kind of environments (special needs, wheel-chairs, different cultural backgrounds) and all of them need to be satisfied and participate in the class like a normal child. The whole classroom in the classroom should be able to be adapted for each child need. [30]
• Safety: The classroom should ensure that the children are not going to suffer any damage because of the equipment and facilities that are in it. The material, equipment, should follow some kind of regulations and standards. [30]
Approach and implementation
33
Conclusions:
• All the products in this environment should implement some elements that work as noise absorbents that helps to have a better environment and less noisy.
• The desks should be able to move around the classroom and allow teachers to change the disposition and work in groups when they want to.
• All the products should keep good aesthetics and be suitable for the environment and user.
• It is good to have something individual for each child to help them to keep their things ordered, so that they can have their own storage place.
• All the products have to be adaptable or designed for all children taking into account those with special needs.
• Follow the standards while designing products for this kind of environments.
4.4 Market analysis:
The analysis was done by analyzing the products that are in the market. This analysis has been divided into three different groups; company, competitors and trend, to have a global overview of the context and the market in which our product is going to be placed. The tool used for this analysis was internet reviews.
This research is based in pictures that have been collected and documented in order to obtain some conclusions or characteristics that describes each group.
Since adjustable tables are not very extended in the market, this analysis is going to be based in desks in general intended for scholar use.
4.4.1 Company:
In order to design a product according to the appearance that characterizes all the products produced by this company is important to know their basic formal language. Products:
Approach and implementation
34
All the products are characterized for their simplicity, straight lines and basic shapes that makes their use very flexible.
These products are mainly produced with wood and metal structures. Materials:
White Birch Beech
Figure 15. Materials [2]
4.4.2 Competitors:
As part of the competitor’s analysis, some different Swedish companies that could be the ones that compete against Form O Miljö were analyzed.
Although this new adjustable table doesn’t have any direct competitor because is a completely new product, this analysis is performed in order to know which products are the potential possible competitors, so that I have chosen some of the products from their product catalogue, the ones that I consider are more interesting and could contribute with my final design.
1. Martela:
Figure 16. Martela products [31]
These products are designed with special attention to ergonomics and functionality Some of them are based on movability and group work, they include wheels that helps the user to move it around the classroom.
They form language is simple, they have straight and geometric shapes. Regarding materials, they combine metal for the structure and wood for the table.
Approach and implementation
35
2. Kinnarps:
Figure 17. Kinnarps products. [32]
Based on minimalistic and flexible design. This kind of products can be applied to any kind of environment.
These products are based on straight lines and geometry shapes. They don’t include any special feature except the last one that is developed to suit environments in which the people use to work in groups and need to stimulate their communication. This table has a lot of possibilities and flexibility.
3. EFG (European furniture group):
Figure 18. EFG products. [33]
This tables are based on basic and geometric shapes that can be joined one to another in order to create a new big table, this is designed based on the idea of group work They are designed in a sound absorbing material called linoleum. As an additional feature, you can add bag hangers, castors and chair hangers to them.
4.5 Ergonomics analysis:
4.5.1 Standards:
This analysis describes all the standard research for the product that is going to be designed. This rules serve as a guide for designing the table and ensure that it accomplishes the international requirements for this kind of products and it can be sold on the market.
The follow information is taken from three different brochures provided by the company and belongs to the Swedish standards institute.
From these standards it has been taken the main points, the one that are going to affect directly the design, so that it is not going to appear in this research all the points that doesn’t have any impact on it.
Approach and implementation
36
4.5.2 Office furniture- work tables and desks- part 1: dimensions:
The dimensional requirements of the tables and desks are based upon the 5th and 95th percentile of the European office user group. In general, this is the 5th percentile female and the 95th percentile male (from 1493 mm to 1913 mm for the stature height). To accomplish the needs of users outside this range, individual solutions can be applied. Some European countries can have 5th percentile females and/or 95th percentile males outside this European user group. [34]Dimensions requirements:
Type A- Fully adjustable
H1 Height of the work surface
Sitting only Minimum range 650-850 Standing only Minimum range
950-1250
Sit/stand Minimum range
650-1250 T1
and t2
Maximum desk top thickness
At the front, t1 55
At 500 mm from the front
edge, t2 80
K1 Minimum height of knee clearance for standing position only
Applies only to tables with a
height more than 850 mm 700
K2 Minimum depth of knee clearance for standing
position only 80
K3 Minimum depth of foot clearance for standing
position only 150
F1 and
f2
minimum height of minimum foot clearance
Sitting only and sit/stand from 600 mm to 800 mm
from the front edge f1 120 Standing only from front
edge to 150 mm, f2 120
G1 Minimum legroom depth Sitting only and sit/stand 800
D Minimum desk top depth 800
W Minimum legroom width Sitting only and sit/stand 1200
Standing only 790
Approach and implementation
37
Figure 19. Desk ergonomics. [34]
4.5.3 Office furniture- work tables and desks- part 2: mechanical
safety requirements:
In order to avoid injuries or damage in the user it is necessary to meet the following requirements:
• The edges and corners of the top surfaces have to be rounded with a radius not less than 2 mm
• The safety distance between accessible movable parts is either ≤ 8 mm or ≥ 25 mm in any position during movement. This applies to any elements moving relative to each other, with the exception of doors (including hinges) and extension elements (including runners
• The handles are designed so that they cannot trap fingers during intended use • The ends of feet and hollow components are closed or capped.
Stability requirements:
• The table does not overbalance or rest supported on the drawers and all feet return to the ground when the loads are removed.
4.6 Concepts generation:
After the research about the topic, the next step was to generate different concepts to find solutions to de problems defined. In this stage, the aim was to generate as many ideas as possible so that it could be easier to find a good one to develop afterwards. In
Approach and implementation
38
the end, three concepts are created and only one of them is the one chosen be improved as the final one.
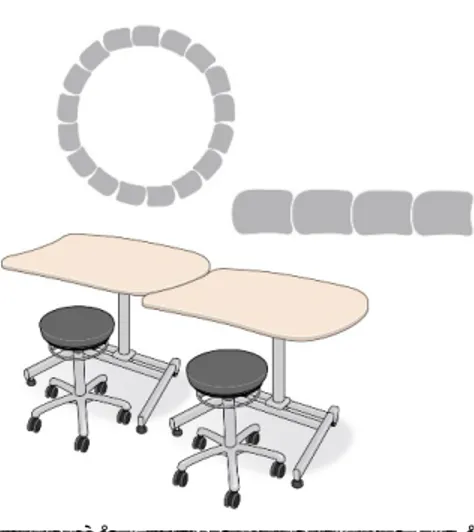
4.6.1 Main shape exploration:
To begin with the concepts, some exploration about the shape that the table has to acquire. The idea is to make the table a modular piece that the children can use around the classroom and can use it while working together in groups.
Figure 20. Tabletop shape exploration (own illustration)
4.6.2 Quick sketching:
The first quick concepts were created to visualize the ideas that came up to the mind while the problem definition. This first sketches were used after to create better ones and develop it into new ideas for the three concepts. See Appendix 2
4.6.3 First concepts:
The first concepts were created mixing some of the ideas generated in the quick sketching. The intention for the first concepts was to find a solution for all the problems that came from the research and visualize different ways to solve them. These problems were mainly:
• Having a place to leave school material and also the keyboard if needed (books, pen case…)
• Having something were the children can put their backpack • Up/down button
Approach and implementation
39
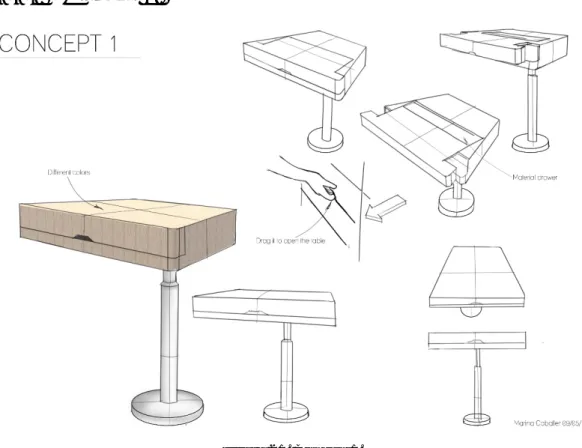
4.6.3.1
Concept 1:
Figure 21. Concept1.
The first concept emerged from the idea of having a traditional drawer. This offers the possibility to have children belongings inside the table and also has an easy and intuitive opening system.
The user can open the drawer by dragging it and all the things that he/she has in the table are still in the same position since the table is always horizontal. To drag it, the table is provided with a hole that is adapted to the user’s hand and the user has put his hand inside and realize the movement.
The base frame of the table has a circular shape since it was one of the trends discovered on the market research and also fits with the whole design. It has wheels under it that are covered so they don’t interfere with the table aesthetics.
Approach and implementation
40
4.6.3.2
Concept 2:
Figure 22. Concept 2.
Concept 2 also offers a place where the children can put their things but in this case is not a drawer. The table shape is asymmetric and this allows to have one of the sides larger and with a “hook” shape, perfect to put their books in it. The dimensions in height of this “hook” are calculated in order to have books there but at the same time enables putting another table next to it without interfering with the material.
It is also provided with a drawer where children can put other kind of belongings, more personal, that they don’t want to show or they prefer to have hidden. This drawer works with the same way as the one in concept 1. The drawer (as it shows in the sketches) can change its color so each school can choose their favorite color depending on their preferences.
It has a simple hook on one of the sides so the children can hang their backpack, bag… The base frame has a different shape, more friendly and adapted to the school environment that fits with the whole table design.
Approach and implementation
41
4.6.3.3
Concept 3:
Figure 23. Concept 3.
Concept 3 has a drawer like in concept 1 but different opening system. In this case is vertical. The user has to tilt the table vertically to have access to the interior of it. The table surface also allows to tilt a second piece that works as a support for the device. The children can adjust it in the different heights, depending on the one he/she needs. It also has a small drawer in one of the sides so they can have their stuff and it is going to be always in the same position regardless of other surfaces change of position. The base frame follows the same shape as the table surface and has two wheels to move the table.
In one of the sides, the user can find a hidden hook that can use to hang his backpack. In order to use it, the user has to change its position from vertical to horizontal. It is specially designed like this thinking about having a hook always there and people passing next to it because it can be a problem. Whit this solution the hook never disturbs in case it is not being used.
4.7 Concepts evaluation:
This evaluation was done in collaboration with the company. A meeting was held in Stockholm in order to receive some feedback for the concepts.
The company decided to continue with concept 3 due to its possibilities although it needs some modifications in order to fulfil the company requirements for the product. 1. The weight for the drawer has to be taken into account in order to avoid
problems with the gas spring since it has a max weigh that can lift. 2. The hook for the backpack should be kept
Approach and implementation
42
3. The up/down button should be kept
4. The tilt support should be kept but developed further in order to avoid pinching risk.
5. The pen drawer is not necessary and can be skipped.
6. The frame should be kept but the placement of the wheels has to be different to enable easier movement.
After the new requirements and direction, the next step was to generate new concepts.
4.8 Second concepts:
The second round of concept generation was taking into account the feedback from the company and made in order to achieve better results on the final product.
These concepts are defined in a more detailed way in order to have better understanding of the product.
4.8.1 Variant 1:
Figure 24. Variant 1.
Characteristics:
• Wheels in the back side of the table to allow the movement and support on the front to stop the movement.
Approach and implementation
43
• Holes all around the table in order to avoid pinching risk when tilting the support or opening the box.
• Gum texture between the box and the supports in order to have a smooth close • Drawings that allow better understanding on the up/down button
• Special geometry for pieces that are close in order to allow the movement but avoid that the kids put their fingers inside because it is too small.
• The support for the computer… is part of the table and it can be tilted in order to put the device on it.
• It has two handles in the bottom part of the box in order to help the user to move the table. The user has to put his hands in it and just push it up and move it. It makes the movement more intuitive.
• Soft close hinges
4.8.2 Variant 2:
Figure 25. Variant 2. Characteristics:
• Wheels in the back side of the table to allow the movement and support on the front to stop the movement.
• Bigger table support to ensure stability in the bottom part of the table.
• Different device support shape. It is round in the back side and it has a hole to allow the user hold it and tilt it easier.

![Figure 14. Form o Miljö products. [2]](https://thumb-eu.123doks.com/thumbv2/5dokorg/4599369.118327/34.892.139.762.780.1158/figure-form-o-miljö-products.webp)
![Figure 16. Martela products [31]](https://thumb-eu.123doks.com/thumbv2/5dokorg/4599369.118327/35.892.137.761.641.798/figure-martela-products.webp)
![Figure 17. Kinnarps products. [32]](https://thumb-eu.123doks.com/thumbv2/5dokorg/4599369.118327/36.892.146.729.114.282/figure-kinnarps-products.webp)
![Figure 19. Desk ergonomics. [34]](https://thumb-eu.123doks.com/thumbv2/5dokorg/4599369.118327/38.892.218.683.102.589/figure-desk-ergonomics.webp)